C++ Setup
In order to get started with C++ modding, you should first follow the Getting Started guide. This guide assumes that you have already installed all required dependencies and followed the setup process described there.
You should also have a basic understanding of the concepts mentioned on the C++ Modding section index page.
Background Information
To build C++ code, Unreal uses its own written build pipeline called the "Unreal Build Tool" (aka. UBT).
The UBT then does the job of copying files, running the "Unreal Header Tool" (UHT), and building for the desired platform automatically.
The UHT is a tool which analyzes the source code you have written and replaces specific macros, like the UFUNCTION-Macro, with automatically generated code.
It also generates separate files containing even more additional automatically generated code for you.
The UBT will run in the "Development Editor" configuration automatically
when you open the .uproject file in the editor or when you run a build in the Visual Studio solution file.
UBT uses multiple files placed into your source code for configuration of the source component you make. An overview of these files is provided below.
Targets
Targets are like UBT "programs" that define how the game gets packaged.
As of the 1.0 release, mods no longer define their own Targets, instead using the base game’s targets,
which you can find in Source/TargetName.Target.cs.
You should not modify these target files.
Modules
Modules are UBTs components of programs. Each target depends on at least one module.
A module can be a library, Unreal Engine itself, plugins, the headers of Satisfactory, or your mod code.
Most modules are located within their own folders in the /Source folder of the project.
For example, the Satisfactory headers used to reference functions and data structures
are contained in the "FactoryGame" module located under /Source/FactoryGame.
Each module folder then has again a configuration file in its root folder.
For the "FactoryGame" module, this will be the file /Source/FactoryGame/FactoryGame.Build.cs.
Module configuration files allow for writing custom code to control how your module is compiled. Unreal uses C# to implement this configuration system.
Example uses cases include:
-
Specifying dependencies to Satisfactory, Unreal Engine, or third-party code
-
Doing defines for public/private build based on env vars
-
Adding external .lib files
-
Calculating information (such as build ID) from the state of the file system
Creating a C++ Mod Skeleton
There are multiple approaches you can use to create a C++ mod. They are presented below in order of ease of use.
Regardless of the option you chose, consider reading the Creating the Mod-Module From Scratch section to get a better understanding of the purpose of the files involved in a C++ mod.
Option 1: Alpakit "Convert to C++ & Blueprint Mod" on an Existing Blueprint Mod
If you already have an existing blueprint mod that you’d like to add C++ to, open the Alpakit Edit Mod dialog for the mod from the Alpakit Dev window and click the "Convert to C++ & Blueprint Mod" button. This will apply the Alpakit C++ template’s files to your existing mod.
After using the button, close the editor, regenerate Visual Studio project files, and build for the Development Editor target so your mod’s new C++ module is recognized by the editor.
Next, advance to the Compiling section of this page.
Option 2: Using the Alpakit Template
The Alpakit Create Mod wizard can automatically create a blank C++ and Blueprint mod for you. You can learn more about the wizard on the Plugin Setup and Game World Module page. Select the "C++ and Blueprint" template.
After using the wizard, advance to the Compiling section of this page.
Option 3: Creating the Mod-Module From Scratch
Before you can add C++ code to your mod you’ll have to create a Module build configuration file.
Navigate to your mod’s folder, Mods/YourModReference/, where your 'YourModReference.uplugin' file is located.
Create a new folder named Source and within it a subfolder named YourModReference.
As a reminder, the concept of a mod reference is explained here.
Within this folder, you should create a new file called YourModReference.Build.cs.
You can do this by creating a new text file and then changing the extension to a .cs file, for example.
If you chose to create the file in this manner, we suggest you turn on
showing file name extensions
to assist with this.
Within this new file you will need to add the following configuration text.
The latest version of this template can be found in the Starter Project Repository as an Alpakit template.
Make sure to replace all instances of PLUGIN_NAME with your actual mod reference.
|
Note that the file we just created is a C# file (.cs) and not a C++ file (.cpp). |
This configuration will add the basic Unreal Engine framework, Satisfactory, and the Mod Loader as dependencies to your module, in addition to setting up some other useful stuff for you.
It’s important to note that this example lists more PublicDependencyModuleNames than are required bare minimum. They are included "just in case" - without them, if you were to include a FG header that happens to use one of those, you would get a confusing error because module dependencies are not transitive. Upon encountering that error you would need to add the module containing the mentioned header to this file, but the error message contains no indication of what that Module Name you need to add is.
You can come back to this configuration file later and change things here if needed.
It’s now time to get started adding the module source code.
Do this by creating a file called YourModReferenceModule.h and fill it with this template.
Replace YourModReference with your actual mod reference.
Remember to replace all instances of YourModReference with your actual mod reference.
#pragma once

#include "CoreMinimal.h"
#include "Modules/ModuleManager.h"

class FYourModReferenceModule : public IModuleInterface
{
public:

	/** IModuleInterface implementation */
	virtual void StartupModule() override;
	virtual void ShutdownModule() override;
};
Next up we need another new file called YourModReferenceModule.cpp. Go ahead and fill it with the following template code.
Again, replace YourModReference with your actual mod reference.
#include "YourModReferenceModule.h"

#define LOCTEXT_NAMESPACE "FYourModReferenceModuleModule"

void FYourModReferenceModule::StartupModule()
{
	// This code will execute after your module is loaded into memory; the exact timing is specified in the .uplugin file per-module
}

void FYourModReferenceModule::ShutdownModule()
{
	// This function may be called during shutdown to clean up your module.  For modules that support dynamic reloading,
	// we call this function before unloading the module.
}

#undef LOCTEXT_NAMESPACE

IMPLEMENT_MODULE(FYourModReferenceModule, YourModReference)
Adding the Module to the UPlugin
Next we need to tell the Unreal Editor to use our editor module.
For this open up the YourModReference.uplugin file in your plugin root.
Add the Modules array in the root json, then add your module with your mod_reference as name, Runtime as Type and Default as LoadingPhase.
Like this:
"Modules": [
        {
            "Name": "YourModReference",
            "Type": "Runtime",
            "LoadingPhase": "Default"
        }
    ]
(the name used was YourModReference, make sure you use your own mod reference instead)
Finishing Up
Now that you have added your module folder, configuration, source, and added it to the targets, you will need to regenerate your Visual Studio project files. Directions on how to do this can be found here.
After this process completes, you should be able to start working on the C++ code for your mod.
Compiling
Whenever you make changes to the class structure of your code
you will need to recompile the Unreal Editor before you can open it again.
Do this by building the Development Editor Win64 target of the FactoryGame project
with the editor closed.
Using Alpakit Dev or Alpakit Release from the Unreal editor will automatically build other targets as needed, so you don’t need to worry about building them yourself unless the builds are failing and you want more specific details.
To build for specific targets from Visual Studio, see the table below:
| To build for X, use… | Solution Configuration | Solution Platform | Project |
|---|---|---|---|
Unreal Editor (Windows) |
Development Editor |
Win64 |
FactoryGame |
Windows Client |
Shipping |
Win64 |
FactoryGameSteam/FactoryGameEGS |
Windows Dedicated Server |
Shipping Server |
Win64 |
FactoryGame |
Linux Dedicated Server |
Shipping Server |
Linux |
FactoryGame |
Adding New Classes
When you want to add a new class, there are two generally safe ways to go about it. Note that you should not create new files from Visual Studio directly - it is not knowledgeable about the project structure and will create files in a temporary directory where they won’t be detected by the UBT.
|
Make sure you are aware of the naming conventions for classes, files, and fields in Unreal Engine.
They are covered in the
Coding Standard for Unreal Engine documentation page.
For example, if you create an UObject whose class name does not start with |
Using the Unreal Editor Add Class Wizard
Open your project in the Unreal Editor and use the Tools > New C++ Class… menu option.
Then select your desired base class (None or Object if you’re not sure yet),
hit next, and name your class.
Next to the "Name" field, select your mod’s C++ module from the dropdown
to ensure the files are created in the correct location.
Leave the "Class Type" as Public to streamline compatibility with other mods.
Consider editing the "Path" to utilize subfolders to further organize your files.
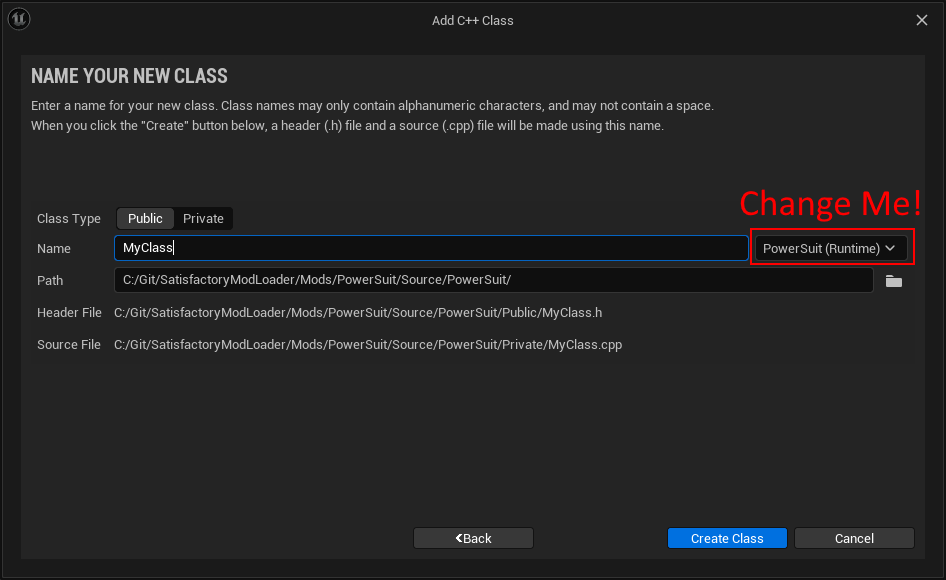
Finally, select Create Class to generate the files and trigger Unreal Engine’s live coding rebuild functionality.
Once your mod has at least one C++ class its classes folder will appear in Content Browser windows assuming you have "Show C++ Classes" enabled in your Content Browser settings (cog button menu). Right clicking on empty space in one of these folders also allows opening this wizard, although it unfortunately does not pre-fill the selected module.
|
Make sure you always select your mod’s Module when creating a class. If you write your code in one of the FactoryGame or SML modules by accident, it won’t be compiled with your mod and it won’t work at runtime. |
Manually Creating Files
Alternatively, you can manually create the files backing your class. This is not recommended as it’s very easy to make mistakes with folders, boilerplate code, and includes while doing so.
Navigate to your mod’s C++ module folder in Windows Explorer
and create the .h and .cpp files in the Public and Private folders respectively.
Then run the
Generate Visual Studio project files
utility to refresh Visual Studio’s project structure.
You can now open them in Visual Studio, or a text editor of your choice.