Create an Item
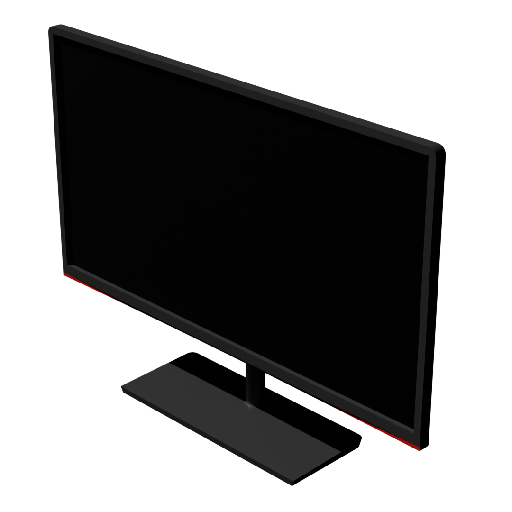
Now that you’ve created a custom Recipe and Schematic, let’s create a custom Item. For this tutorial, we’ll make an item named 'Doc Item'. It will look like a flatscreen television.
Creating a Folder for our Item
Items (and fluids) in Satisfactory are defined by FGItemDescriptors, which contain information on their appearance and properties. They often also come with textures (to define their icons), meshes, and materials (to define their in-world appearance).
To stay organized, let’s create some folders to keep our item-related files together.
Go to the Content Browser in the Unreal editor.
Navigate to the root folder of your mod (appears as DocMod Content), right click, and select 'New Folder'.
Call the new folder "Items" to keep with our organization pattern so far.
Repeat the process again to create a folder called DocItem.
Creating the Blueprint Class
First, we’ll create the FGItemDescriptor.
Inside of your DocItem folder in the Content Browser, right click,
select to create a Blueprint Class, and use FGItemDescriptor as the parent class.
We’ll call it Desc_DocItem to follow Coffee Stain’s naming convention ("Desc" stands for descriptor).
Describe the Item
Double click your new descriptor to open it, and you should see the default settings of the classes' attributes. If not, click on the "Class Defaults" button in the toolbar and they should appear in the Details browser.
Let’s go through each attribute and set up our item’s properties. You can hover over the left side of a field to get a tooltip describing its purpose (pulled from the game headers).
-
- M Display Name
-
The item’s name in game, which appears in its tooltip and what it is called in the Codex.
We’ll set this toDoc Item.
-
- M Description
-
A description of the item, which appears in its tooltip and the Codex.
In our case, we can use the textThis is the starter item of the Doc mod.
-
- M Abbreviated Display Name
-
A shortend form of the name, try to keep it below 5 characters. If the user has enabled abbreviated names in their 'User Interface > Item Abbreviation' game settings, this text will appear (white with black outlines) in the top left corner of the item icon. In the base game, this is usually only set for items that are difficult to distinguish, for example, raw ores and ingots.
We can leave this blank, or useDocI.
-
- M Stack Size
-
Satisfactory has hardcoded item stack sizes. Items can stack to either 1 (One), 50 (Small), 100 (Medium), 200 (Big), 500 (Huge), or 50,000 (Fluid, 50 Liters).
Go ahead and pick one as you see fit.
-
- M Can be Discarded
-
Whether the item can be trashed using the trashcan slot of your inventory. AWESOME sink settings are handled though a different system.
We’ll uncheck it so that you can’t throw the item into the trashcan - Ficsit does not waste!
-
- M Remember Pick Up
-
Decides if the game should keep track of if any player has ever possessed this item. The base game uses this for items like Raw Quartz ore, which unlocks the Quartz MAM tree and triggers an ADA voiceline once collected.
Let’s leave this unchecked, since we won’t cover that functionality in this tutorial.
-
- M Energy Value
-
Describes how much energy in megawatt Seconds (MWs, aka MJ) this item should release when burned in a generator or vehicle. You can find the fuel values of vanilla items on the wiki. Note that if you want your item to qualify as a biofuel for the Biomass Burner, you should subclass
FGItemDescriptorBiomassinstead.
Our Doc Item won’t be a fuel item, so it shouldn’t be able to get burned in any generators, so we’ll use0.0for that value.
-
- M Radioactive Decay
-
If set to a value greater than 0, the item will cause the player to take radiation damage. The editor tooltip for this field is incorrect - values can seemingly be any value greater than 0. For example, Plutonium Waste (most intense in Vanilla) uses a value of 200, and Encased Uranium Cell (least intense) uses 0.5.
We’ll leave this at0for safety while testing our mod.
-
- M Form
-
Defines the type of this item: Invalid, Solid, Liquid, Gas, or Heat
Our new item should be aSolidfor ease of testing.
|
Keep in mind that liquid and gas type descriptors have some special behavior. When an item is defined as having a form factor of Liquid or Gas,
it will switch to being displayed in a format where 1000 units (liters) of the item represents 1 cubic meter of the fluid.
As such, it’s important to make sure that fluids are also assigned the Stack Size of |
-
- M Conveyor Mesh
-
All items have 3-Dimensional representations for when they appear in the world. Items use the mesh you specify here when you’ve dropped them on the ground and for display on conveyors.
We’ll cover this in more detail further down on the page, as setting it up to render correctly takes a couple of extra steps.
-
- M Color 1
-
Controls the color of a fluid in pipes.
As this item is not a Liquid or Gas, we don’t need to change this property.
-
- M Color 2
-
Controls the second color that used by gasses in pipes.
As this item is not a Gas, we don’t need to change this property.
-
- M Compatible Item Descriptors
-
Array of item descriptors associated with this one, for example, the ammo that a weapon can use. It will show up in this item’s tooltip.
Our Doc Item does not need this logic, so you don’t need to add any descriptors to this list.
-
- M Small Icon
-
An image texture to be used in the inventory, machine slots, and more. The recommend size is 64px for regular items, and 256px for Build Gun items.
We have an image ready for use here. You can import it via the Content Browser right click menu, or via theImportbutton in the Content Browser header.
-
- M Big Icon
-
Same concept as the small icon, but can be higher resolution for display in places like signs. The recommend size is 256px for regular items, 512px for Build Gun items.
Let’s use the same image we used as before for simplicity.
|
When using your own models, you can follow the Icon Generation tutorial to semi-automatically render icons that look like the ones in game. |
-
- M Category
-
Groups the item into a category, which affects where it shows up in the recipe list.
Set this to the base-game-supplied categoryCat_Other, because items without categories will not appear unless searched for by name in certain GUIs.
-
- M Sub Categories
-
Further sorting categories used by the Build Gun.
Leave this as the default empty array.
-
- M Quick Switch Group
-
Optional reference to a quick-switch group, which controls what other buildings will appear when pressing the quick switch keybind.
Leave this as None, since we’re making an item, not a building.
-
- M Menu Priority
-
Controls the order that items appear within their category.
Stick with the default value of0.0.
Item Visuals In World
Before continuing, remember to compile and save!
In order to avoid having your item display as the default flat white cube when on a conveyor or when dropped in the world, you must specify a Conveyor Mesh.
You can re-use the meshes of existing items, or create your own. For the purposes of this tutorial, we will use a custom mesh to demonstrate the non-trivial setup process.
We have an example model and textures that you can click here to download. The process of importing meshes and textures has a couple extra details that we need to pay attention to.
Importing the Mesh
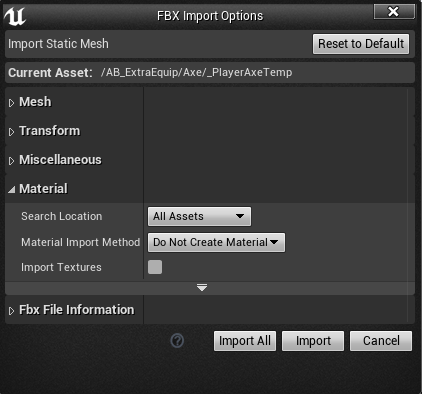
First, import the mesh (.fbx file) to your DocItem folder via one of the Content Browser’s Import features described earlier.
Select just the Mesh, and pay attention on the dialog that pops up.
Most of the default settings are fine, but scroll down to the Material section
and ensure that:
-
'Search Location' is set to
All Assets -
'Material Import Method' is set to
Do Not Create Material -
'Import Textures' is unchecked
To finish this dialog, select the Import option in the prompt.
Next, rename the created asset to SM_DocItem to follow Coffee Stain’s naming scheme.
SM stands for Static Mesh.
Creating the Material Instance
We chose to not import any textures with the model because we want to leverage the Unreal material instances system to improve game performance.
Right click in the Content Browser to create an advanced asset: Material > Material Instance
and name it MI_DocItem to follow Coffee Stain’s naming scheme.
MI stands for Material Instance, whereas MM stands for Master Material.
Open up this new asset.
In the Details panel, set its Parent field by searching for the asset MM_FactoryBaked.
Afterwards, save the asset.
This base-game-supplied master material contains a ton of optimization logic to make rendering conveyor items work at large scales without butchering game performance. We can plug in our own textures to the material parameters to use something other than the default grid it comes with.
|
If your item mesh has dynamic properties that don’t work with the baked-in material, it is possible to create your own master material and use that instead. Make sure that 'Used with Instanced Static Meshes' is checked in the material’s details, otherwise it will render with the worldgrid material on belts. |
Importing the Textures
Now we’ll import the 3 textures from the earlier download. We need to make sure Unreal handles our textures properly, or the item won’t look right in-game.
Go back to the Content Browser and import the 3 image files from the download.
These images probably don’t look like normal image files that you’re used to. That’s because they store special information in each of the 4 (Red, Green, Blue, Alpha) image color channels. How this works is outside of the scope of this tutorial, but you can find some more info in the Modeling section of the docs.
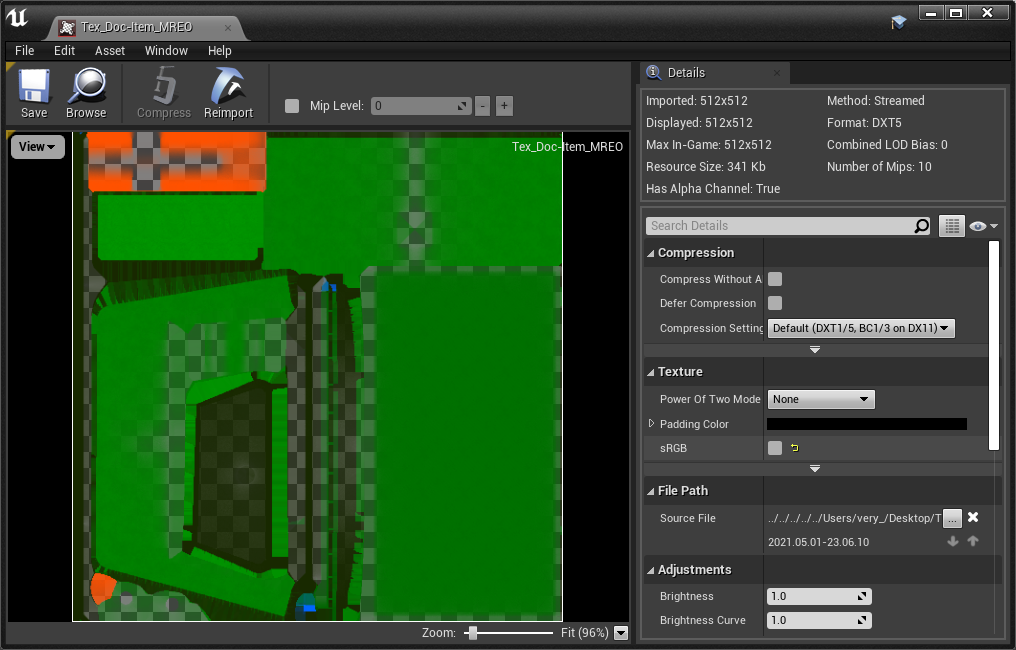
Open the imported Tex_Doc-Item_MREO texture, and in the Textures category of the Details pane,
uncheck sRGB
and set the Compression Settings to Masks (no sRGB)
We have to do this because the of the special data in each color channel - we don’t want Unreal to treat it like a normal image.
The Main Materials
page has more details about what’s going on.
Afterwards, save the asset.
Assign the Textures to the Material Instance
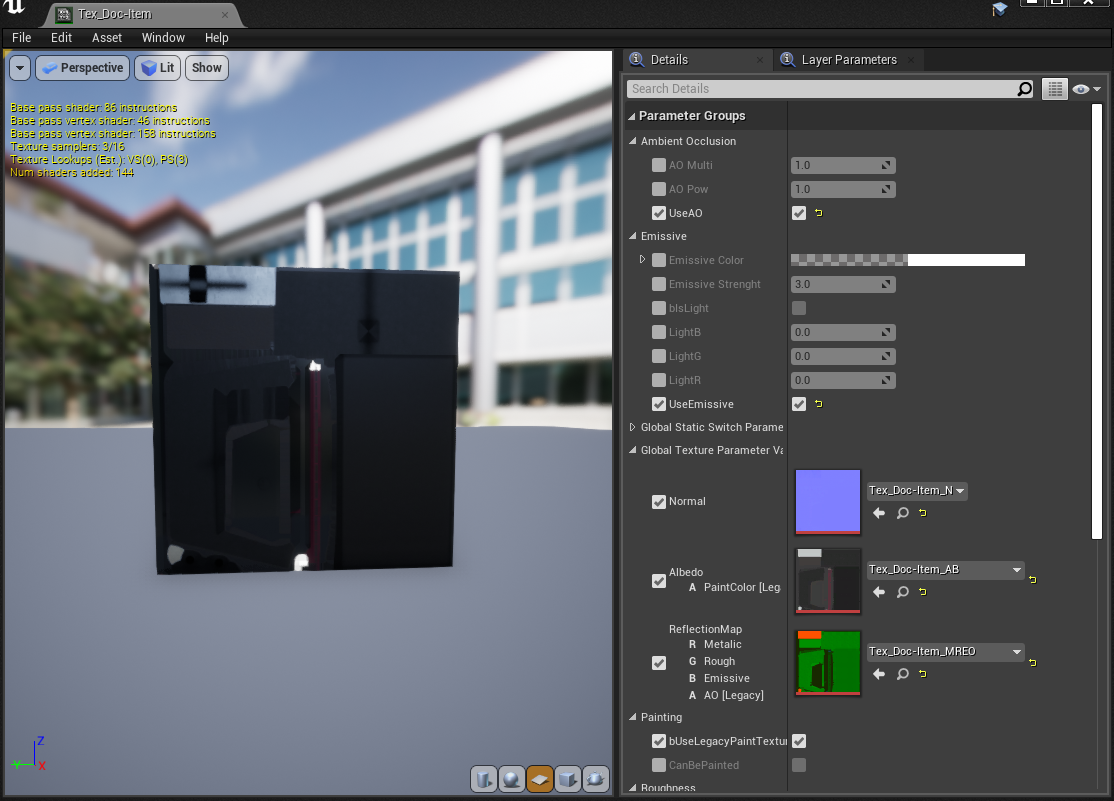
Next, we need to assign these textures to the parameters of the material instance.
Open up our MI_DocItem asset again.
In the Details pane, find the "Parameter Groups" heading’s "Textures" subsection
and check all three of these checkboxes to allow us to override their values:
-
For the Albedo field, select
Tex_Doc-Item_AB. -
For the Normal field, select
Tex_Doc-Item_N. -
For the Reflection Map field, select
Tex_Doc-Item_MREO.
Next, find the AO section, and check the UseAO box.
In the Emissive section, check the UseEmissive box.
In the "Global Static Switch Parameter Values" section, check the bUseLegacyPaintTextures box.
In the bottom right corner of the preview viewport, click on the flat panel icon to preview the material on a plane instead of a sphere. If you’ve done everything correctly, it should look like the below image. Note that no warnings appear in the top left of the viewport, just some statistics about the material. Afterwards, save the asset.
This process is pretty standard to the way Unreal does things, so if you’re a little confused, standard Unreal tutorials will help. We have very specific settings on the material because of the way the asset was made. If you team up with a modeler later on to help make your assets, they should know what changes to make if you send them a link to the Main Materials page, and you can ask questions on the Discord if needed. For now, just follow the settings on the above image.
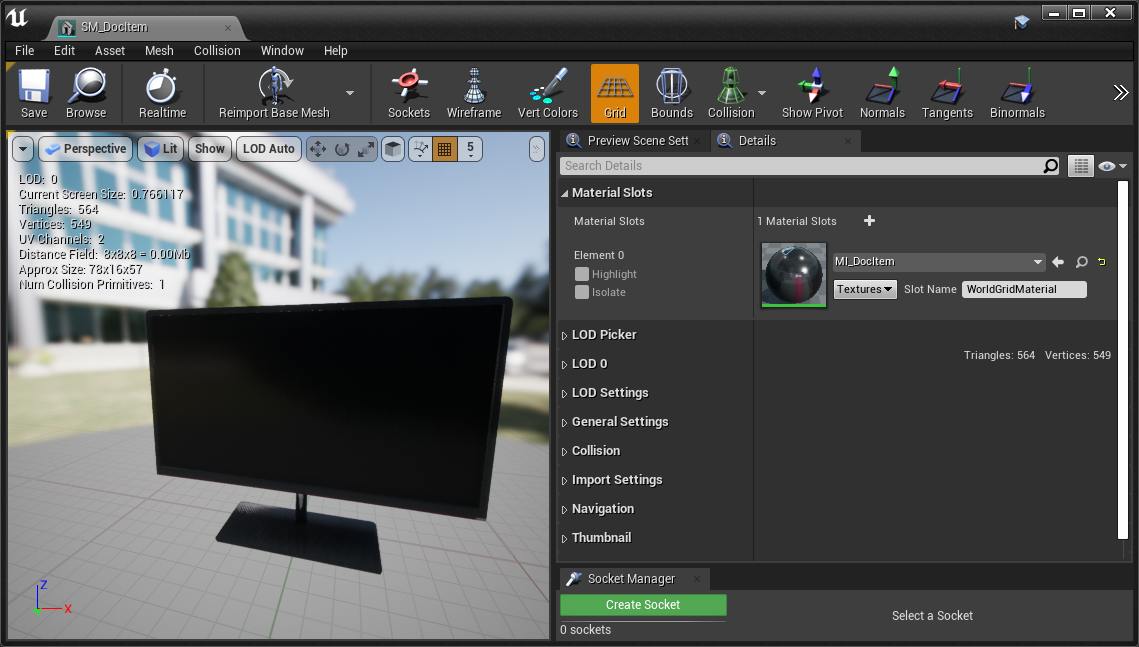
Assign the Material Instance to the Mesh
Now that we’ve set up our material instance, it’s time to tell the mesh to use it.
Go back to the content browser and open up our SM_DocItem mesh again.
In the details pane, find the Material Slots option.
Our example mesh only has one slot, but other meshes you encounter may have more.
Set the slot’s value by searching for our MI_DocItem asset.
Afterwards, save the asset.
|
Making and setting up custom meshes can be a lot of work. If you don’t want to use a custom mesh for items you create in the future, consider reusing the mesh of a nondescript base game item, such as the HUB Parts, as opposed to leaving it as the default white cube. |
Make the Item Available
Before continuing, remember to compile and save!
From here on out, we’ll stop reminding you to compile and save, but it isn’t any less important - remember to do it often!
We’ve created our item, but there’s one more step before we can obtain it in-game.
As a performance measure, an item is generally not available in Satisfactory unless something else registers it. One way we can do that is by having our item used in a Recipe. Conveniently, we’re usually already planning to have the item be usable in a recipe, so that the player can obtain it during normal play! Change the product of the recipe you made earlier to this new item, or create a new recipe for it if you’d like to practice that.
And you’re done! Go ahead and Alpakit your plugin, then check out your fancy new item in game. You can find info on how to use Alpakit back on the Project Setup page.
If something went wrong, feel free to contact us on the Discord for help.
Next Steps
Depending on the kind of mod you want to make, this might be all the info you need in order to start creating! Once you have a mod you’re ready to upload, follow the Releasing Your Mod directions to export and upload it for other people to use.
If you’d like to try making a decorative building, or a very basic machine with a GUI, continue on in this tutorial series.