Plugin Setup and Game World Module
To get started with our mod, we’ll need to make a new Unreal plugin using Alpakit’s wizard. Every mod you make should be a separate Unreal plugin.
Mod Reference
We need to talk about the concept of a "mod reference" before we continue because it will be referenced quite often.
A mod reference is essentially a mod’s unique name. This mod reference will then be used in class names, file names, folder names, and many other places. When you upload your mod to the Satisfactory Mod Repository for other people to use, you’ll need to provide your mod reference there as well.
Your Unreal plugin (also known as your mod) will need to use the mod reference as its name, and any C++ modules you write must be in a Source folder with the mod reference as the name.
Mod references can’t contain special characters (ex. +, #, ., ß, …) nor can they contain spaces.
However, they can contain underscores (_).
End users of your mod see your mod’s Display Name (which can contain spaces and special characters) instead of the Mod Reference, with the notable exception of mod folders on disk, log messages, and filepaths.
We strongly suggest that you follow Pascal Case naming conventions, that is, each 'word' in the mod reference starts with a capital letter and the rest are lowercase.
Here are a few possible examples of mod names and suggested mod references.
| Mod Display Name | Mod Reference |
|---|---|
Example Mod |
|
Rob’s very cool mod |
Note the exclusion of the apostrophe, because it’s a special character. |
Satisfactory Mod Loader |
Note that a mod’s reference doesn’t need to exactly match its display name’s text. |
Unreal Plugin Creation
Since SML3.0, mods are now Unreal plugins, and their loading is handled by Unreal itself.
Alpakit contains a wizard that helps with creating the plugin files for Satisfactory mods. If you haven’t already opened the Alpakit Dev panel, follow the directions here to do so.
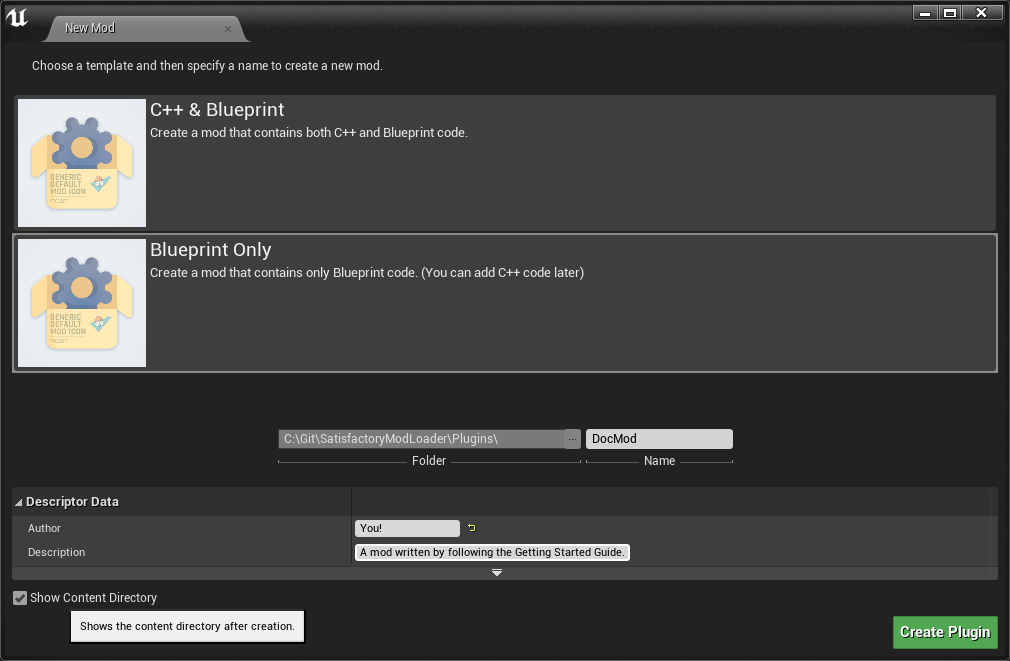
To open the mod creation wizard, click the Create Mod button in the Alpakit Dev panel.
Mod templates that the community has created will appear here.
Select the Blueprint Only template.
The wizard will also prompt you for a Mod Name.
The name of your plugin must be your mod’s
Mod Reference.
For this documentation example, you can use DocMod as the mod reference.
When you start on your own mod, you will have to create a new plugin
with a mod reference other than this.
Optionally, fill out the "Descriptor Data" section, or leave it blank since it can be edited later.
|
Be sure to read the notes on Mod References if you have not yet done so. It is critical that your mod reference follows these formatting rules. |
Leave "Show Content Directory" checked and press Create Mod.
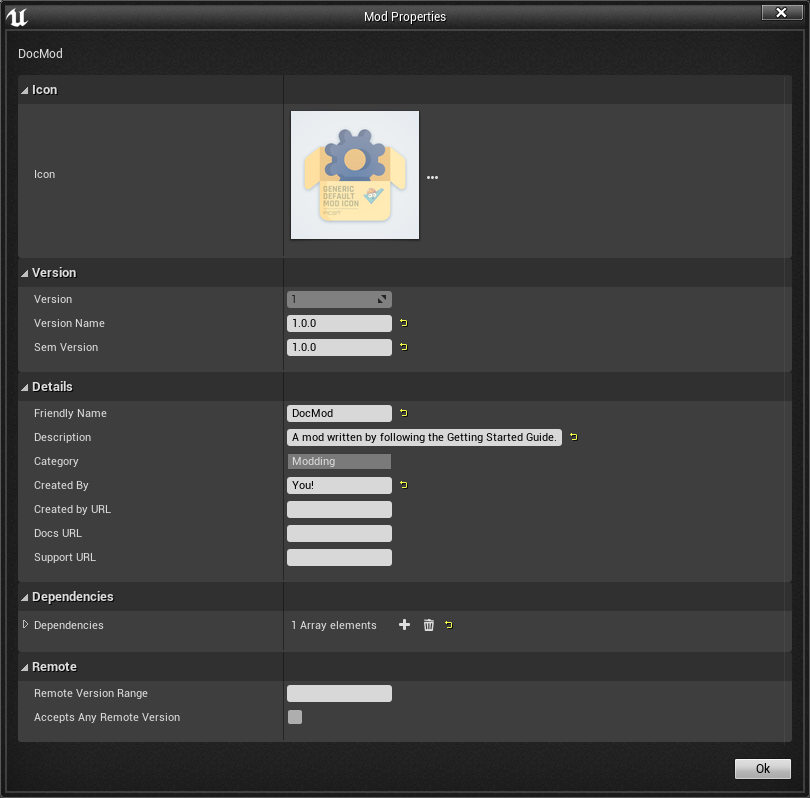
Edit Mod Properties
Your new plugin should now appear in Alpakit’s list of mods.
Click the Edit button next to its listing to open the Alpakit mod properties wizard
Here, you can fill out some additional details for your mod. Hover over the labels on the left to get a tooltip that explains their purpose. Since we’re working on an example mod right now, most of these fields are not relevant to us, but we’ll be back later before publicly releasing a mod.
Add your name in the Created By field.
Otherwise, the default values will be fine for now.
If you’d like to give your mod an icon, you can do so here via the three-dots file picker. Make sure the image you select is a square and at least 128 by 128 pixels. You should probably hold onto a higher resolution version of this image for later use on your mod’s ficsit.app page.
The Dependencies list should already be pre-populated with a dependency on the current SML version for you.
Your Mod’s Files
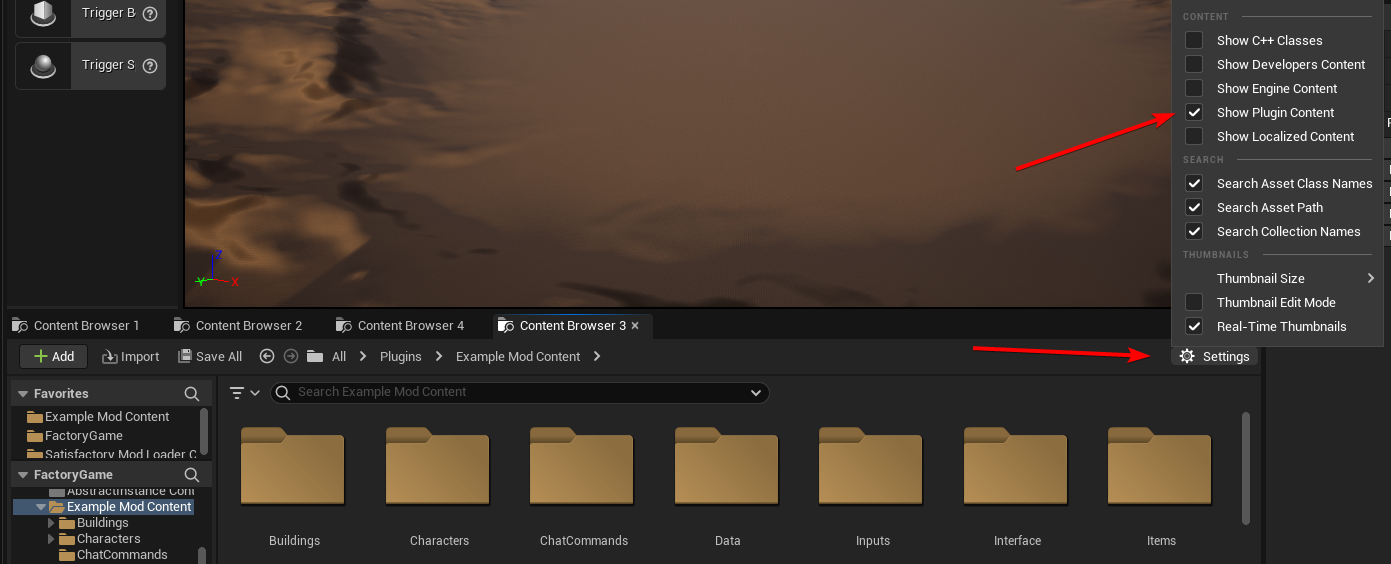
You can find your mod’s files within the editor in the Plugins subfolder of any Content Browser.
On disk, the folder can be found inside your modding project folder at
<project>/Mods/<Mod Reference>.
This folder is where all of the assets
(code, models, blueprints, textures, etc.) that your mod uses will live.
All of the settings you selected in the wizard are stored in your mod’s .uplugin file,
which you can optionally read more about
here.
Inside the editor, you can find your mod in the <Your Mod Reference> Content
subfolder of the Content Browser root folder.
You might need to click on View Options → Show Plugin Content
in a Content Browser to view the contents of your mod in the Unreal Editor.
|
If, for some reason, you want the editor or game to not load your plugin,
simply change the extension of your uplugin file to This is helpful when updating your mods later. If your uplugin file was previously |
Optional: Create a Git Repository for your Mod
Using version control is essential for collaborating on a mod with others, it helps write patch notes when you release an update, and you can use it to go back to previous versions of your files if something breaks.
A guide for setting up Git to work with your mod can be found here. It is safe to pause following this guide and switch to following that guide now.
If you work on multiple mods, you only need one modding project set up (which can be the cloned SatisfactoryModLoader repository) and each mod that you make will be a plugin in this project setup. Each plugin’s folder is the version control repository for that individual mod.
Create Game World Module
Now that we’ve created our plugin, we must create a starting point from which everything else gets invoked and registered. Without some point of reference, the game will never know to load our mod’s content!
In our case, the starting point will be a Game World Module, but this is not always required. Game World Modules are helpers defined by Satisfactory Mod Loader that allow us to define new Schematics, and through those schematics, items, recipes, and more.
|
If you’re interested learning about the other types of Modules and how the content loading system works, you can read more on the Mod Modules system page. |
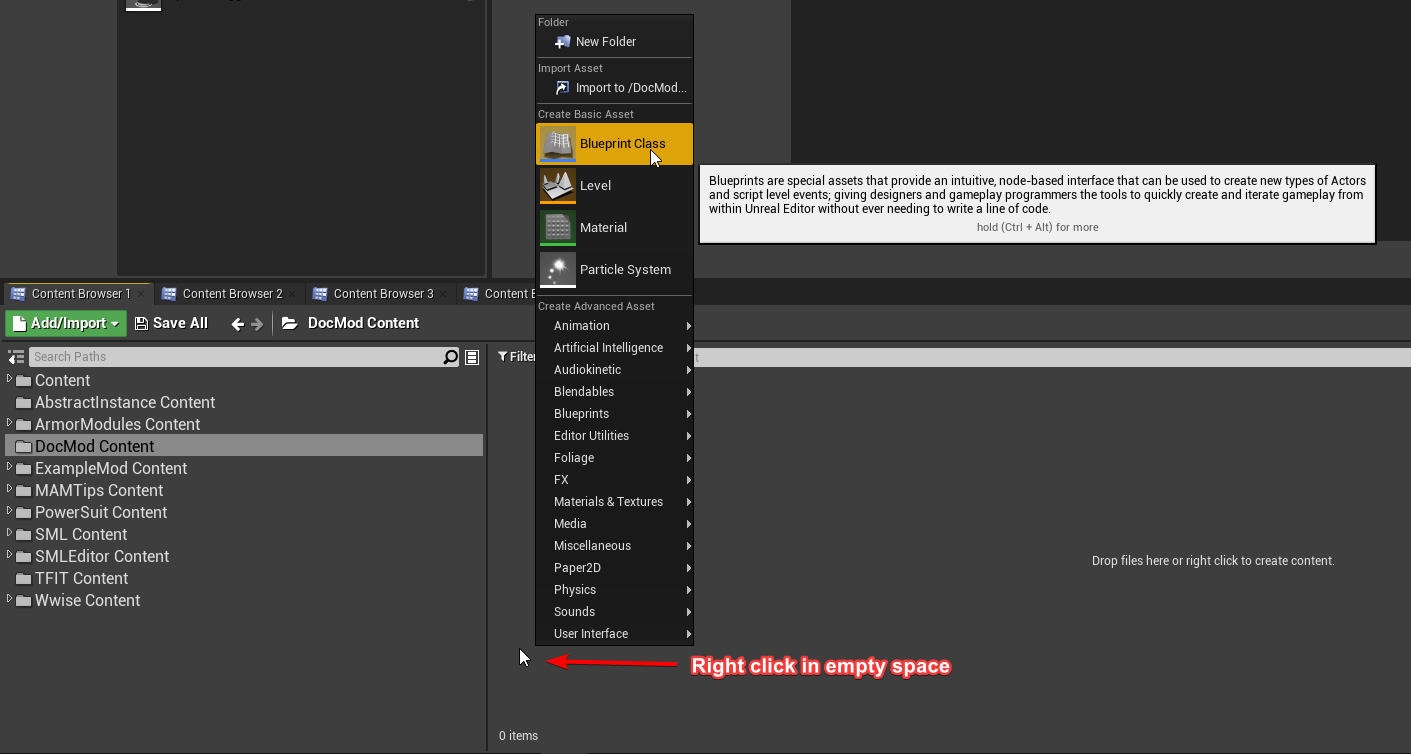
Within your mod’s content folder,
right click in empty space and select Blueprint Class under Create Basic Asset.
Click the triangle to close the Common Classes section,
and click the other triangle to expand the All Classes section.
Start typing GameWorldModule into the search box.
Once it comes up, select it and press the green Select button to create the blueprint.

|
Make sure that you select |
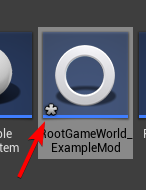
Name it RootGameWorld_YourModReferenceHere.
The prefix Root doesn’t do anything on its own,
but helps to identify it if you decide to add more GameWorld modules later.
By giving it a name that includes the mod reference,
it becomes easier to identify in crash logs
and helps you tell the modules of different mods apart in the editor.
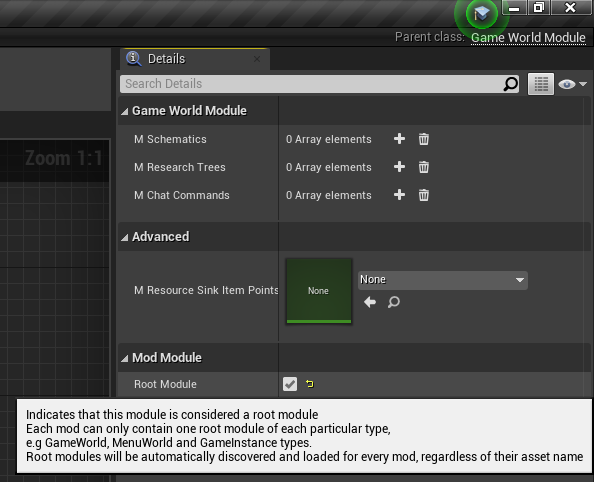
Next, double click on the module to open up its blueprint settings.
To make sure that SML automatically detects and loads our module,
mark it as the Root Module via the Root Module checkbox in the Details pane.
|
Make sure to mark your new Module as the Root Module! Most content not referenced by a module (or the Content Registration API) will be inaccessible and silently ignored by the game. To assist with catching this mistake, the editor performs data validation when you save Mod Modules. If you exceed more than one Root module per type (Instance, GameWorld, MenuWorld), or have modules of a type but none are marked as Root, the module will fail data validation and cause an error in the editor informing you of what you need to change. |
If you’d like to learn more about root modules, you can read about them on the Mod Modules system page.
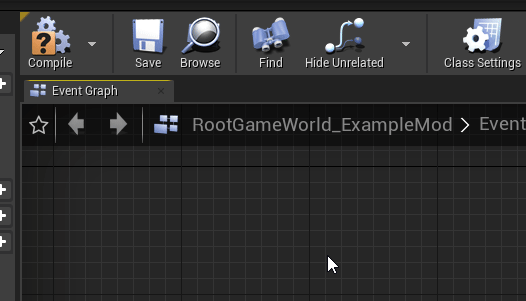
Compile and Save
Now that we’ve created our first mod asset, we need to 'compile' and save it. In Unreal Engine blueprints, 'compiling' is a data validation step that will check for errors and prepare the files to be packaged later.
The editor lets you know that your assets are unsaved through a variety of indicators:
-
In the Content Browser, an asterisk (*) will appear in the bottom-left corner of the asset’s icon.
-
If you have the asset open, an asterisk will appear at the end of the asset’s name in the tab in the top bar.
-
If you have the asset editor panel open, the Compile button’s icon will be different.
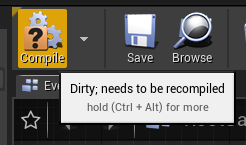
A common way to compile and Save is by clicking the 'compile' button in the top left of the asset editor panel.
Another approach is to press the F7 key, which is the keybind for that same button.
|
We suggest that you enable "Save on Compile: On Success Only" to skip having to also press the save button.
|
Whenever you create or edit mod assets, remember to compile and save them!
If you don’t compile and save the file, next time you package and try out the mod, the changes you made will not be included with your mod - this can be very confusing to troubleshoot!
Additionally, if the editor happens to crash before you save, you will lose all of your changes. A phrase you will hear often when working with computers is: "Save early, save often".
There is one exception to this rule -
if you are inspecting some of the
base game’s asset placeholders in the editor,
opening the assets may cause them to be marked as unsaved due to other placeholders being detected missing.
As an example, opening BP_Explorer from the FactoryGame assets will cause it to be marked as unsaved even if you don’t change anything.
There is no point in saving changes to those placeholder files because your mod doesn’t make use of them.
If you mistakenly save after tweaking one of the values on the file, you could confuse yourself in the future by saving an inaccurate value.
Testing Our Mod
To make sure everything is working as expected, let’s package our mod for use in the game.
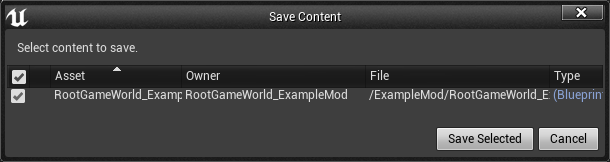
Before packaging, we can quickly check if we have any unsaved files via File > Choose Files to Save….
It will bring up a dialog like the one shown below.
Click 'Save Selected' to save any files you missed earlier.
We haven’t actually added any content yet, so our mod won’t really do anything. However, it will appear on the loaded mods list on the main menu. This is a good opportunity to catch issues that could have happened earlier in the setup process. We would still run into them later, but it would be less clear what the cause was. By catching them now, we know the issue must be caused by something we have done leading up to this point. Test early and test often to catch bugs sooner!
To package the mod, run Alpakit. You can find info on how to use it back on the Project Setup page.
After starting the package process you can click the "Show Alpakit Log" text to bring up the Alpakit-specific log window if you’d like. This information is also present in the UE Output Log, albeit mixed with other editor messages.
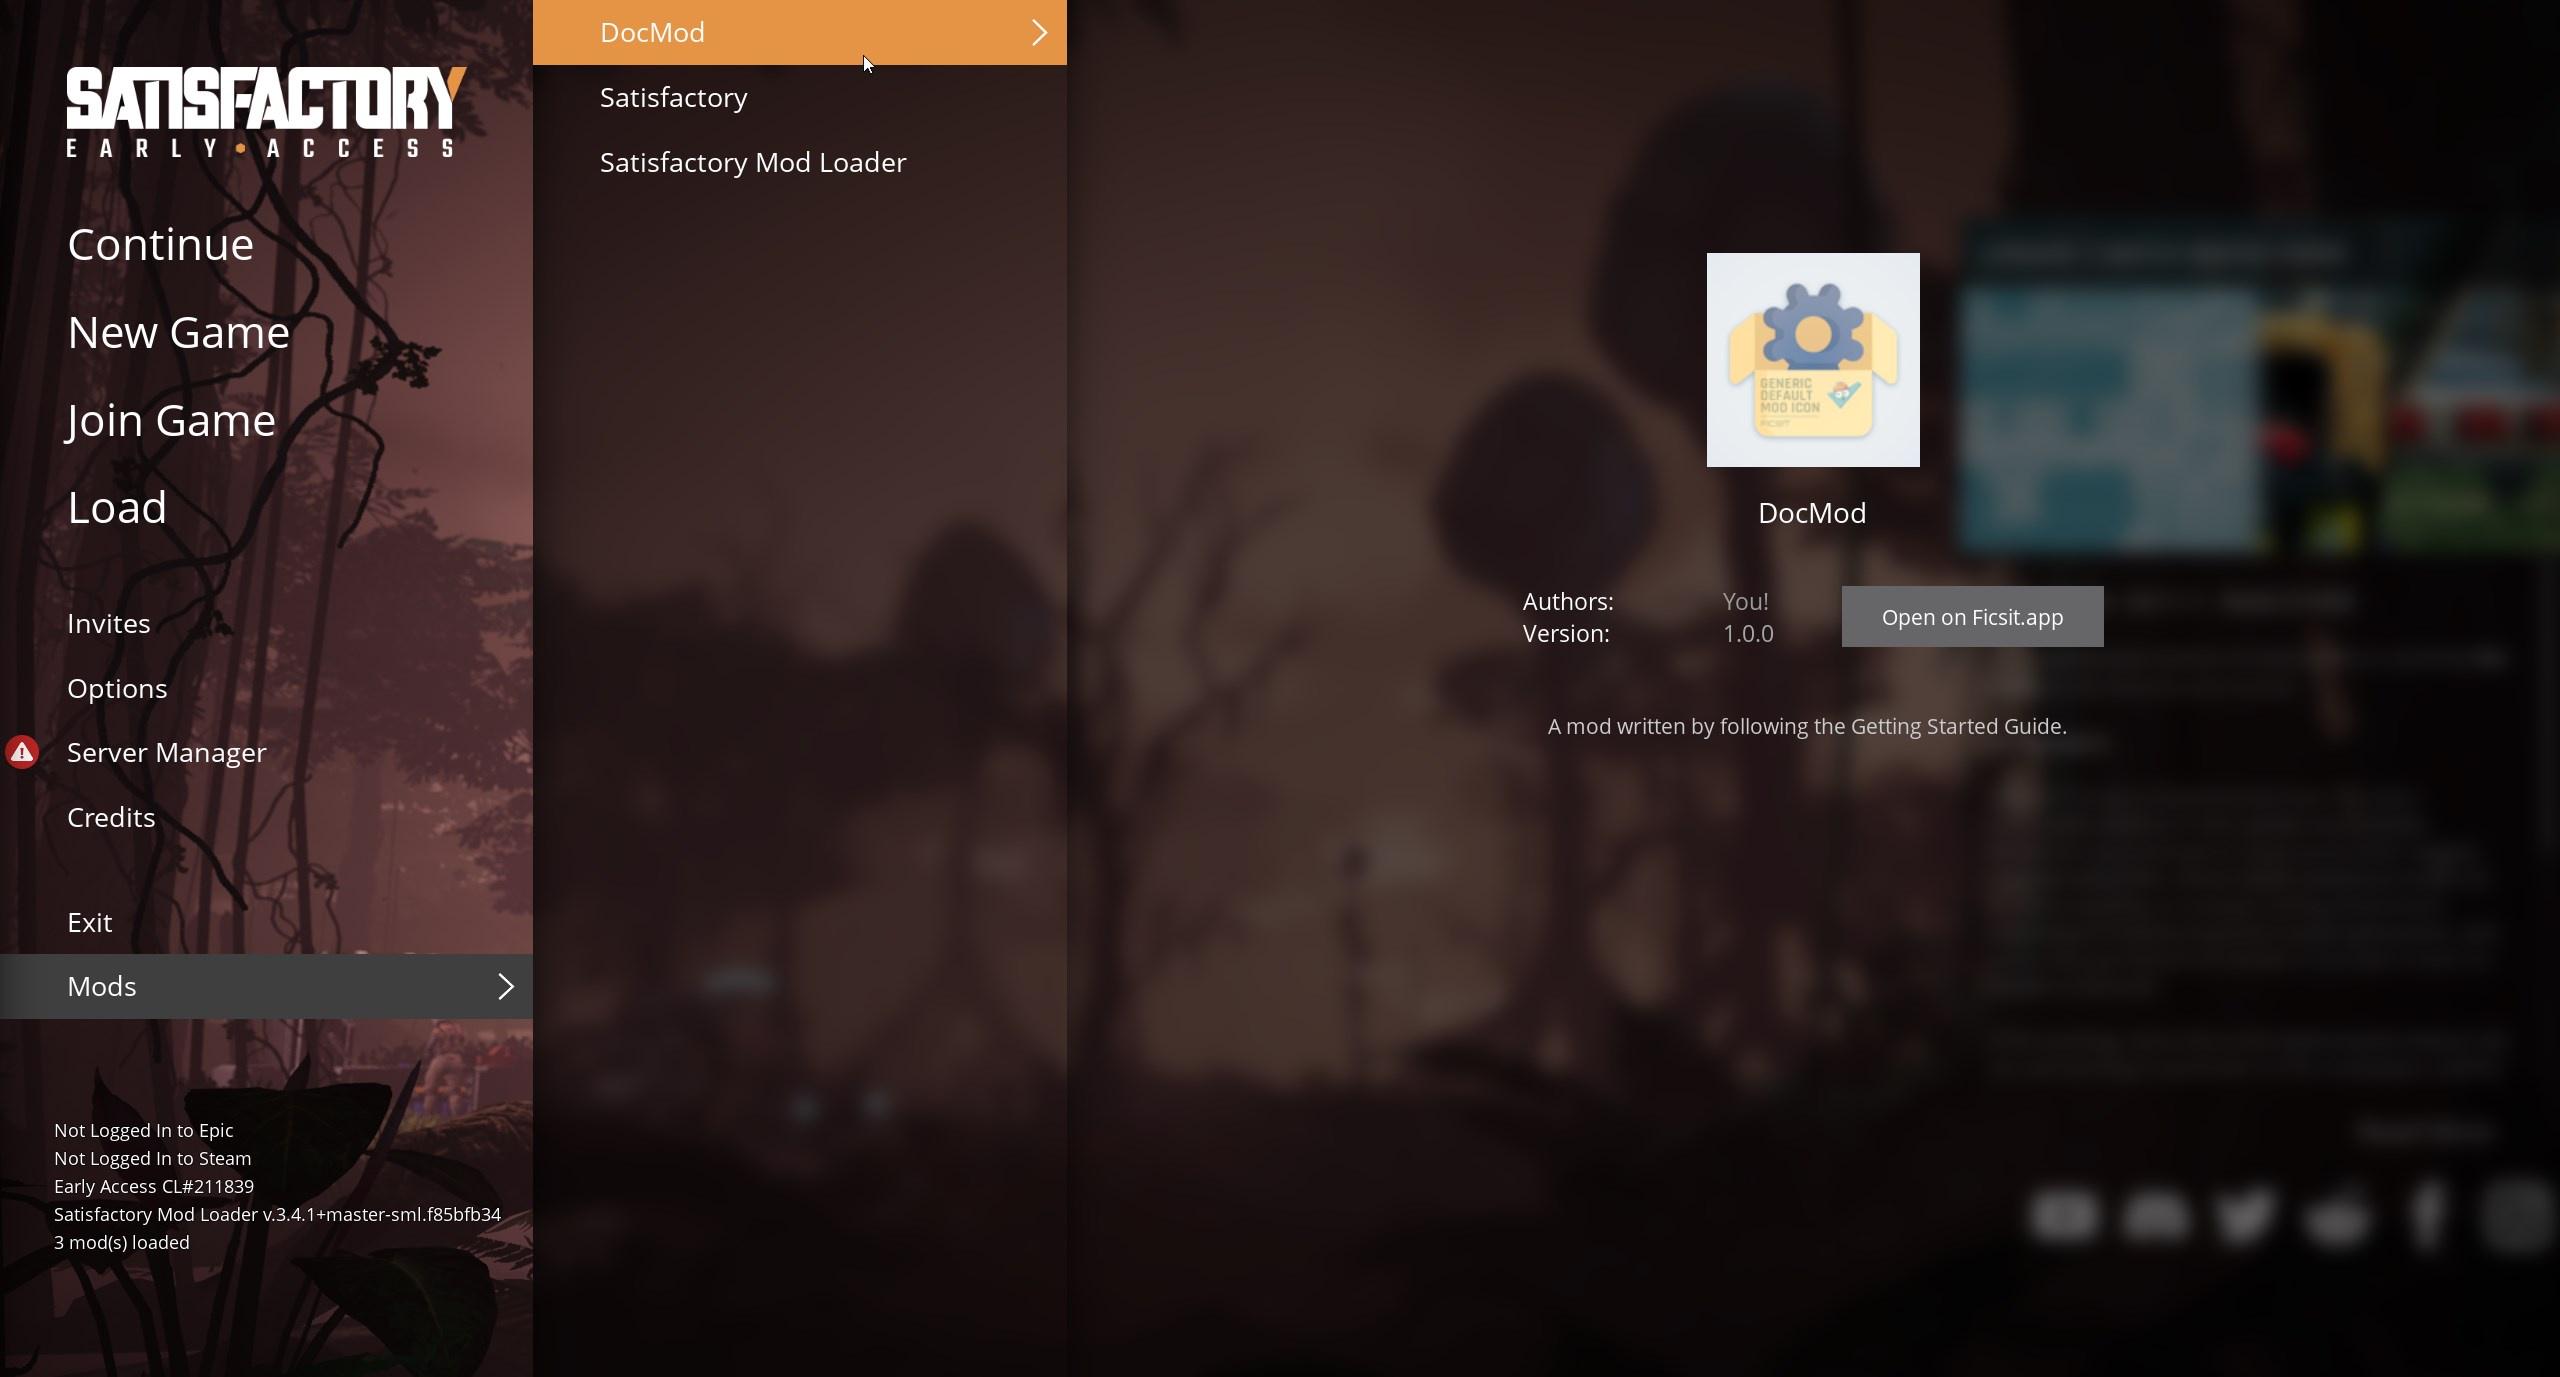
Once Alpakit has completed, launch the game, assuming you haven’t already set Alpakit to launch it for you. Your mod should appear in the main menu mods list shown in the screenshot below.
Even if this worked correctly, you should still read the Troubleshooting section below to see how to deal with errors you may encounter later.
Troubleshooting
Below you can find some information about errors you may encounter at this point, or later in mod development.
Package mod task failed!
Alpakit will display this message in the editor when something has prevented the mod from packaging.
This message alone tells you nothing about the error
- you’ll have to look at the Alpakit Log (File > Alpakit Log) or Output Log (Window > Output Log).
Once in the logs, look for red-colored Error messages, as it will likely contain the reason the task failed. If you’re using the Output Log you can use the Filters dropdown to show only errors.
Note that there will be probably be tens or hundreds of Warning messages - this is to be expected, and is usually not a problem. We don’t have complete versions of the files Coffee Stain Studios uses to build the game, so various Unreal Engine and game systems will complain about pieces being missing or incomplete. Consider reading these warning messages from time to time to see if they pertain to your mod, but warning messages alone are very unlikely to be the cause of your mod failing to package.
Once you find the error message(s), proceed to fix the problems they describe, or ask for help on the Discord
Failed to delete directory / Failed to delete file
The editor can’t copy your mod files to your game files if the game is already running, since the game has locked those files, as it is actively using them. Shut down the game and try again.
UATHelper: Package Mod Task Parsing command line ERROR: Failed to load script DLL Operation is not supported
This error could appear when packing a mod.
This has happened because your computer is treating one of the files you downloaded as unsafe and is refusing to run it.
An example case of the full error message:
UATHelper: Package Mod Task (Windows): Parsing command line: -ScriptsForProject=E:/SatisfactoryModLoader-master/FactoryGame.uproject PackagePlugin -Project=E:/SatisfactoryModLoader-master/FactoryGame.uproject -PluginName=DocMod -GameDir=E:/SatisfactoryEarlyAccess -CopyToGameDir
UATHelper: Package Mod Task (Windows): ERROR: Failed to load script DLL: E:\SatisfactoryModLoader-master\Build\Alpakit.Automation\Scripts\Alpakit.Automation.dll: Could not load file or assembly 'Alpakit.Automation, Version=1.0.0.0, Culture=neutral, PublicKeyToken=null' or one of its dependencies. Operation is not supported. (Exception from HRESULT: 0x8013151
5)
To fix this, go to the file mentioned in the error message (in this specific example, E:\SatisfactoryModLoader-master\Build\Alpakit.Automation\Scripts\Alpakit.Automation.dll), right click on it, hit Properties, and tick the box at the bottom to unblock the file.
You can avoid this issue in the future by using Git to clone the starter project instead of downloading a zip.
Plugin failed to load because module could not be found
This error could appear when launching the game.
This issue appears when a mod’s C++ module could not be loaded correctly at runtime.
You should not normally encounter this issue at this stage in the tutorial
because we created a plugin from the Blueprint Only template, not the Blueprint and C++ template.
However, if you used the other template, that is not a problem.
You need to build the Shipping profile whenever C++ code changes and you want to test in-game. Under normal circumstances, Alpakit will build Shipping for you if it’s out of date.
Similarly, you need to build for Development Editor when C++ code changes and you want it to update in the editor. You should have the editor closed when doing that though, because although Unreal Engine tries to implement hot reloading, it tends to break and just crashes the editor instead.
This issue can usually be resolved by building the Shipping profile from Visual Studio. You may also need to regenerate Visual Studio project files first.
This project requires … which has a missing dependency on the SML plugin
This error could appear when launching the game.
You probably don’t have Satisfactory Mod Loader installed in your copy of the game, and Unreal Engine is telling you it must be installed for your own mod to function. You can package a copy of SML yourself using Alpakit following the steps on the previous page.
Corrupt data found, please verify your installation
This error could appear when launching the game.
First, make sure that the game will load correctly without your mod. Consider verifying your game files to be sure.
If the game loads correctly without your mod, then it is likely you have the wrong version of the engine installed. Make sure you are following the latest version of the docs and have downloaded the correct version of the engine and starter project as mentioned in the previous setup pages.
If that isn’t the issue, make sure that your mod depends on the latest version of SML and not something newer than that. You can find out what SML version your project has by opening the mod editor widget on SML’s listing in the Alpakit list.
Next Steps
Next up, let’s get started making our own content by creating a recipe and a schematic, which will allow us to unlock and utilize a new crafting recipe in-game.
If you need a refresher on how to find the docs page for this step, check out the Getting Started section header.