Satisfactory Train / Train Signal Manual
Introduction
Train signals in Satisfactory are extremely simple in comparison to other games. Even so, they can often be confusing to new players or players who are not already familiar with the language of train signals. With hope this manual will help to give a basis of information for players to design their own train systems.
Trains and all their various associated pieces are unlocked in Tier 6, Monorail Technologies. You unlock Rails, Engines, Freight Cars, Stations, Freight Platforms, Fluid Freight Platforms, Block and Path signals.
This guide was originally written by Lynkfox and is being maintained by the Satisfactory Modding community. To view contribution and edit history, click "Edit this Page" in the top right corner of the page.
Too Long, Didn’t Read:
Here are some quick best practices.
-
Don’t mix parts in a Freight Car. 1 Car/Station per part
-
Unless you are only ever going to have 1 Train on the track, it is advised to use one-way tracks and loop your train back along a parallel track to its source. This prevents gridlock or lots of manual optimization.
-
Trains always arrive from the back of the station and park the engine facing the same direction as the curve of the station.
-
A Freight/Fluid Platform locks during load and unload; so, you cannot get a full 2 mk5 belts of throughput through a station ever.
-
It’s generally advised to avoid shipping fluid in fluid cars. If you must ship fluid by train (instead of using it where you extract it) then you can achieve a higher throughput with most fluids by packaging them first
-
Trains cannot dynamically route in the middle of travel. They pick their path when they are about to leave the station, and that path cannot change.
-
You can get away with just using Block signals everywhere. Path signals can be completely ignored until your train network has a LOT of trains on it.
Effectively, they’re big belts.
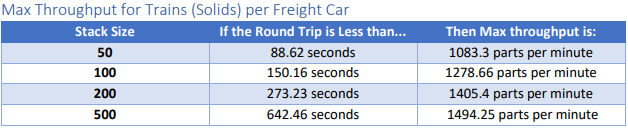
Trains are, in effect, very high throughput belts. The difference from a belt is that the max throughput of a single car is not a set number but affected by the time it takes a train to make a round trip and the stack size of a given part being transported. With certain constraints explained further into this document in mind, you can generally consider that if you put X parts per minute into a station, you will over time be receiving X parts per minute at the output station (Factors include the Lock Out Timer on stations loading and loading, the stack size of the part in question, and the round trip time from start back to start.)
The Parts
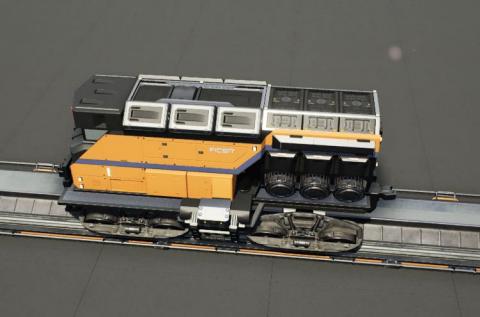
Engines
-
Engines can only pull, not push, so if you want a train to run forward and backward on the same rail you need an engine on each side of the cars.
-
Engines can pull a number of cars determined by their weight, which is determined by how full they are (the type of part of fluid in the car does not affect the weight). In general, aim to keep your trains under 8 freight/fluid cars, though you can go above that in certain given situations. See the Satisfactory Wiki: Freight Car Weight page for a full breakdown. To see the weight of a train car calculated live in-game, use TFIT.
-
Engines use electricity - provided to them from the Rails, which is provided by powering stations. They use between 25mw and 110mw depending on the incline, speed, and how much they are pulling.
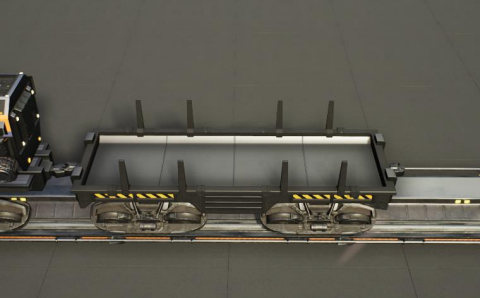
Freight Cars
-
Freight Cars carry parts and fluids. If it is Freight or Fluid is determined by what type of platform it loads from.. You can mix parts in a Freight car, but like all fluid systems, each fluid car can only hold one fluid. Still, it is often easiest to keep each freight car to a single part.
-
Freight cars must be loaded/unloaded by Freight Platforms; Fluid by Fluid Platforms.
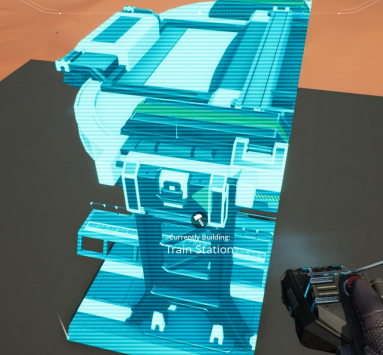
Stations
-
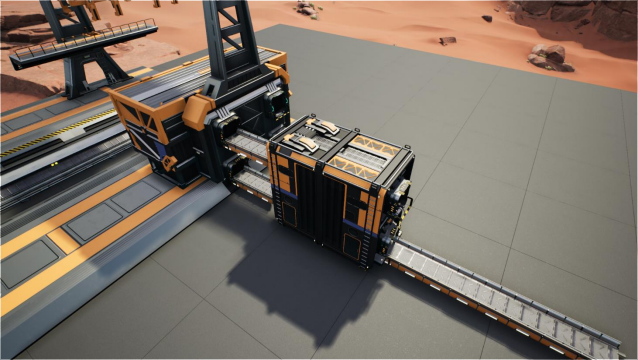
The Station is where the Engine will align itself when it arrives. Each place you want to load and unload trains at needs a station as the first piece, attaching various platforms to it.
-
The station has a Front and a Back: looking at its model, the curved side is the Front - trains will always path to arrive at a station coming in from the back and parking the Engine at the station facing the same direction as the curved side.
-
When placing a Station, the curved side is the front. There is also an arrow pointing in the right direction, but it can be hard to see.
-
Trains generate a path based on the shortest path possible between their origin and destinations. These paths will not change after the train starts its auto pilot.
|
Trains will not change their path after they have started moving. You cannot dynamically have trains pick a path while they are already traveling. |
-
Stations incur a 'distance penalty' on route planning: If a train could pick one of two equal length routes to get to its destination, but one has a Station it would pass through that it is not stopping at, it will favor the other route. Trains will not change their path after they have started moving. You cannot dynamically have trains pick a path while it is already traveling.
-
Routes will respect any Signals (Path or Block) if they are only on one side of the track - this creates a “One Way” section, and trains will not generate a path going against that One-Way direction.
Freight, Fluid, and Empty Platforms
-
Platforms must be arranged in the same order in the station as the cars that need to be loaded/unloaded at a given stop.
-
Platforms must all be connected to another platform or through another platform, a station. If there is no station, platforms will not work.
-
Even though filters exist on the Train Schedule to allow only certain items to be loaded or unloaded at a given platform, they still need to line up with the right car to take effect.
-
In addition, it is considered far easier to keep each station/car combination to a single part, to avoid the need for sorters or one part clogging up a station inventory and preventing the other part from being loaded at all.
|
Stations Lock when Loading or Unloading cargo from a train. This means they DO NOT accept anything from a belt or output anything to a belt for this duration, which is about 27 seconds. |
-
Due to the lock effect when a station is being loaded or unloaded, trains can never achieve the maximum of two Mk5 belts attached (1560) throughput through a single station.
-
This is because for almost a minute (load and unload) the belts will not be able to add/remove items from the station, and so they cannot continue to provide the max amount of their throughput.
-
Additionally, this lock effect can disrupt flow - even if your train network is short enough that parts should have a travel time that still facilitates maintain the output of the machines at the loading station, the lockout time will disrupt this UNLESS a buffer is used.
For Example:
-
Assume you have a train that loads Iron in Car One, Copper in Car 2, and Coal in Car 3. The station where it loads would need to be: Station-Freight-Freight-Freight.
-
If you want to unload the copper in car 2 at Station A, but the Iron and Coal at station B, then you will need to use empty platforms to make up the difference.
-
Station A would need to be: Station-Empty-Freight-Empty
-
Station B would need to be Station-Freight-Empty-Freight
-
You can replace the empty platforms with Freight that are set to the opposite of what you intend to happen to that car and have no belts attached (so an unload station has the pseudo empty set to Load and has no belts attached) but it is cleaner and easier to review in the future if you use Empty Platforms.
Station Buffers
-
Solid and Liquid items, to not have an interruption in their throughput, need to use a buffer at both the loading and the output. Remember, Freight/Fluid platforms lock during loading/unloading and so items will back up on the belt. If you are running close to the maximum, it will cause machines to become full and stop producing, or belts to be empty and machines to starve.
-
In some low throughput situations, if the amount being transported is far below the max of a Mk5 belt, and Mk5 belts are being used to load/unload, you have enough space on the belt itself to act as a buffer. In general, though, it’s just a good idea to use a buffer.
-
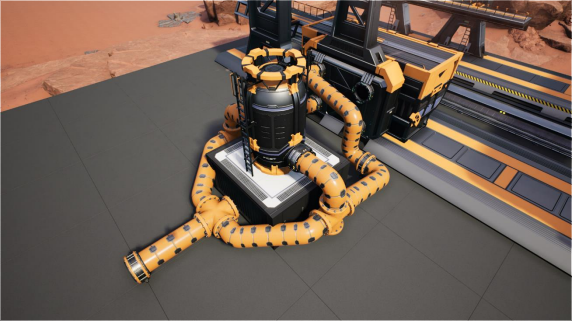
A Freight buffer relies on using a single belt input into an Industrial Storage Container, and then both outputs into the station for loading, and in reverse for unloading (both outputs into an ISC and only one out)
-
Yes; this means if you need your throughput to be constant, you can only transport 1 mk5 belt worth of items per freight car or 600m3 (1 mk2 pipe) of liquid. If you do not need the throughput to be constant, or there is far more being transported than being used at the other end you can get away without doing this.
-
Fluid buffers work the same but rely on the fact that fluids are prioritized from lower z-height inputs.
-
In effect, this allows parts/fluid to continue to flow even when the station is locked. The parts/fluid fill up the storage containers, and as soon as the station unlocks, there are twice the amount of output as input, allowing it to catch back up to whatever buffered in the storage container.
-
In reverse, in unloading, this unloads the station twice as fast, but only allows 1 output to head to the consuming machines, which will only tuned to accepting a single line worth.
-
While transporting raw fluid by train is generally not advised, this is a must as fluids are much more prone to issues if you cannot maintain a constant flow rate. Buffering DOES NOT work for Gasses (i.e, Nitrogen Gas) because the Buffer Building does not work properly for Gasses as they ignore Headlift.
|
Buffering DOES NOT work for Gasses (i.e, Nitrogen Gas) because the Buffer Building does not work properly for Gasses as they ignore Headlift. |
-
For most Fluids, a higher throughput can be achieved by packaging the fluids before travel. This does add the additional complexity of either returning the empty containers afterward or SINKing / Producing containers.
-
For Gas, due to the fact you cannot buffer them, it is almost a requirement to package them first.
-
For the most part, transporting anything that goes in pipes a long distance is difficult, and it is generally recommended to use the fluids to produce items near where they are extracted, and ship the final product.
Rails
Rail pieces are obviously what a train will travel on. While you can do a single rail and have trains running down it in both directions, this creates a lot of complication and hand done optimization when working with more than 1 train on the track.
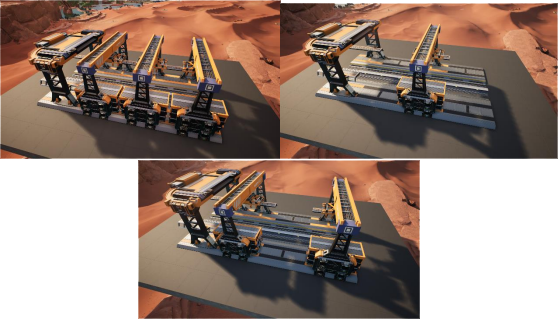
The Best Practice is to run two lines in parallel with each other and designate that each line will run in the opposite direction.
This is often quickly referred to as Right Hand or Left-Hand drive trains (the train is driving on the right side of two parallel tracks when moving forward). You can consider each track a lane in a divided highway.
Rails will only connect to each other at the end of a previous rail segment; if you want to make a split in the track, it will start at the point where the last rail piece ends, by connecting two pieces to that end. Rails can cross over each other and “clip” together, without any adverse effect to trains running (assuming signals are employed when there are multiple trains).
Curves

The smallest curve that can be done with rails is a 3x3 curve: However, this is not a feasible way to build a lot of curves you will have to use - instead it is recommended to be at least 4x4. If you want to achieve good clean curves, then it is advised to create the segments on both ends of the curve first, and then create the curve itself:
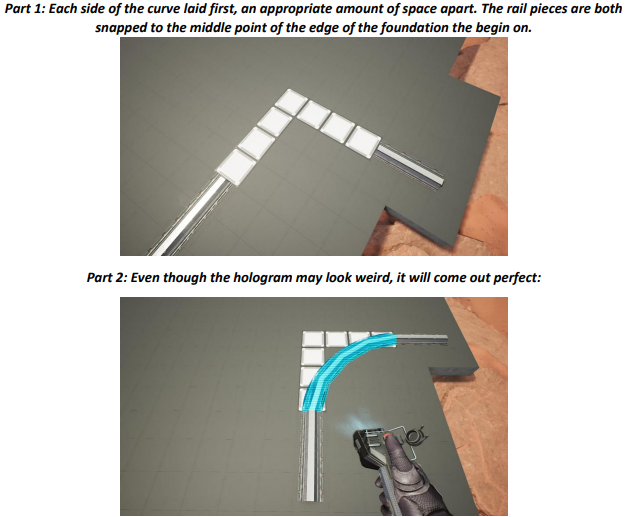
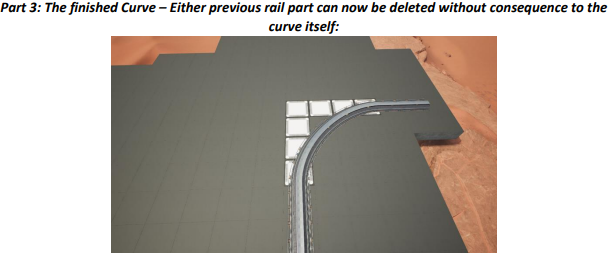
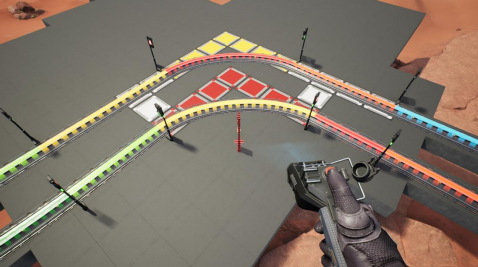
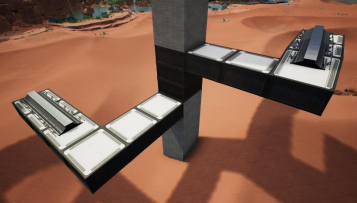
It is usually advised to put some straight rail pieces between each curve, to prevent issues with connecting to them for new rails or when making a full loop. Because it is recommended to build in parallel one-way tracks, this is how you would do a 90 degree turn on foundations and keep it clean. The signals have been added to help differentiate the different built rail pieces.
An alternative to parallel rails is Stacked Rails. Rails should be at least Three (3) 4-meter foundations part from the base of the lower rail to bottom of whatever the upper rail is resting on to prevent clipping, but otherwise the trains will not be affected if the rail is far enough above the other the train does not clip with the rail itself.
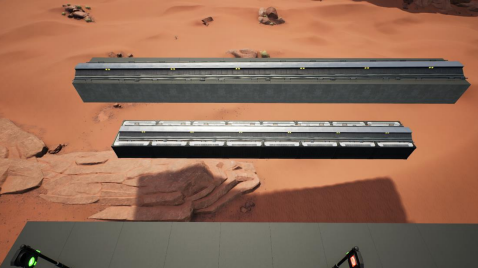
Stacked rails can save space but add additional complexity when building intersections and stations. However, they also open the possibility of intersections where the various connecting rails do not cross, instead going above or below where they would cross in a completely flat intersection, which removes the need for many, if not all, of the path signals, and speeds up trains when passing through.
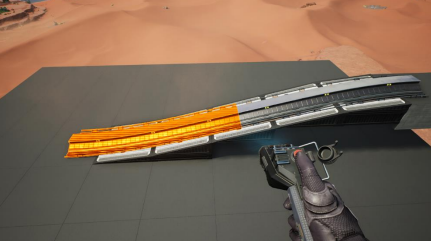
Ramps
Ramps can be achieved cleanly up to a 2m ramp foundation in gradient. Anything higher than that, an Engine will be unable to ascend the incline. To build a smooth foundation under a rail incline, use a combination of 1m and 2m inclines.
Place a 1m incline, then 2m incline until almost to your desired height, then once again a 1m incline at the top to level off.
It is also important that you do not snap the rail segments to the very edge of the initial and final incline. Instead, you want to go about a quarter of a foundation beyond on the top, and about half of a foundation below on the bottom. The look is improved if you stop at least halfway up the incline and form a new segment as well.
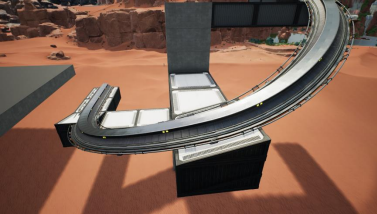
It is possible to do a corkscrew for a small footprint ascension. It is a bit of work to achieve a very smooth transition between curves but it is entirely possible to do:
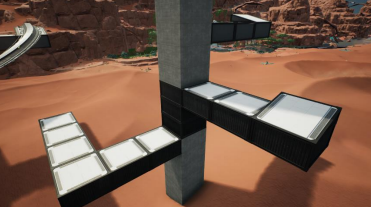
Step 1: Build a center tower and spokes that are 3 foundations out on every side, and with a gap of two 4m foundations between them. On the first spoke extend at a 90-degree angle away from the next highest spoke for the track to enter on. On every other spoke, add a 2m incline to the end:
Step 2: Add 2 more foundations to the first spoke above the ground level, and a rail starting from 3/4ths of the incline:
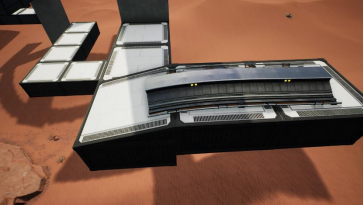
Step 3: Bring the initial entry point of the Rail to just about halfway before the first spoke:
Step 4: Connect the two rails with a curve.

Step 5: Remove the excess rail and foundations on the upper spoke. Repeat every spoke until desired height has been reached.

Signals
There are two types of signals in Satisfactory, Block and Path. Between the two of these you can engineer an efficient and high throughput train network to make sure your trains continue to move products efficiently.
|
Signals are an "All or Nothing" affair. Either your entire network has signals or none of it does. If you try to do it in partial setups, you will find that it does not behave like you want it to. |
Segments
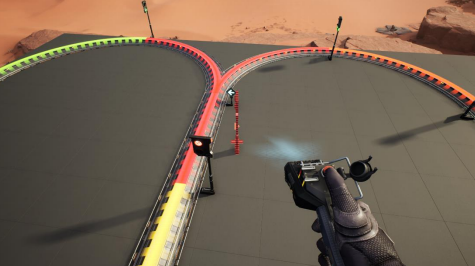
When you place two signals on the same side of the track, the space between them becomes a segment. You can view these segments in-game by holding a signal to be constructed in your build gun. The game randomly assigns colors to the tracks segments to help you see where they are.
In general, a given segment can have one train in it. This is how signals prevent collisions - Trains will respect the status of a segment when they reach the signal that begins it and will not enter if it will cause a collision of Trains.
A Segment is defined by the signal that begins it. Trains only look for signals on the right-hand side of the track.
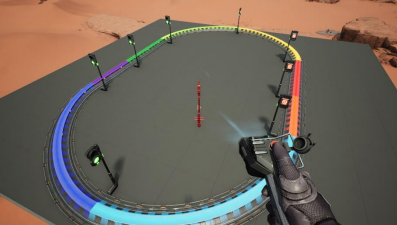
Each color is a segment. The color means nothing, it is just a way of differentiation
|
Tracks placed too close to each other can cause overlap, causing the system to treat both tracks as the same segment. It is advised to keep your tracks about 1.5 foundations apart when running parallel or close to parallel. |
Block Segments
A Block Segment is defined when there are two Block Signals on the same track. The length of track between them is the Block Segment.
A Block Segment is a binary system - There is either a train inside the segment, or no train inside the segment. If there is any part of a train inside the segment, no matter how small a part it is, the entrance signal will report Red and not let other trains enter it.
Hence why it is called a Block Signal - a train in between two Block Signals blocks other trains from passing the first signal.
Trains look one Block segment ahead - they do not know the status of additional segments beyond the one directly in front of them.
If the segment head reports that it is currently occupied, a train will begin to slow down and will stop right at the signal as long as that next segment remains blocked.
This means that if your blocks are too close together it can cause trains to start and stop often. It can also mean that if one train is stopped partially in multiple blocks, it may cause a train to stop that does not need to.
|
In general, it is seen as good practice to place your Block Signals on long straightaways about 1.5 to train lengths apart from each other. |
Tracks placed too close to each other can cause overlap, causing the system to treat both tracks as the same segment. It is advised to keep your tracks about 1.5 foundations apart when running parallel or close to parallel.
This in turn slows down your trains overall, increasing the Round Trip Duration of a given train, and lowering your throughput. For small networks of only a few trains this is not an issue usually, but it is generally good to plan ahead.
Placing your Block signals this far apart on long straightaways means that at most any given train will be inside two Block Segments at any given point, reducing the amount of start and stops any following trains may have to do.
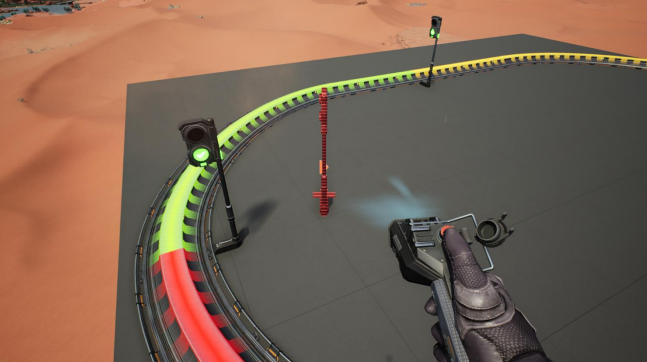
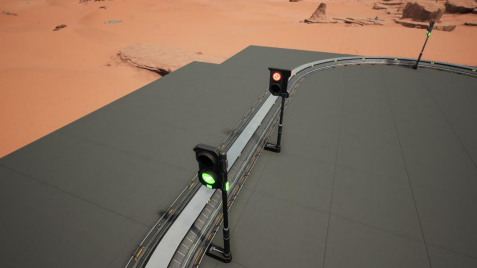
A Block Segment between two Block Signals. The Segment is currently clear
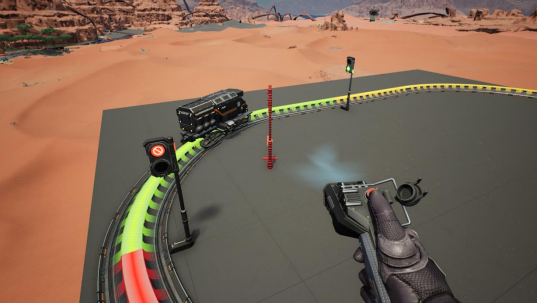
A Block Segment that is currently occupied. The Red Signal will prevent another train from entering.
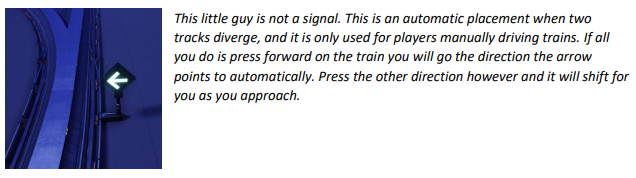
The Signals are on the left side of the track from this direction, and since there are no signals on the right side it shows the Do Not Enter symbol, meaning trains will not path this direction.
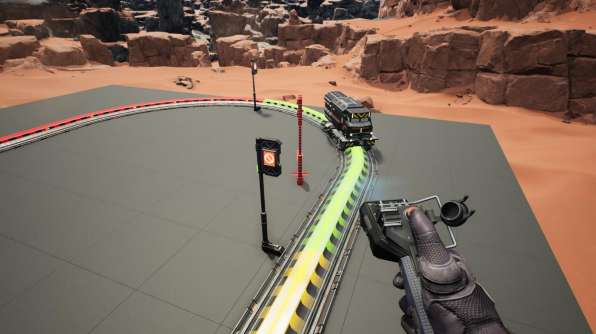
Adding another signal removes the Do Not Enter, but this block is still occupied preventing another train from entering; Hence the Best Practice of one-way train tracks.
Path Segments
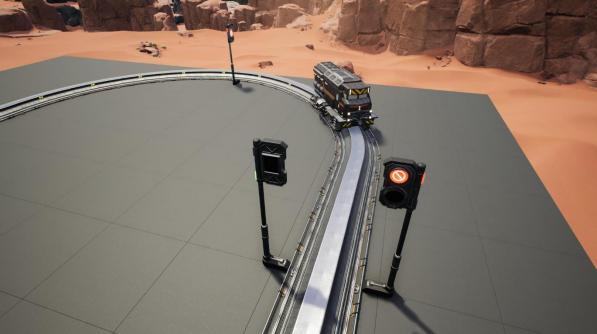
A Block signal and a Path Signal, the Path signal is the further down the line signal showing red. It has a different top and is more square. Path Signals (and so the Segment immediately following a Path Signal) are more complex. They are not a pure binary output - more than one train can be in the Segment if their planned paths do not cross at any given point - hence the name of Path.
In addition, trains will only enter a Path Segment if the following Block Segment is clear. This means if you put multiple Path signals in a row, a train will continue to look until it reaches the next block signals. This is because Path Segments do not allow trains to stop inside them. Doing such a thing is known as Chaining and is usually used for situations where there are multiple entrances to a single line.
|
Path Signals DO NOT allow a train to change its set path on the fly. The path is set when the train is about to leave the station and will not be updated. |
Intersections
Path Signals are used to allow multiple trains to enter the same “Intersection” at the same time. Remember, trains cannot change their path once they leave the station, as such being in the same intersection at the same time revolves around if the path the train would take through the Path Segment does not interact with another trains path at the same time.
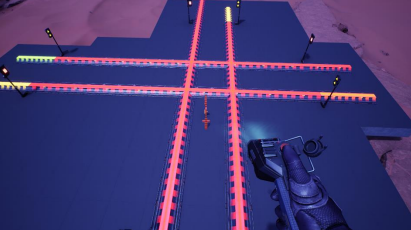
This Intersection is pointless for a path signal. There is never a time where two trains could be in this red segment without their paths crossing.
This intersection, meanwhile, Path Signals would allow both North/South (up/down) lines to have a train on them simultaneously or both East/West (left/right) lines. However, it would not allow both a North and an East bound train (or any other combination of 90-degree lines)
Common Intersection Patterns
For the most part these patterns expect a One-Way rail, where both directions are running parallel to each other. This creates some complex intersections but overall is still very doable. There are arrows indicating the direction train traffic would flow on that rail, and the signal indicators are placed on the side of the track they should go on. Each of these intersections is Right Hand Drive (when moving in the direction of trains, you are on the right side of two parallel tracks.) This can be swapped for Left Hand Drive by moving the signals to the other side of the track.
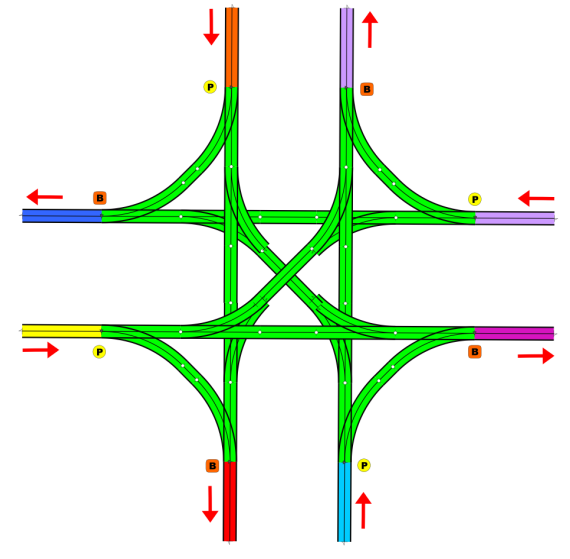
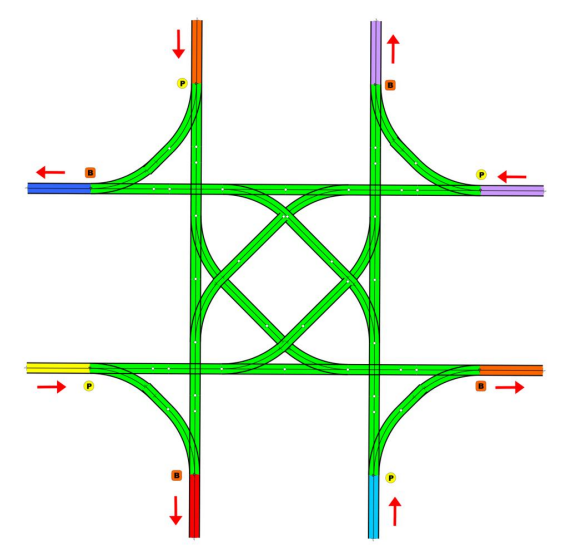
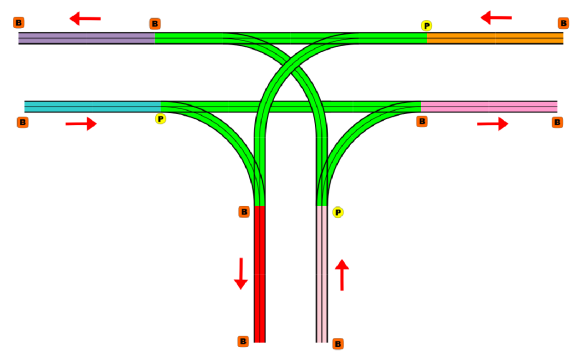
Expanded 4-way intersection:
This one takes up a bit more room but is easier to build in some ways. The signalling however is the same.
3-way T Intersection:
A classic 3-way intersection. This can easily become a Y shape, but is easier to show as a T.
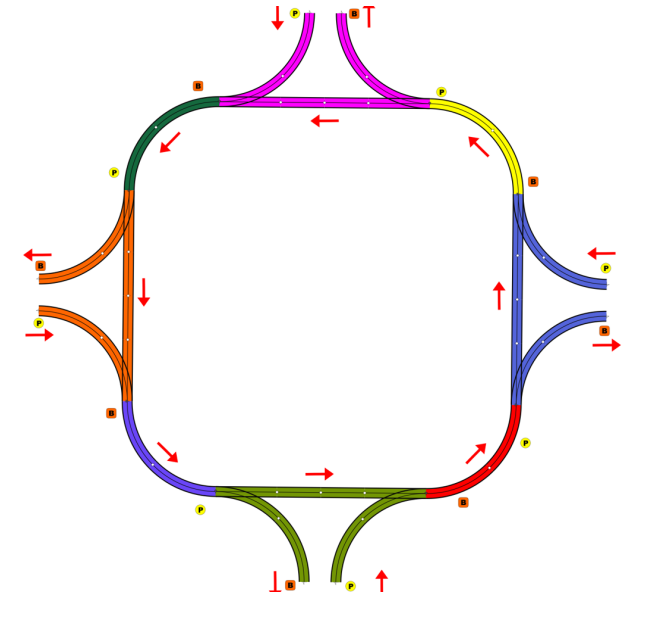
A Roundabout:
While this diagram is Square in order to showcase the various parts, in Satisfactory the rails can maintain a full circle.
Roundabouts are not very Path friendly. If you try to make a very compact and small round about it’s best to ignore Path signals and just let only one train use it at a time. If you really want it to function like a true roundabout, you need to expand the portions between the Entry/Exit sections so they are a few foundations longer than your longest train, then make them their own segments.
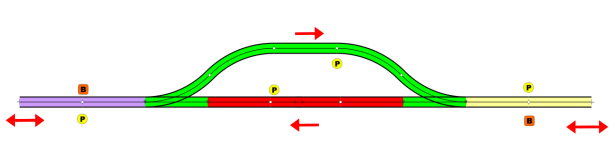
In-Line Station:
In order to prevent trains stopped at a station from stopping trains that have no business at that station, its best to take them off the main track. A design like this allows you to have the trains arrive at this station from any direction. You can extend this with multiple stations, and each one on its own segment. Remember: Path Signals cannot be directly before a Station, but they can be after it.
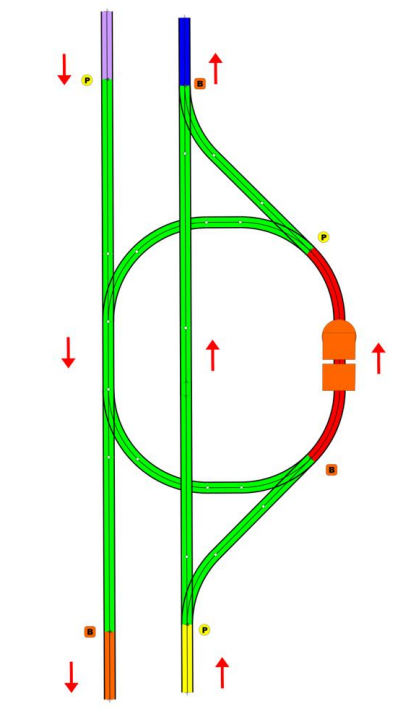
An End-Point Station with Turn Around:
Like the above diagram, this one is useful for a station at the end of a line. Especially if you have other stations close by this can help make sure trains do not get blocked and waiting for the station to be free so they can pass through it, or worse pathing a completely different direction because of the station path tax.
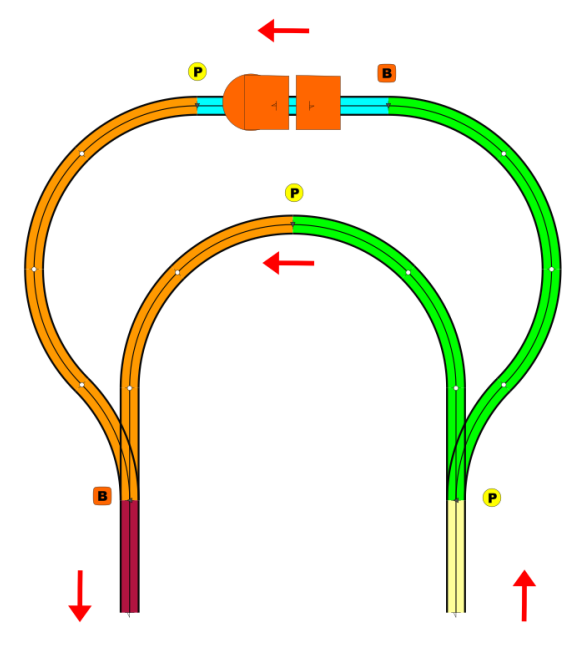
A Pass Around
It is possible to use a structure like this with a single line of track to have more than one train on a two-way rail. However, it is not perfect - the train going in the return direction will always take the passaround, no matter what because it is a one-way track. The more trains added, the more of these will need to be built - compared to one-way tracks in parallel, which will automatically balance the trains out and space them according to the signals. None the less, this is here for consumption.