C++ Setup
In order to get started with C++ modding, you should first begin by performing the setup the project for a Blueprint-based modding project, as shown in the Getting Started guide. This guide assumes that you have already installed all required dependecies and followed the setup process described there.
Basics
To build C++ code, Unreal uses its own written build pipeline called the "Unreal Build Tool" (aka. UBT).
The UBT then does the job of copying files, running the "Unreal Header Tool" (UHT), and building for the desired platform automatically.
The UHT is a tool which analyzes the source code you have written and replaces specific macros, like the UFUNCTION-Macro, with automatically generated code.
It also generates separate files containing even more additional automatically generated code for you.
The UBT will run in the "Development Editor"-Configuration automatically
when you open the .uproject file or when you run a build in the Visual Studio solution file.
UBT uses multiple files placed into your source code for configuration of the source component you make. An overview of these files is provided below.
Targets
Targets are UBTs "programs" that you write.
Most of the time, like in our modding case, there are two targets.
One target is for compiling our modules compatible with the Unreal Editor,
and the second target is for compiling our modules compatible with the final game.
You can find the configuration files for them in the /Source folder of your project.
The target configurations follow the <ModuleName>.Target.cs naming pattern for the "shipping" configuration
and the <ModuleName>Editor.Target.cs naming pattern for the "development editor" configuration.
Modules
Modules are UBTs components of programs. Each target depends on at least one module.
A module can be a library, Unreal Engine itself, plugins, the headers of Satisfactory, or your mod code.
Most modules are located within their own folders in the /Source folder of the project.
The Satisfactory headers used to reference functions and data structures
are contained in the "FactoryGame" module located under /Source/FactoryGame.
Each module folder then has again a configuration file in its root folder.
For the "FactoryGame" module, this will be the file /Source/FactoryGame/FactoryGame.build.cs.
In those configuration files you also define dependencies of the module like the unreal engine itself,
SF or third party libraries you might want to include.
Creating the Mod-Module
To start off, navigate to the base folder of your mod, the location of your FactoryGame.uproject and FactoryGame.sln files.
Next, open up the Source folder and create a new sub folder, the name of which will be your mod reference.
As a reminder, the concept of a mod reference is explained here.
Within this folder, you should create a new file called <your mod reference>.Build.cs.
You can do this by creating a new text file and then changing the extension to a .cs file, for example. If you chose to create the file in this manner, we suggest you turn on showing file name extensions to assist with this.
Within this new file you will need to add the following configuration text.
Make sure to replace all instances of <mod_reference> with your actual mod reference. Don’t keep the `<>`s.
using UnrealBuildTool;
using System.IO;
using System;

public class <mod_reference> : ModuleRules
{
    public <mod reference>(ReadOnlyTargetRules Target) : base(Target)
    {
        PCHUsage = PCHUsageMode.UseExplicitOrSharedPCHs;

		PublicDependencyModuleNames.AddRange(new string[] {
            "Core", "CoreUObject",
            "Engine",
            "InputCore",
            "OnlineSubsystem", "OnlineSubsystemUtils", "OnlineSubsystemNULL",
            "SignificanceManager",
            "PhysX", "APEX", "PhysXVehicles", "ApexDestruction",
            "AkAudio",
            "ReplicationGraph",
            "UMG",
            "AIModule",
            "NavigationSystem",
            "AssetRegistry",
            "GameplayTasks",
            "AnimGraphRuntime",
            "Slate", "SlateCore",
            "Json"
            });


        if (Target.Type == TargetRules.TargetType.Editor) {
			PublicDependencyModuleNames.AddRange(new string[] {"OnlineBlueprintSupport", "AnimGraph"});
		}
        PublicDependencyModuleNames.AddRange(new string[] {"FactoryGame", "SML"});
    }
}|
Note that the file we just created is a C# file (.cs) and not a C++ file (.cpp). |
This configuration will add the basic Unreal Engine framework, Satisfactory and the Mod Loader as dependencies to your module, in addition to setting up some other useful stuff for you.
You can come back to this configuration file later and change things here if needed.
It’s now time to get started adding the module source code.
Do this by creating a file called <your mod reference>Module.h and fill it with this template.
Replace <mod reference> with your actual mod reference.
Remember to replace all instances of <mod_reference> with your actual mod reference. Don’t keep the `<>`s.
#pragma once

#include "Modules/ModuleManager.h"

class F<mod_reference>Module : public FDefaultGameModuleImpl {
public:
	virtual void StartupModule() override;

	virtual bool IsGameModule() const override { return true; }
};
Next up we need another new file called <mod_reference>Module.cpp. Go ahead and fill it with the following template code.
Again, replace <mod_reference> with your actual mod reference.
#include "<mod_reference>Module.h"

void F<mod reference>Module::StartupModule() {

}

IMPLEMENT_GAME_MODULE(F<mod_reference>Module, <mod_reference>);
Adding the Module to the Targets
Now that you have created your module, you will need to add it to the list of default targets so it actually gets built when you run the UBT.
In order to do that, you will need to open the target configurations within the files /Source/FactoryGame.Target.cs
and /Source/FactoryGameEditor.Target.cs and make the following changes.
In both of these files, search for
ExtraModuleNames.AddRange( new string[] { "FactoryGame", "SML", "ExampleMod" } );(around line 15 in FactoryGame and 11 in FactoryGameEditor) and add a string with your mod reference to the array literal like this:
ExtraModuleNames.AddRange( new string[] { "FactoryGame", "SML", "ExampleMod", "mod_reference" } );(the mod reference used was mod_reference, make sure you use your own mod reference instead)
Adding the Module to the UProject
Next we need to tell the Unreal Editor to use our editor module.
For this open up the FactoryGame.uproject file in your project root.
In the Modules array, add your module with your mod_reference as name, Runtime as Type and Default as LoadingPhase.
Like this:
"Modules": [
	{
	...
	},
	{
		"Name": "<mod_reference>",
		"Type": "Runtime",
		"LoadingPhase": "Default"
	}
]
(the name used was <mod_reference>, make sure you use your own mod reference instead)
Finishing Up
Now that you have added your module folder, configuration, source, and added it to the targets, you will need to regenerate your Visual Studio project files. Directions on how to do this can be found here.
After this process completes, you should be able to start working on the C++ code for your mod.
|
Make always sure you code in a custom created module! Don’t write your code in the FactoryGame or SML modules by accident. |
Adding a Class
When you want to add a new class, there are two generally safe ways to go about it.
-
Navigate to the folder in which you want to add your class in Windows Explorer and create the
.cpp-File and the.h-File manually. You can now open them in Visual Studio or a text editor of your choice. Fill them with a template code or just directly the class you need. -
Open the Unreal editor and open the "tree view" of the content browser. Then navigate to the
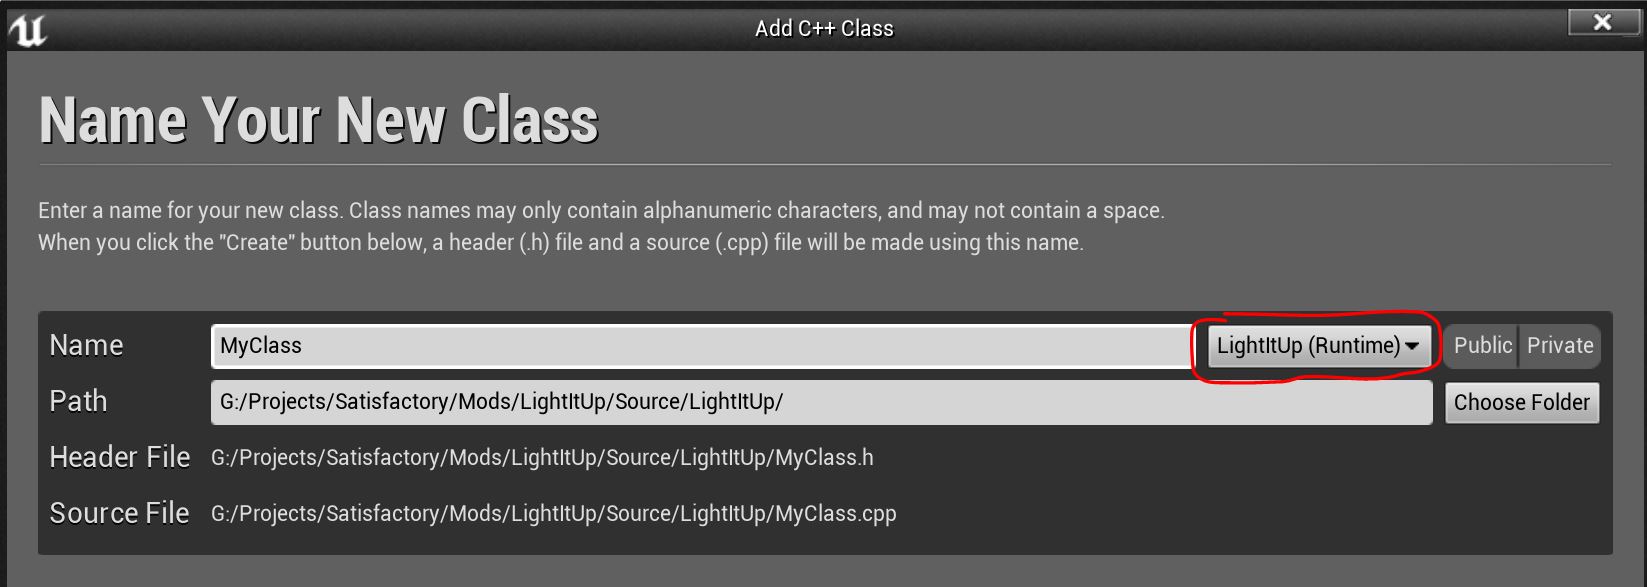
C++-Classesroot folder and open the folder named with your mod reference. Within that folder, right-click into empty space and selectNew C++-Class. Then select your desired base class, hit next, and name your class. Change the other settings as your desire and finish withcreate class.
|
Make sure you select your custom C++-module when using the Unreal editor method of creating a new class file. In this screenshot, the mod reference is 'LightItUp'.
|