Audio
|
This page is a work in progress. |
Adding sound effects and music via mods can really help bring them to life. Coffee Stain uses the Wwise audio system to play sounds in Satisfactory. Depending on what your mod is trying to do, you may want to use the built in Unreal system or the Wwise system.
Audio for ADA Messages
See the dedicated page on ADA Messages for more information.
Unreal Audio System
If you’re playing sound for the purpose of user interfaces (UI) or client-side only effects, it may be easier to use Unreal’s built in sound system at the cost of losing integration with some of the game’s systems (ex. ADA) and the advanced features of Wwise.
The "Play Sound 2D" and "Play Sound at Location" blueprint nodes are useful for this purpose.
Wwise
Interfacing with the Wwise sound system will require setting up and integrating a Wwise project and integrating it with the modding project.
Note that using large numbers of Wwise sounds may require getting a Wwise indie license for your project.
Opening the Wwise Editor
Creating and editing Wwise assets requires using the Wwise Editor application.
The quickest way to do this is to open the Wwise Project File located at
SatisfactoryModLoader_WwiseProject/SatisfactoryModLoader_WwiseProject.wproj
in your project folder.
The path and name will be slightly different if your Unreal project directory is named differently.
You can also open it from the Wwise Launcher application’s "Unreal Engine" tab using the wwise-logo-circle "Open in Wwise" button (next to the triangle button).
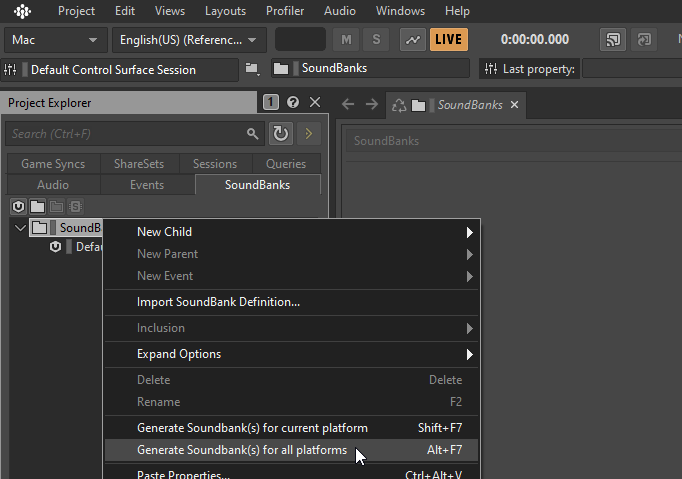
Generating Sound Banks
Generating sound banks triggers Wwise to create files that the Unreal Editor can use. You’ll need to do this once when setting up the modding project to set up the Wwise database and again any time you create new Audiokinetic soundbanks.
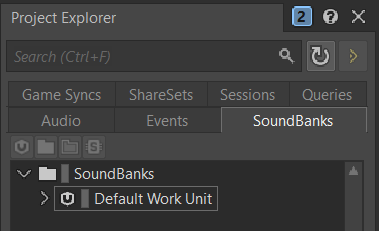
In the Wwise Editor’s Project Explorer, on the SoundBanks tab,
right-click on the Default Work Unit and click Generate Soundbank(s) for all platforms.
Setting Up Audio Buses
By default when using Wwise audio only the Master volume slider will work.
You will need to manually create the different Audio Buses that link to the other sliders.
TODO: Mods can’t reuse vanilla Wwise bus assets. Must create their own Audio Buses and actively copy values from the vanilla buses' settings values to their own. Need to write more detailed directions for doing this.
Setting Up Attenuation
If you plan to use Wwise audio for buildings or equipment, you must set up attenuation. By default, the audio will play at full volume even if you are on the other side of the map from its origin. Attenuation causes the sound to become quieter at a distance or not play at all.
|
Attenuation is not required if you plan to use Audio for UI or ADA messages, and this step can be skipped. |
On Wwise’s Project Explorer, go to the ShareSets tab. Share Sets are useful for providing the same configuration to multiple Wwise objects.
You will see the section Attenuations → Default Work Unit

Create a new Attenuation object by right-clicking the Default Work Unit then New Child → Attenuation

You can name this whatever you want; just be mindful that you can’t use the same name twice.
Open the new Attenuation ShareSet by double clicking the new attenuation shareset.
In the main section, you will be presented with the following:
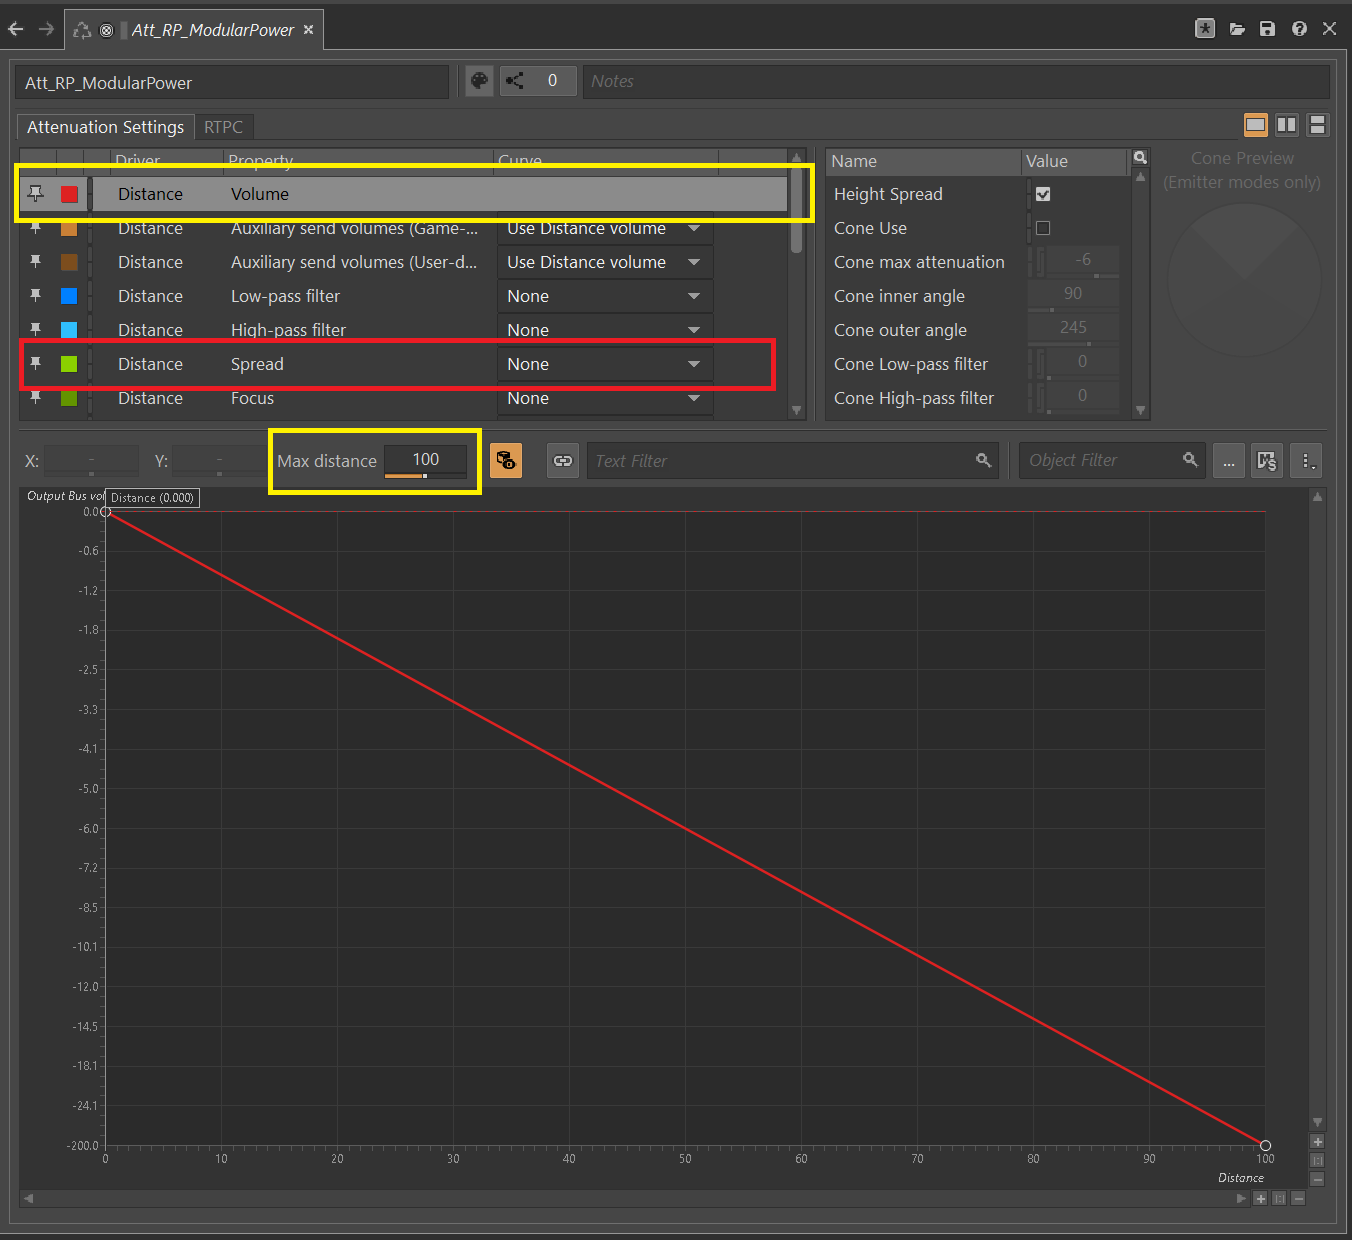
Distance
Click on the First setting, Volume (by default, will automatically be selected). This is marked in Yellow on the screenshot.
You will then need to set the Max Distance setting.
|
This number is in Unreal Units (uu); the conversion is 100uu = 1 meter. |
The Max Distance will be the distance away from the building that the player can still hear the sound.
Based on the vanilla buildings, smaller buildings have a maximum distance of 4,000 to 6,000, and larger vanilla buildings are around 6,000 to 10,000.
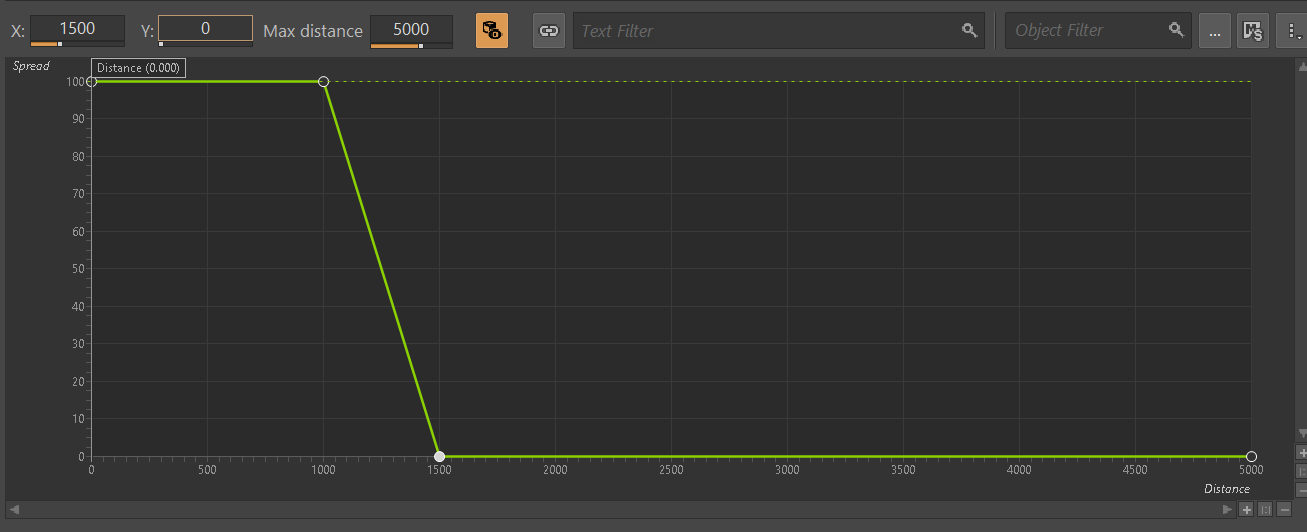
Spread
By default, the spread will be set to 0. This means that the sound comes from a specific point when rotating the player.
This can become very confusing to players when they are standing right next to the building.
On the screenshot above, change the dropdown marked in Red to Custom. This will then show the spread graph in the bottom section.
You can add a new point to the graph by double-clicking the line. Then, set the X value to roughly the size of your building and the Y value to 100.
Add another point to the graph slightly further on, set the X value to the size of the building plus a bit more, and set the Y value to 0.
Importing Media Files to Wwise
First, activate the Designer layout via the top menu: Layout → Designer
On the left-hand side, you will see the project explorer; select the Audio Tab.
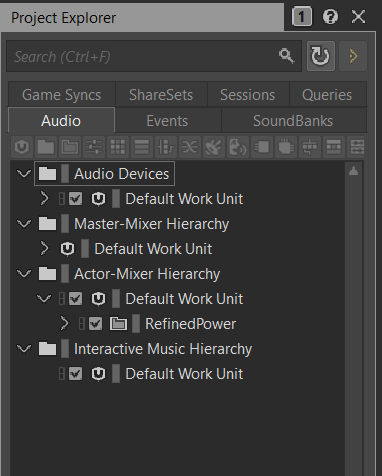
Under Actor-Mixer Hierarchy, there will be Default Work Unit
To keep everything organized, create a new Virtual Folder to house your Wwise files and name it the same as your mod reference.

Now, to import audio files!
Drag your .wav files into this newly created Virtual Folder. The Audio File Importer window will show.
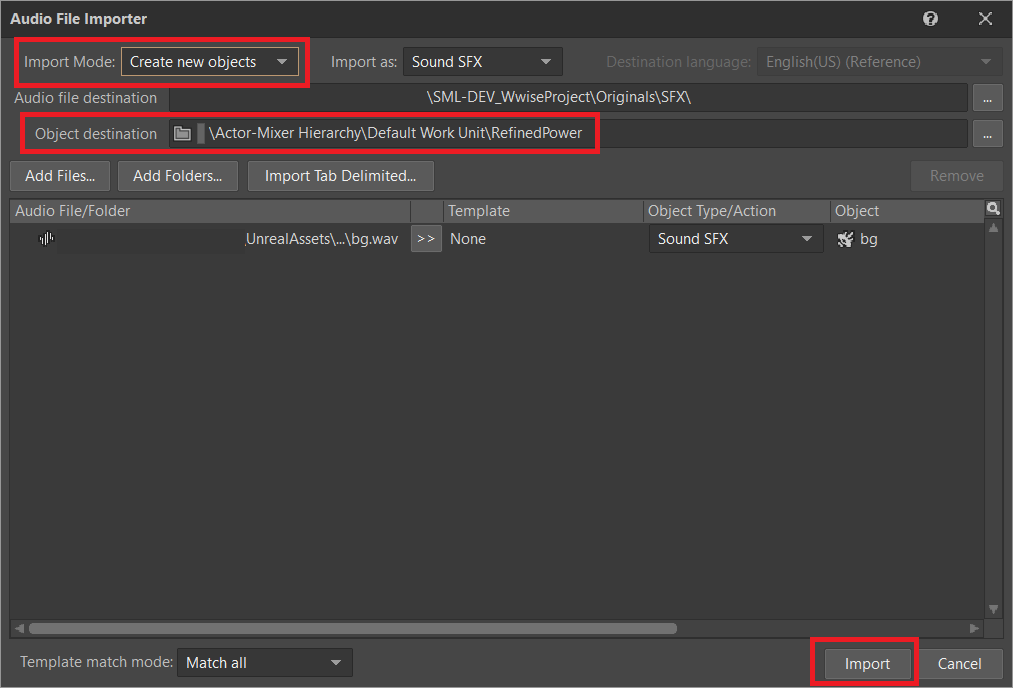
Ensure that you have Create New Objects selected under import mode. Verify it is going to the correct folder and then click Import
Your audio files are now imported to Wwise and ready to be referenced by Unreal systems.
Adding Attenuation To Audio
If you plan on using attenuation on audio, you must first follow the attenuation section of the documentation. Setting Up Attenuation.
To set up attenuation on the audio, double-click the audio file in the Wwise Project Explorer Audio tab.
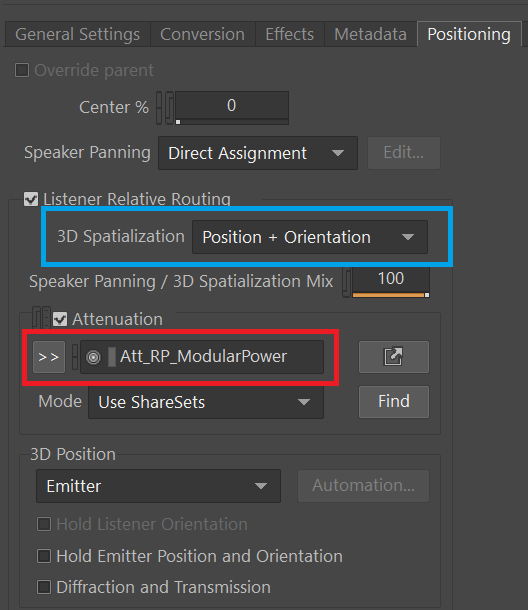
Then, once the audio opens in the main section, go to the Positioning tab.
Change the 3D Spatialization setting to Position + Orientation (Marked in blue in the screenshot).
Click the >> button, then select the Attenuation ShareSet from the list (Marked in red in the screenshot).
Creating Audiokinetic Events
Audiokinetic Events (typically shortened to AKEvents) allow your mod code to tell the Wwise sound system to do something.
Example AKEvent types include Play, Pause, and Stop.
Each sound you want to use typically needs multiple events associated with it.
To play the audio in your mod, you will need to create an event in Wwise. First, make sure that you have followed the above steps to import your .wav files to Wwise.
In Wwise’s Project Explorer, go to the Audio tab and locate the audio for which you want to create an event.
Right-click the audio and select New Event → Play. This will create a new Play event.

Verify the event was created successfully by going to the Project Explorer’s Events tab.
You should see the event Play_<AudioName>.
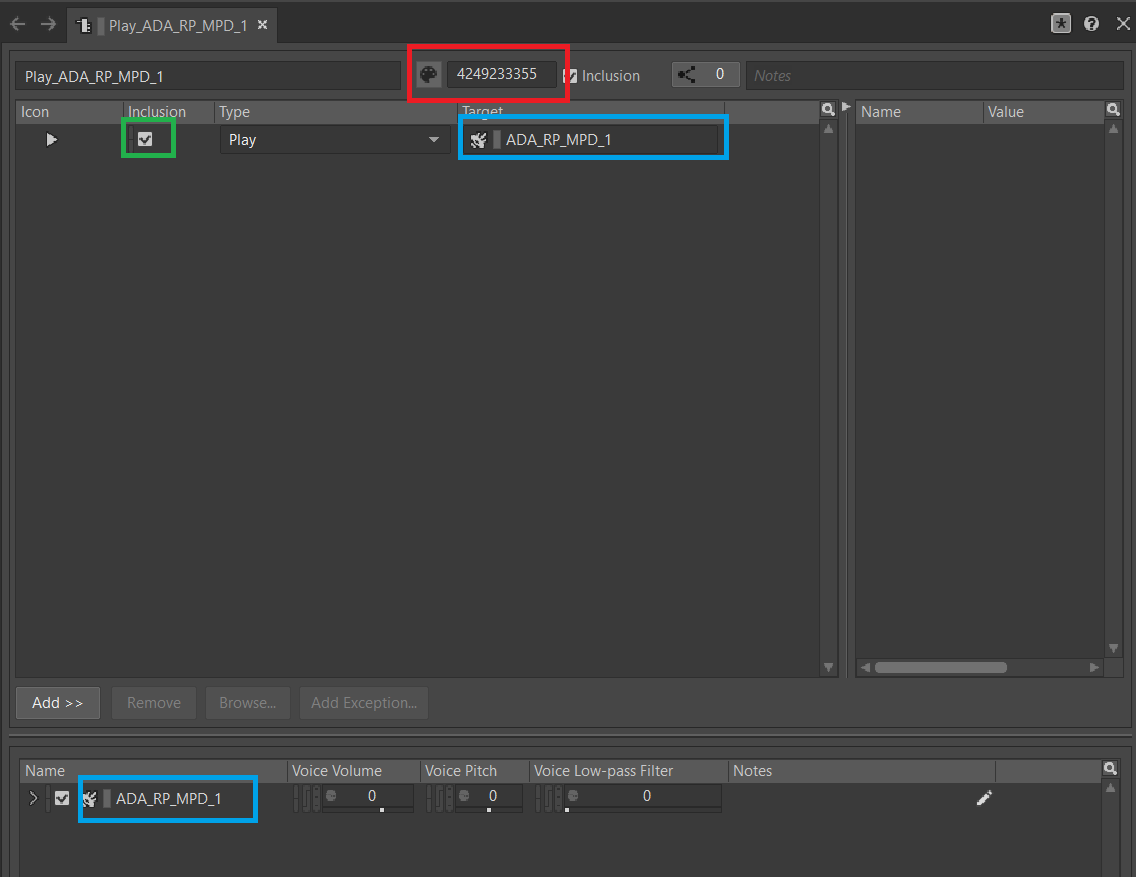
Double-clicking the event will show the Event’s details in the main center section.
There are a few things to take note of and verify:
-
Take a note of the Event ID. You will need to compare it with values in the Unreal Editor later. (Red in the screenshot)
-
Make sure that
Inclusionis checked (Green in the screenshot) -
Verify that the target is for the correct audio (Blue in the screenshot)
Repeat the process for all other audio you want to play in your mod.
|
Consider creating one or more Virtual Folders within your mod’s folder to store your AKEvents for ease of organization. |
Creating Audiokinetic Soundbanks
You will need to create a new Soundbank for all your Events to be stored.
In Wwise, change the layout to Soundbanks. This can be found at the top under Layouts → Soundbanks.
Select the SoundBanks tab in the Project Explorer on the left.
By default, you will have the following tree structure:
Create a new Soundbank by Right-clicking the Default Work Unit then New Child → Soundbank

Name the Soundbank YourModReference_Soundbank.
Soundbank names do not need to be in this format, but including the mod reference helps with organization.
Double-click the newly created Soundbank, which will open in a new window.
In the main Wwise window, navigate to the Events tab in the Project Explorer.
With the Soundbank window still open, drag the Default Work Unit to the Soundbank window. If you created a specific Virtual Folder for your event, drag that folder instead.
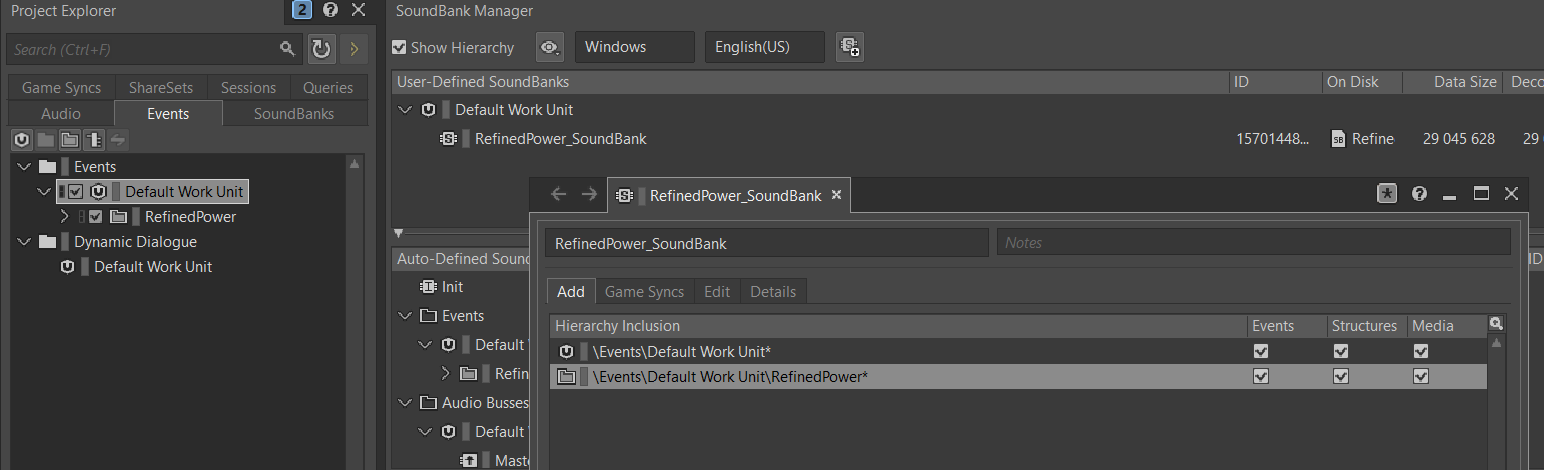
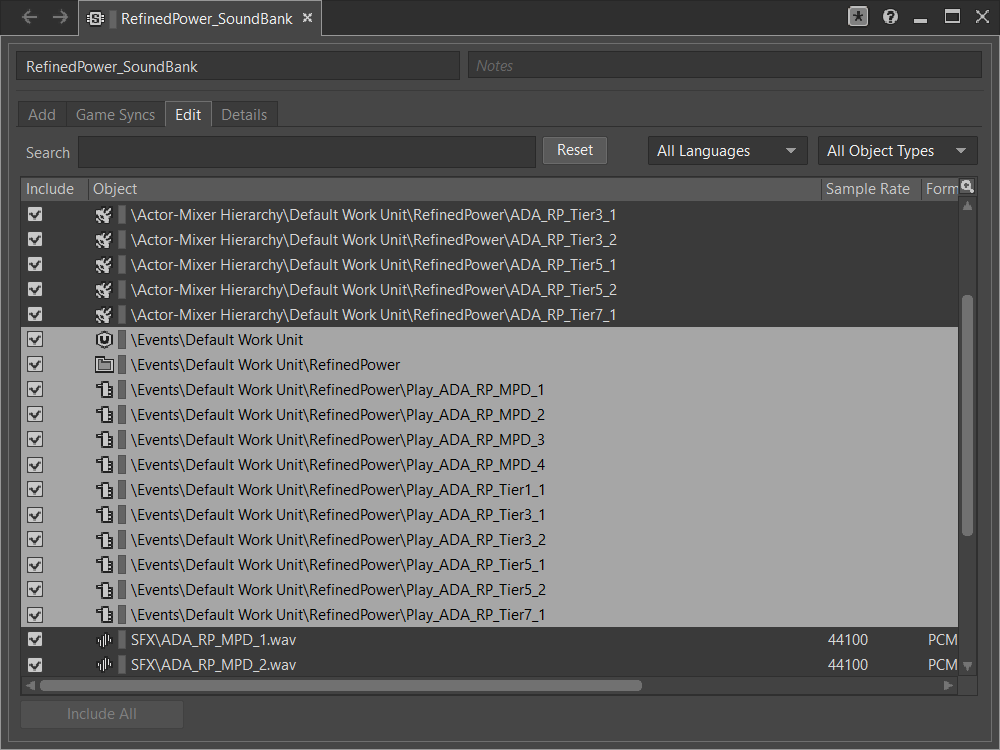
Go to the Edit tab to verify that all the events are included in the Soundbank.
Now, it’s finally time to generate the Soundbank for Unreal Engine. Do so by following the steps in the respective section.
Unreal Project Configuration
Open
the Unreal Engine project settings (Edit > Project Settings…)
and navigate to the "Wwise" category’s page Integration Settings.
In the "Installation" subsection,
change the Root Output Path setting to <WwiseProjectPath>/GeneratedSoundBanks.
Note that it may be pre-filled with an incorrect Wwise project path,
so use the directory picker to ensure you’ve selected your actual Wwise project.
Next, head to the "Initialization" subsection
and change the Unreal Audio Routing setting to Both Wwise and Unreal audio.
You may need to restart the Unreal Editor after making these changes.
Creating AKEvents In Unreal Engine
Now that you’ve defined your audio, events, and soundbanks in Wwise, it’s time to utilize them in the Unreal Engine. The first step in doing this is to create Unreal assets that reference your Wwise assets. Although it is possible to use the Wwise Browser to create these, this is not recommended, as it places them in the wrong project folders. As such, follow the steps below to create them via the Unreal Editor.
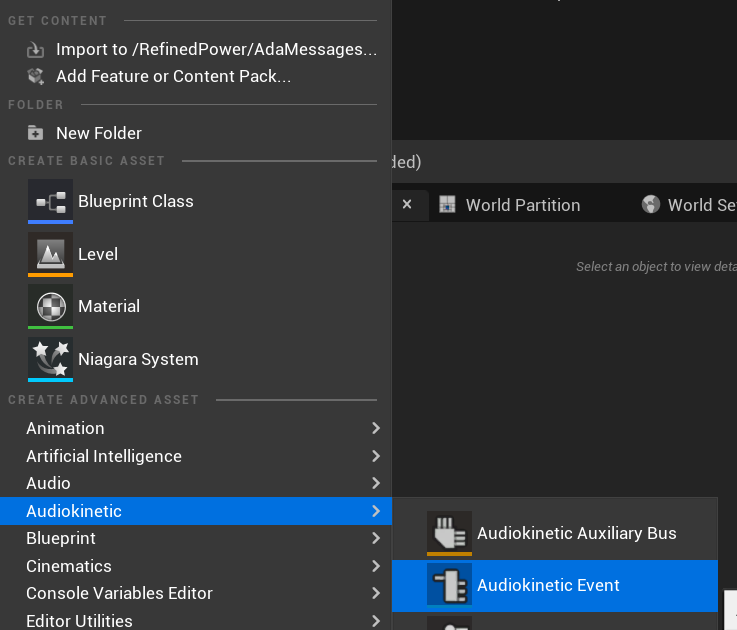
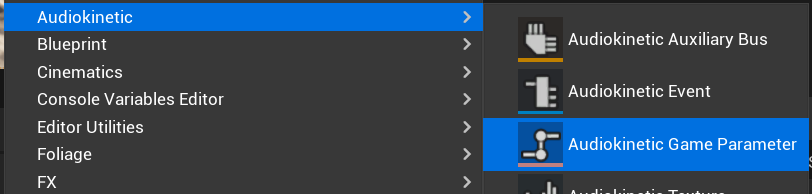
Create a new Audiokinetic Event by right-clicking on an empty area in the Content Browser.
Go To Audiokinetic → Audiokinetic Event
Name the new asset exactly the same name as the event you created earlier in Wwise. This enables Unreal to automatically populate the correct event information in the asset’s fields.
Open the asset and verify that its settings match those configured in Wwise:
-
Verify that the
Wwise Short IDmatches the event ID in Wwise. -
Verify the
Wwise Namematches the event name.
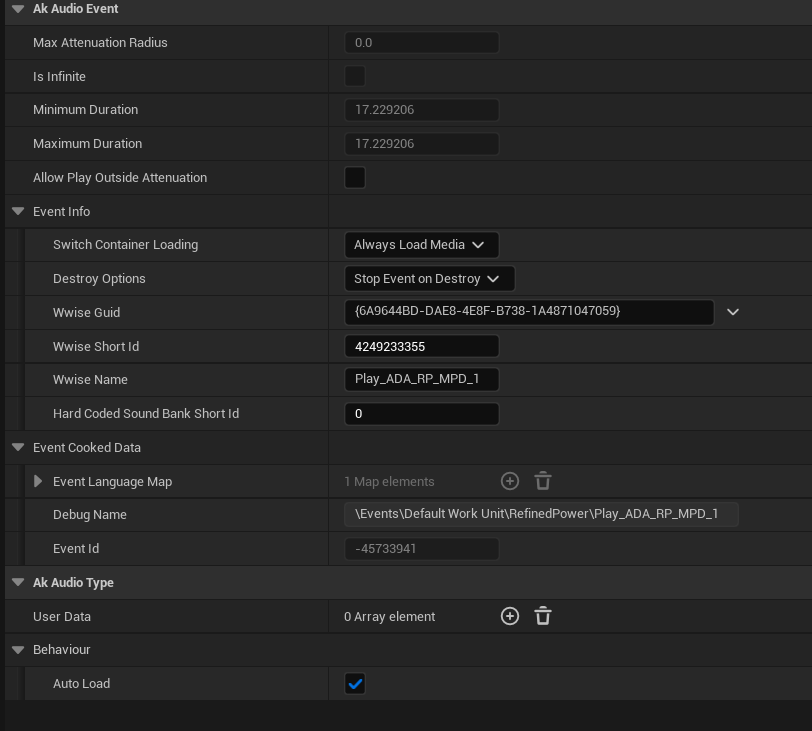
If everything has worked correctly, you can now test the event by right-clicking the event in Unreal and clicking Play Event.
This will trigger the event in the editor, for example, playing the sound if the event is a Play-type event.
Triggering AKEvents in Code
Triggering AKEvents is typically done in Blueprint code.
Although it is possible to trigger them from C++, this is not recommended, as it would require passing lots of asset references to the C++ side. If you want to trigger events from C++, define a BlueprintImplementableEvent UFUNCTION for your C++ code to call, allowing you to define the implementation in Blueprint.
Fire & Forget Events
If you would like to play a one-off AK event, such as a spark sound, you will need to use the following method in your blueprint.
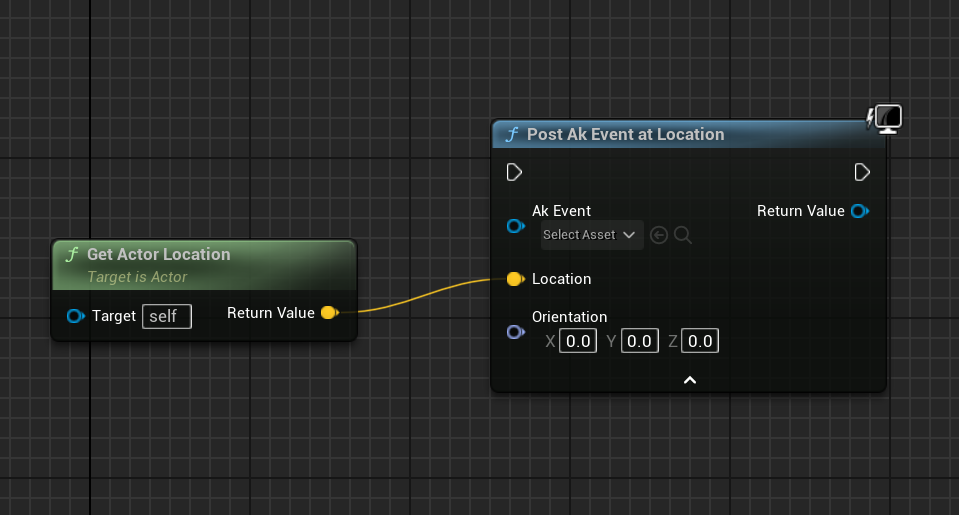
This will create a new temporary AK Component and then play the AK Event specified.
Once the AK event has ended, the temporary AK Component will be automatically cleaned up.
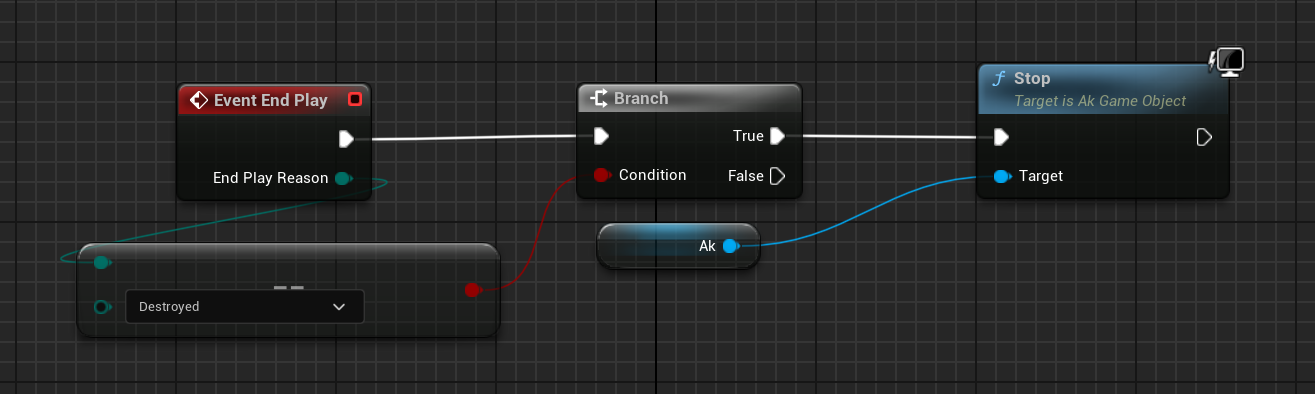
Looping Events
If you would like to play a sound effect that might loop, for example, a humming/buzzing sound for a building, you should use the same AK Component for ease of reference and to avoid the creation/destruction overhead. Add an AK Component to your actor blueprint and set the AK Audio Event variable on the component.
Make sure to stop the audio when the actor is destroyed, otherwise it will continue to play with no way to stop it.
Updating Wwise Values From Your Mod
Wwise uses a feature called Real-Time Parameter Control (RTPC) that allows game engines like Unreal or Unity to change values on Wwise assets in real-time. This enables special behaviors like a manufacturing building’s sound volume to fluctuate based on recipe progress.
After setting up RTPC in Wwise and Unreal, blueprint code can update audio parameter values.
To set these up, in your Wwise project, go to Project Explorer and the Game Syncs tab.
Under Game Parameters → Default Work Unit create a new game parameter by right-clicking the Default Work Unit and then New Child → Game Parameter

Name this whatever you want.
Open the newly created Game Parameter, and you should see the following in the main section:
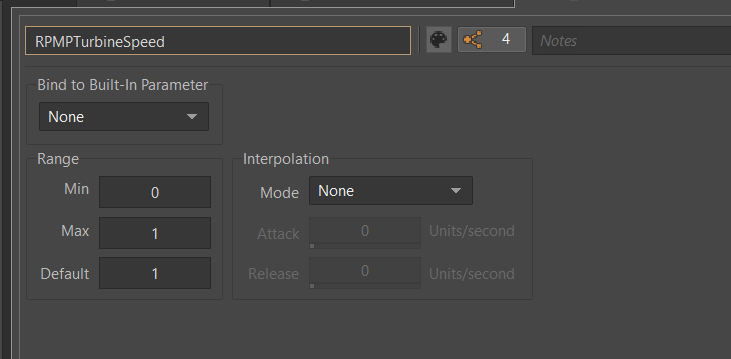
The parameter must have a range defined.
A useful range is 0.0 to 1.0 since many existing game and engine systems already use that range as a start-finish, minimum-maximum, or off-on scale.
Now, assign the RTPC Game Parameter to your audio.
Open your Audio in Wwise and go to the RTPC tab.
Click the >> in the main section to set what you want to update.
This example case shows updating the Voice Volume.
Then click the >> to the right of the first one and select your game parameter.
Once that is done, you should see something similar to the following:

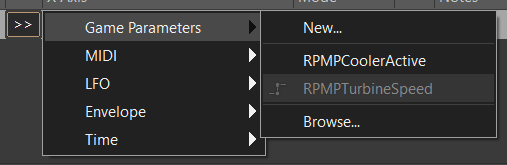
Now, to create the link between Unreal Engine and Wwise you will need to create the Game Parameter in Unreal Engine:
Name it the same as you have in Wwise.
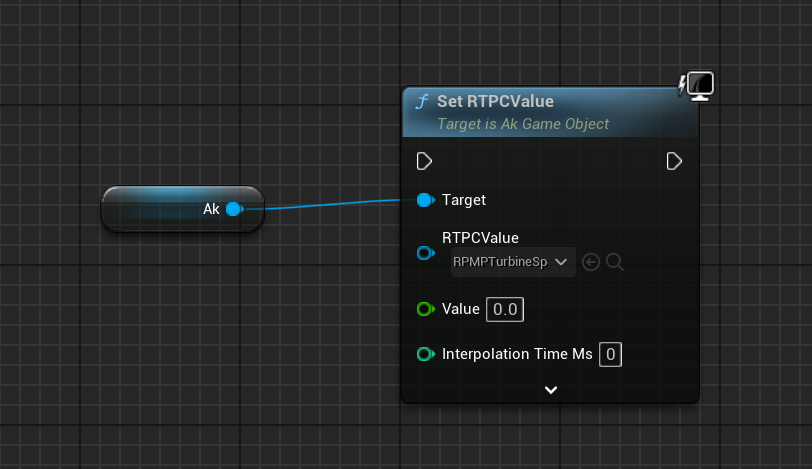
You can now update the RTPC Game Parameter value using blueprints:
Playback Limits
Wwise limits the amount of audio that can be played at once. Trying to play more than this limit will result in lower-priority audio like footsteps, music, or animals to stop playing.
To resolve this, you will need to set playback limits for each of your audio files. This can be done in the audio’s advanced settings tab.
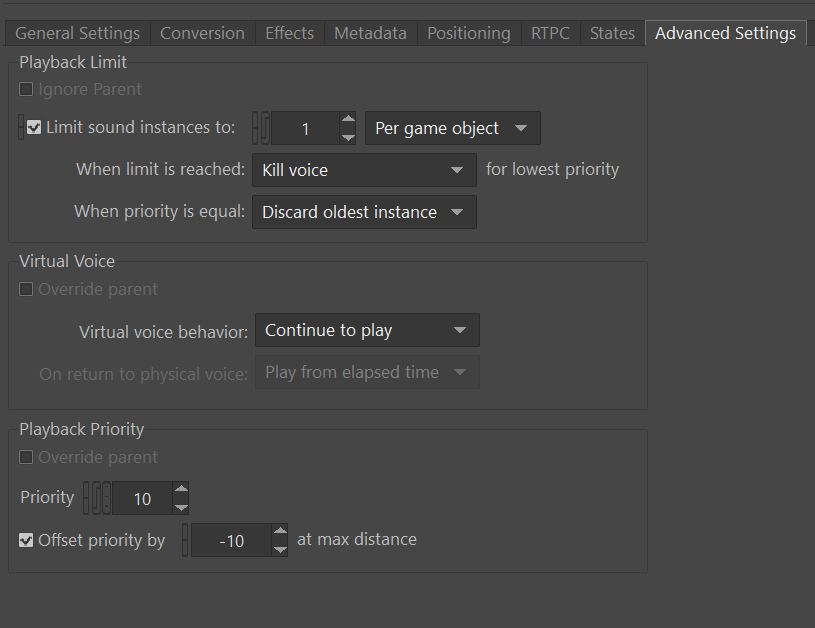
You will need to set the Limit sound instance to amount; this is the number of instances that can play this audio on the AK Component in Unreal.
Also, set the dropdown next to this limit to Per Game Object. In Unreal, this means per AK Component.
Next, you will need to change the When limit is reached to Kill voice and set the drop-down menu under that to Discard oldest instances.
This means that when the limit for this audio is reached, it will kill any oldest instances and discard them.
Finally, you will need to set up playback priority. The playback priority requires that you set up Attenuation.
Set the priority of your audio to something like 10, then set the Offset priority by setting to -10.
This setting will set the audio priority to 10, and then when you are outside the attenuation distance, it will set the priority to 0, allowing for more important audio, like the game sounds, to be played.
Even with Attenuation and playback limits set, the audio will still play and count towards the Wwise Playback Limit.
-
Attenuation will only lower the volume of the audio and not stop the audio.
-
Playback limits only limit the number of audio instances playing on a game object.
So, to prevent audio from playing when you are outside of the attenuation range, you will need to use the Significance Manager.
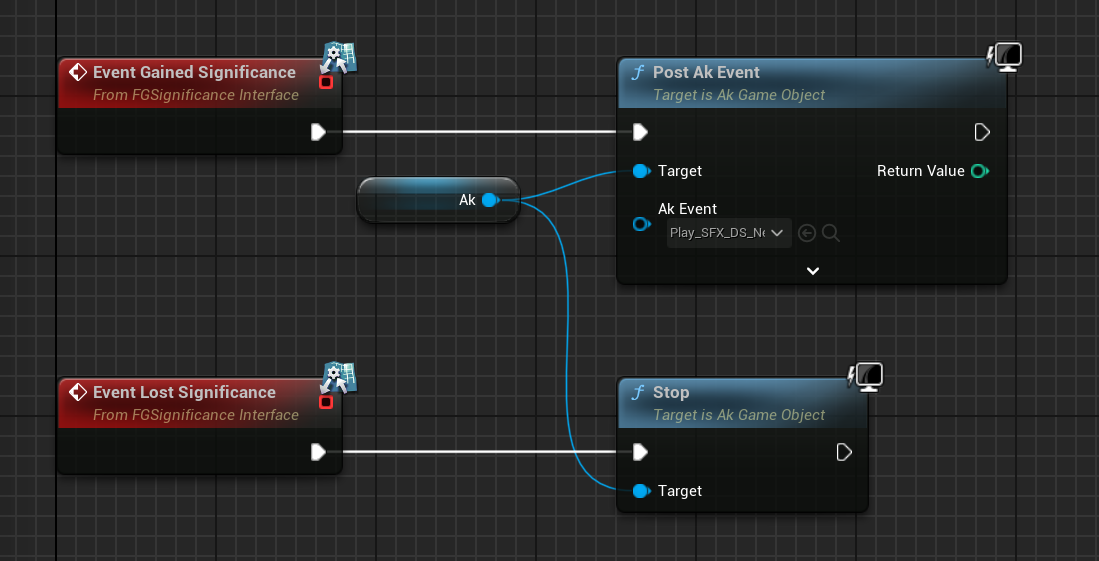
For playing background building sounds, use the Gained Significance and Lost Significance events:
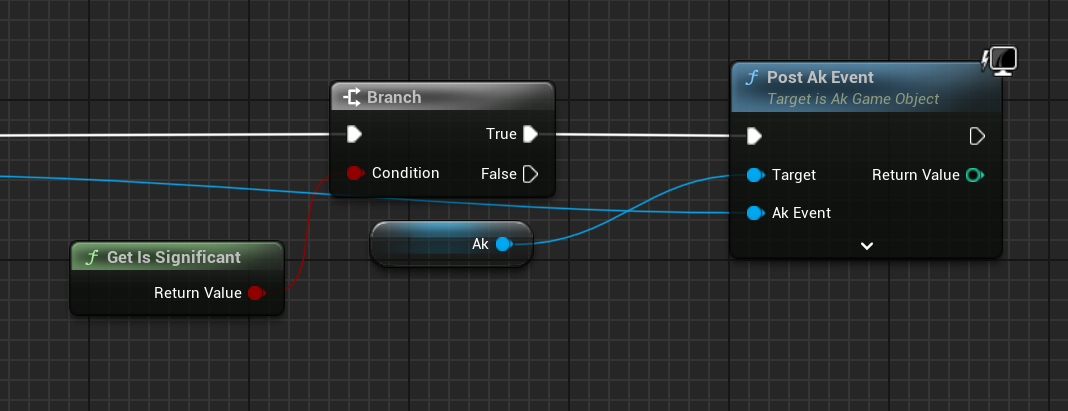
For fire and forget AK events, use the Get Is Significant function before posting the event:
Wwise and Source Control
|
This heading is a work in progress. The SML team plans to ship a Wwise project that includes stubs for base game Wwise events in the future. The suggested approach in this heading may change once that process is complete. |
Wwise project files require extra consideration to store in source control. Distributing the raw audio assets is sometimes prohibited by audio licenses.
One approach is to create a separate (private) repository to store the Wwise project and to enable Git LFS for raw audio files. However, this interferes with the typical one-repo-per-mod structure by tying multiple mod’s files together in one repository.
Wwise offers advice on connecting to source control in their documentation.
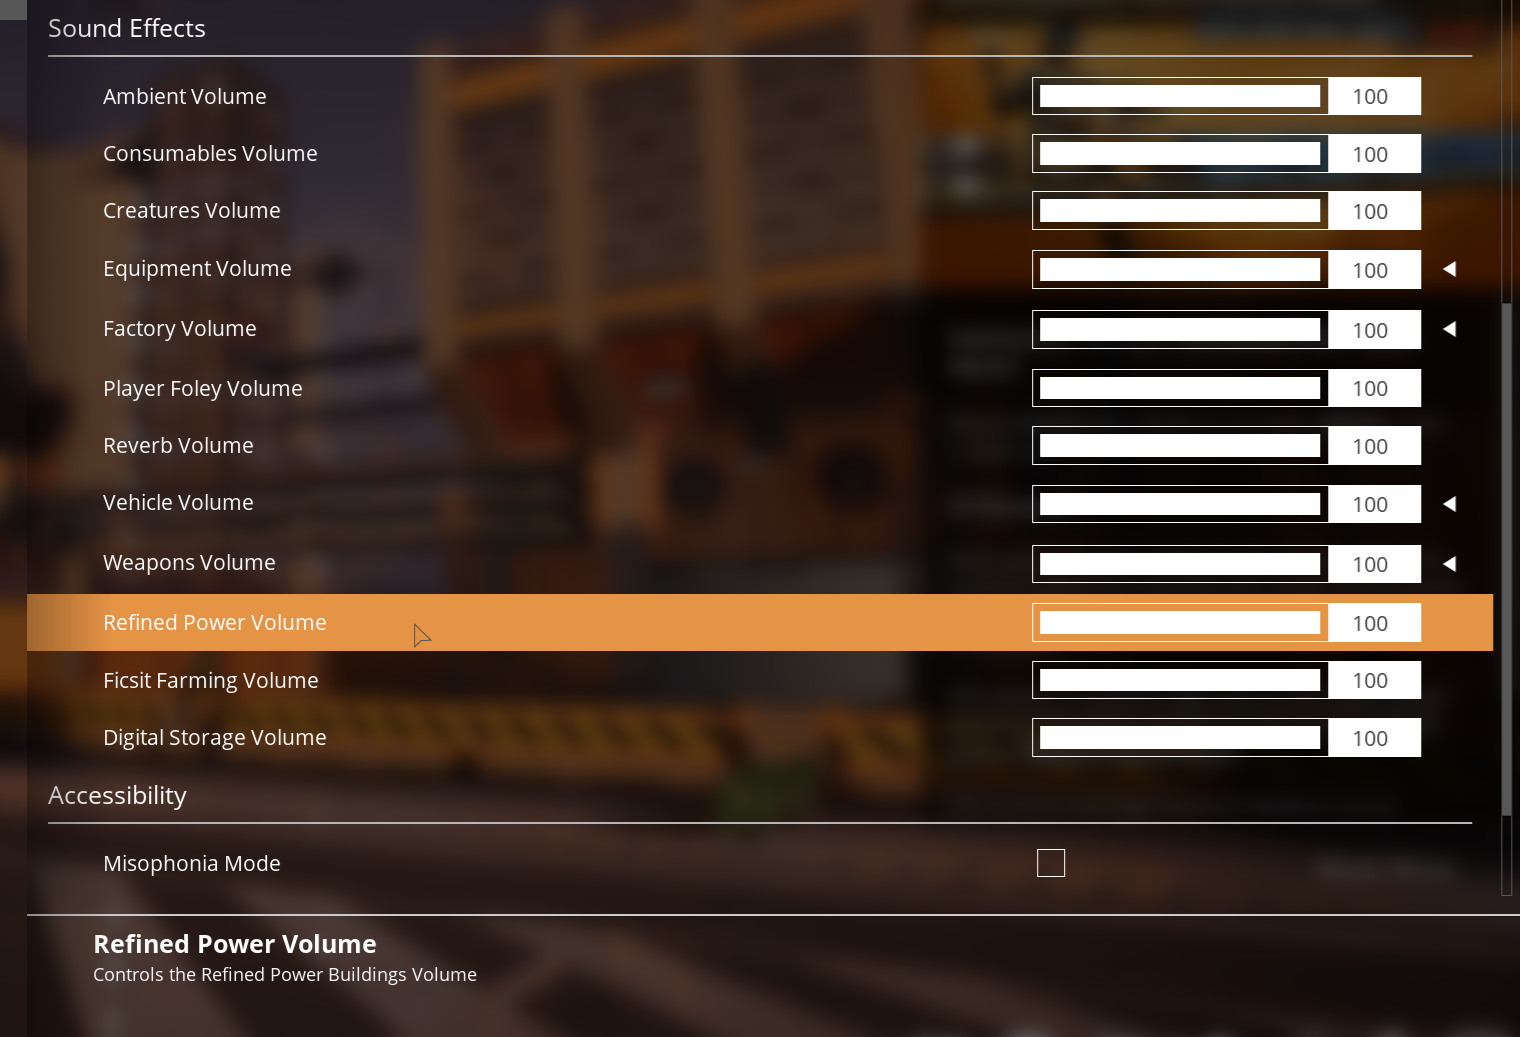
Volume Options
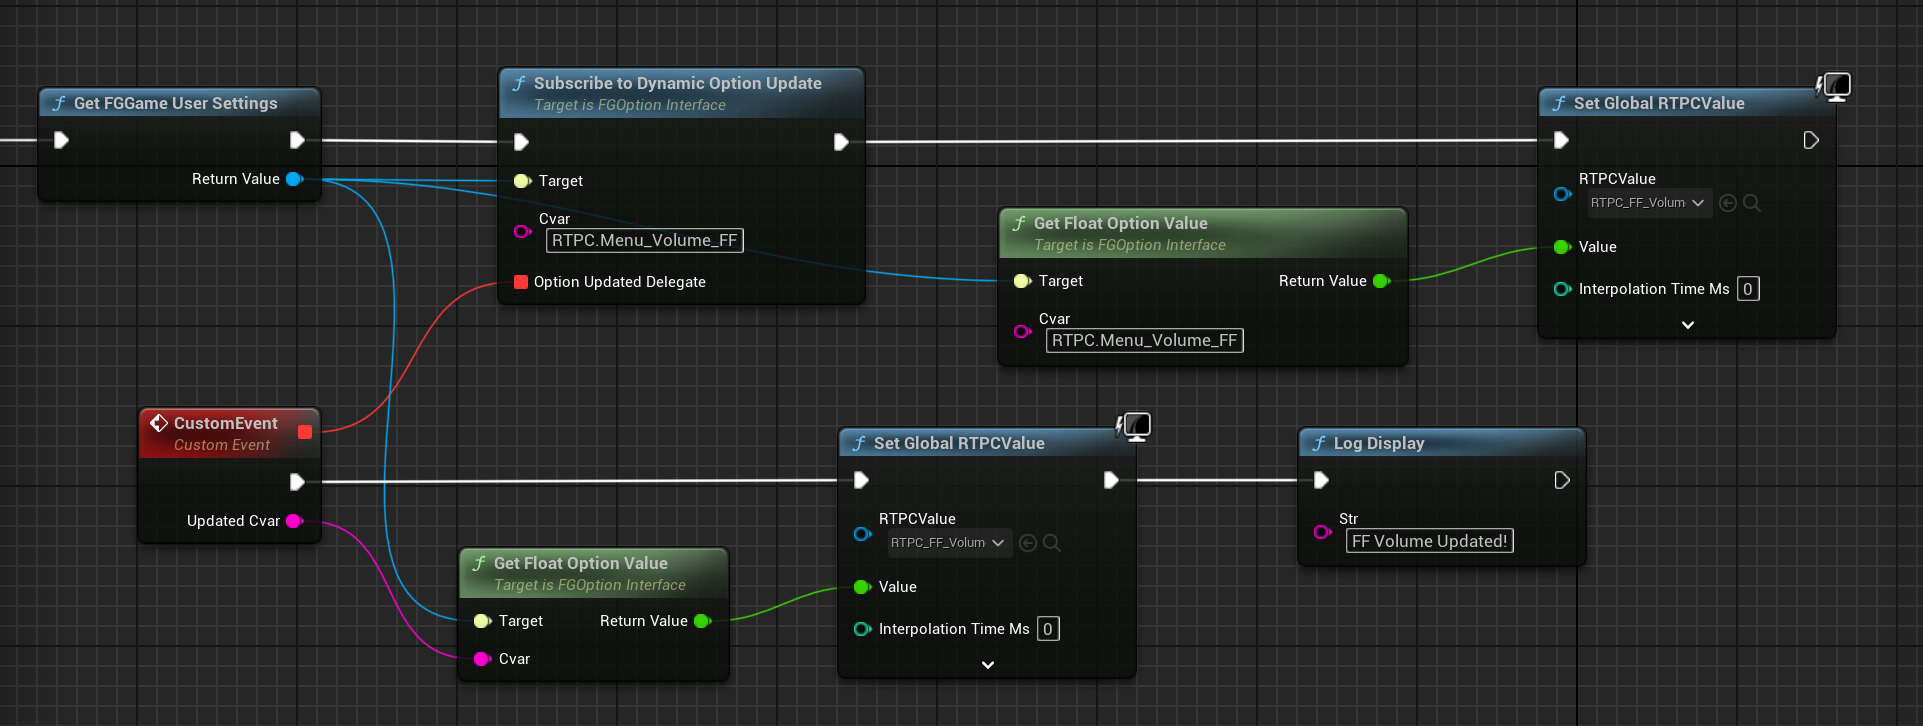
To retrieve the user’s volume options, use "Get FGGame User Settings" and "Get Float Option Value".
To find out what CVARs to use in, adjusting your own user setting for the value then checking your GameUserSettings.ini file to see what they are saved as.
As of the 1.0 release update, these are the CVARs for the main volume categories:
RTPC.Menu_Volume_Master
RTPC.Menu_Volume_Dialogue
RTPC.Menu_Volume_SoundEffects
RTPC.Menu_Volume_UI
RTPC.Music_Bus_Volume
RTPC.Menu_Volume_Ambience
RTPC.Consumables_Bus_Volume
RTPC.Menu_Volume_Creatures
RTPC.Menu_Volume_Equipment
RTPC.Menu_Volume_Factory
RTPC.Menu_Volume_Foley
RTPC.Menu_Volume_Vehicules
RTPC.Menu_Volume_Weapons
These values are on a scale of 0.0 (off) to 1.0 (full volume).
If multiple categories apply, multiply them together to reach the final volume value.
For example, the Chainsaw’s volume is probably Master multiplied with Equipment multiplied with the chainsaw’s specific category.
You may also wish to implement your own volume slider to factor into the mix. The suggested approach is to create a mod float config option combobox ranging from 0.0 to 1.0 and multiplying it with the other relevant volume categories to use as the final volume.
Creating a Modded Wwise Volume Slider
Create the Volume Slider Data Asset
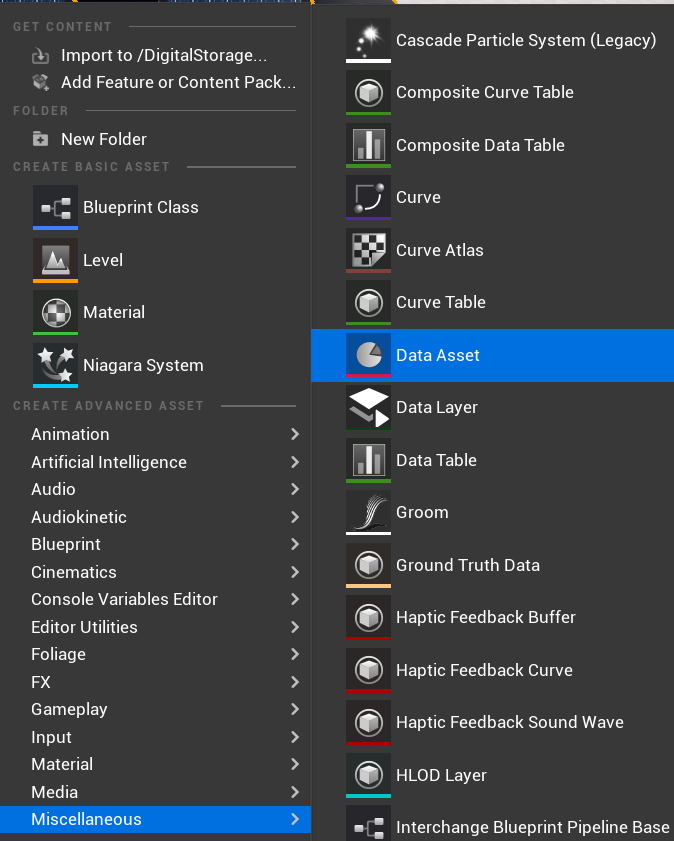
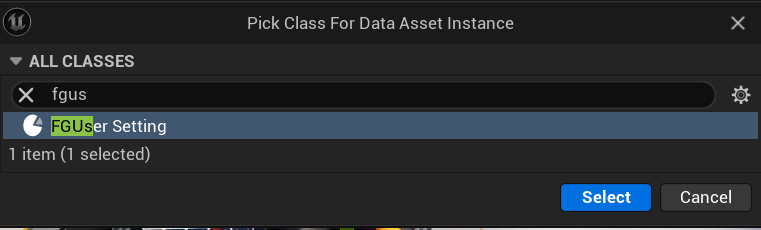
To add a new volume slider to the games user settings you will need to create a new FGUserSetting Data Asset
Once the Data Asset is created you will need to set the settings:
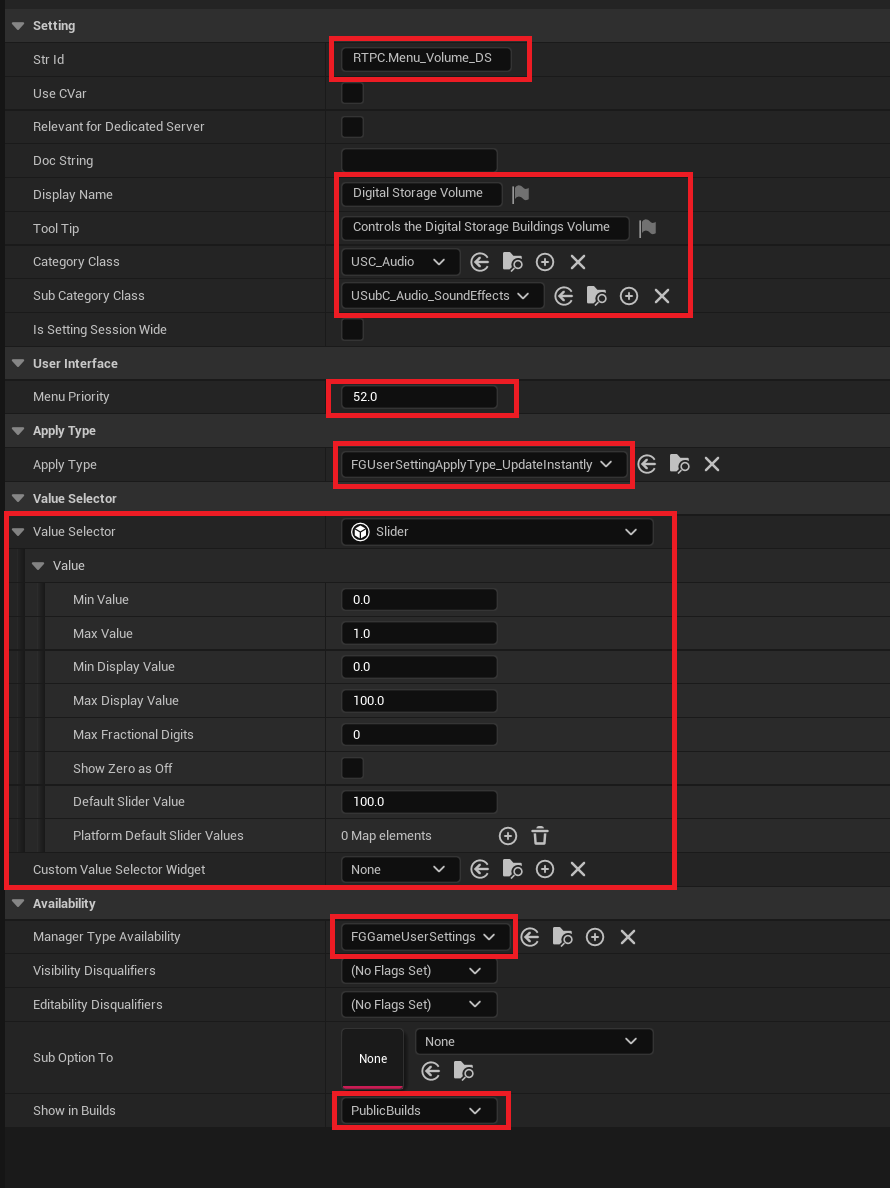
-
Str Id: The user setting id (Recommend using RTPC.Menu_Volume_<ModName>)
-
Display Name: The display name that will appear on the options menu. This should include the friendly name of your mod so users can tell what mod added the setting.
-
Tool Tip: Give a descriptive tool tip for the slider.
-
Category Class: Set this to
USC_Audio -
Sub Category Class: Set this to relevant sub category (Search for
USubC_Audio_) -
Menu Priority: Set this to a high value to not interfere with the game’s options e.g. 50+
-
Apply Type: Set this to
FGUserSettingApplyType_UpdateInstantly -
Value Selector: Set this to what is presented in the image above.
-
Manager Type Availability: Set this to
FGGameUserSettings -
Show In Builds: Set this to
PublicBuilds
This will add a slider to the audio options menu. Now you need to bind the slider to the Wwise sounds.
Create the Wwise Audio Bus
Create a new audio bus in Wwise by going to the Audio tab.
Go to Master-Mixer Hierarchy → Default Work Unit → Master Audio Bus Right click and New Child → Audio Bus
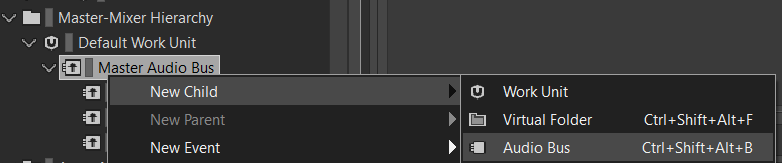
Set the name to anything that you want.
Now link the audio bus to the Wwise audio:
Navigate to your audio in Wwise and go to the General Settings tab and click the … in the Output Bus section.
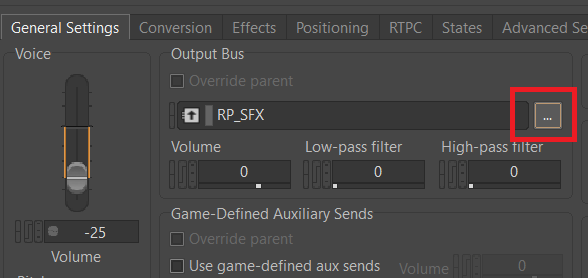
Select the new Audio Bus.
Create the RTPC for the Audio Bus
Create a new RTPC in Wwise using the documentation above: Updating Wwise Values From Your Mod.
|
Make sure that the RTPC min/max values are 0.0 → 1.0 |
Name the RTPC something like RTPC_<ModReference>_Volume
Link the RTPC to the Audio Bus
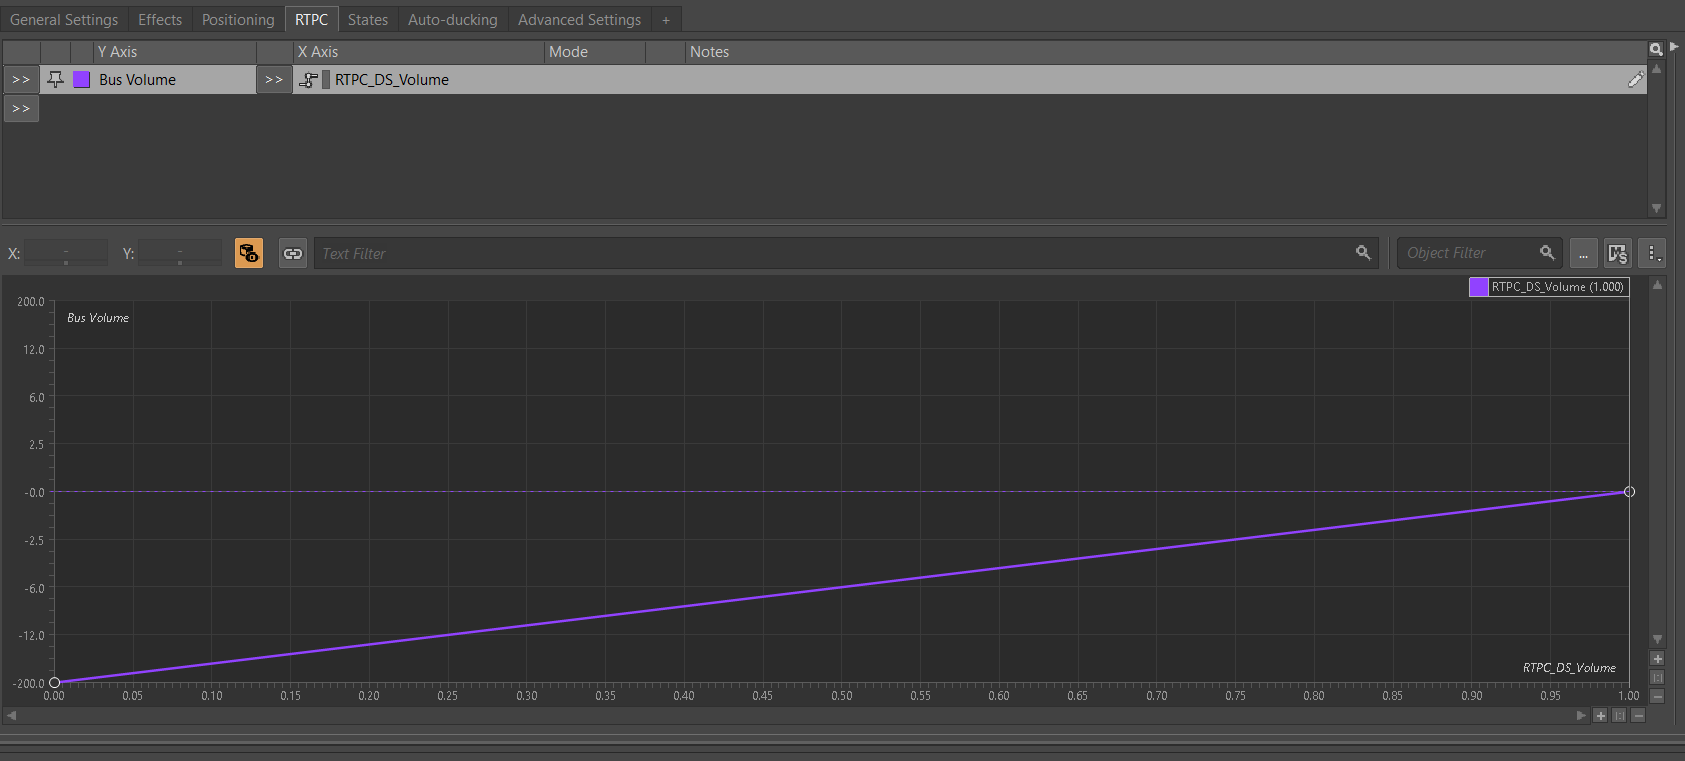
Go to the Audio tab in Wwise and click on the new Audio Bus that you created. Then go to the RTPC tab.
Click the first >> and select Bus Volume
Click the second >> and go to Game Parameters then select the newly created RTPC
You should then have the following graph going from 0 to 1:
Linking the Slider to the RTPC
You will need to create the new RTPC in Unreal Engine:
Name the RTPC in Unreal Engine exactly the same as what you named in Wwise.
Add code to your GameWorldModule as part of the construction stage to link the slider to the RTPC using the following:
Once this has been done you should see the volume slider in the game’s audio options: