Project Setup
Now that you’ve installed all of the prerequisite software and got a copy of the starter project, it’s time to start setting the project up.
|
Are you a returning Satisfactory mod developer who already has a past modding environment set up? Make sure to follow the Updating your Mod guide before following these directions. |
Setting up Wwise
Wwise is an audio and sound system used by Satisfactory, and setting it up is required to get your modding environment working. Setting up Wwise can be confusing, but we’ll walk through the steps here. Be sure to follow only the steps listed here - Wwise will often present you with lots of additional messages that looks like errors or warnings but can be safely ignored.
|
If part of the setup process fails for you, it is most likely this step. If you have errors completing the setup process, come back to here and make sure you followed these steps correctly. |
Integrate Wwise with the Project
Start the Wwise launcher that you installed earlier and update the launcher if prompted. Make sure you have signed in to the launcher. It can give ambiguous error messages when trying to integrate Wwise if you aren’t signed in.
Next, open the Unreal Engine tab in the left sidebar.
Do not click any of the update buttons on the Unreal Engine Wwise tab.
Satisfactory requires a specific version of Wwise to work,
and updating can prevent your mod from working correctly.
Click on the Open other button next to the "RECENT UNREAL ENGINE PROJECTS" header
and select the FactoryGame.uproject file contained in your Starter Project folder.
Your project should now appear in the Wwise launcher.
In case you have multiple projects listed,
click the triangle button to expand the details
and ensure the "Unreal Engine project path" matches the path to your project.
Click on the Integrate Wwise in Project… button.
Change the "Integration Version" drop-down from Latest to All otherwise Wwise will not show the version you care about.
Then use the "Major" and "Version" dropdowns to select the same version you installed earlier (likely 2023.1.3.8471).
The version number may have additional numbers on the end of it e.g.
2023.1.3.8471.2970 but as long as it starts with 2023.1.3.8471 it should work.
If version 2023.1.3.8471 does not appear even after you have selected All,
edit the .uproject file in a text editor to be sure that EngineAssociation
is set to 5.3.2-CSS.
If this version still doesn’t show up, contact us for help on the Discord.
If you missed a required component as part of the Wwise installation, it may show a yellow warning box indicating what’s missing as well as a button to "Modify" the installation. Go ahead and follow what it says for this step only. If Wwise warns you that it could not find an installation in a red warning box, that means you have not selected the correct version as stated above. If you see a blue box offering both "Modify" and "Add Plug-in", that means it’s configured correctly, so continue to the next step.
Under "Wwise Project" header, click the little triangle dropdown on the right
and choose New project to clear the path.
If everything worked according to plan,
you should now be able to click on the blue Integrate button.
Do so, and agree to the terms to start the process.
That’s it! If Wwise shows "Operation completed successfully," you have integrated Wwise into your project.
Note: the below video demo may select a version that does not match what is written above. Please use the version mentioned in the text above.
|
If you encounter a checksum error during Wwise integration, installing another Wwise version similar in version number should fix the problem. |
Generate Sound Banks
Next, we will use Wwise to generate some empty data to avoid the Unreal Engine editor crashing later on.
Integrating Wwise with the project has produced a new subfolder in the Starter Project directory.
Assuming your project folder was called SatisfactoryModLoader,
the new folder will be called SatisfactoryModLoader_WwiseProject.
Inside the subfolder, find the similarly-named SatisfactoryModLoader_WwiseProject.wproj file and open it
which will launch the Wwise editor application.
Find the "Project Explorer" tab in the Wwise editor (left sidebar)
and select the SoundBanks sub-tab.
Right click on the top level folder and click Generate Soundbank(s) for all platforms.
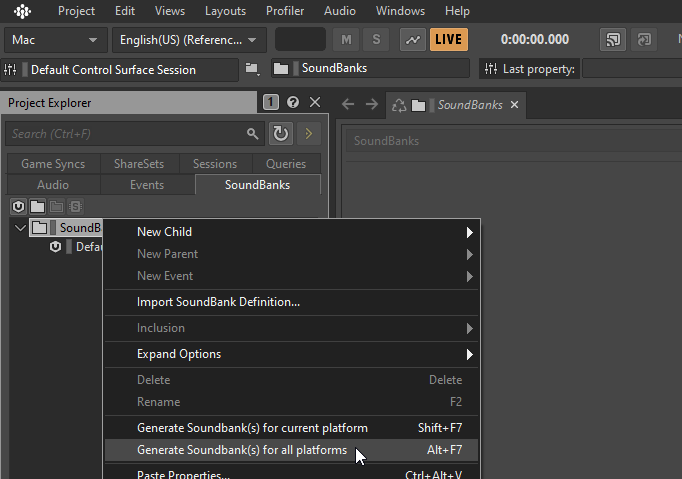
A pop-up should open stating "Completed with message(s)".
Click the Close button in the bottom right.
Finally, close the Wwise editor and Wwise Launcher applications as they are no longer needed for completing project setup.
Generate Visual Studio Files
Next, you’ll need to generate the remaining files for the project with Unreal Engine’s "Generate Visual Studio Project Files" tool.
In Windows file explorer, right-click on the .uproject file in your Starter Project folder and select Generate Visual Studio project files.
Windows 11 might have buried it within the "more options" submenu.
If this option appears for you and runs without error, skip down to the next section.
If this option appears, but errors, check out the Troubleshooting section below.
Otherwise, if the option doesn’t appear, you’ll need to run a tool from the command line to generate the project files.
The command will follow the form below:
& "<path to your Unreal build batch file here (it was installed with the custom Editor)>" -projectfiles -project="<path to your .uproject file here>" -game -rocket -progressHere is an example of a completed command:
& "C:\Program Files\Unreal Engine - CSS\Engine\Build\BatchFiles\Build.bat" -projectfiles -project="D:\Git\SatisfactoryModLoader\FactoryGame.uproject" -game -rocket -progress|
The above command will not work if you copy paste it - you’ll need to modify it yourself to point towards your project file and Unreal Engine install. |
|
The above command is formatted for Powershell.
To run it from Command Prompt instead, remove the |
Troubleshooting
If you are prompted to choose an engine version when generating project files, or the generation command fails, it’s possible that you have a corrupted engine install left behind from previous modding or Unreal Engine endeavors.
The correct engine version should appear in the picker as 5.3.2-CSS and should not be considered a binary build.
To remove a listing for a corrupted engine install,
use the Windows registry editor
to edit the registry key HKEY_CURRENT_USER\SOFTWARE\Epic Games\Unreal Engine\Builds
and remove the key pointing to your "Unreal Engine - CSS" install location.
You can add the correct items to this registry key by either reinstalling the engine
or running the SetupScripts\Register.bat script in the engine’s install folder.
Project Compilation
Next up is compiling the project from Visual Studio. It is possible for Unreal to compile the project as well on launch, but if there are any errors, Unreal will give a very vague report as to what went wrong and you’ll have to rebuild from Visual Studio anyways to get more details. As such, it’s best just to always compile the editor from Visual Studio so you don’t have to build a second time to see the error report.
|
If you have multiple computers available on your network, you can optionally use Incredibuild to speed up the compilation process. More info here. |
Open up the FactoryGame.sln file in your project folder.
Popups and Notices
You’ll be presented with a few notices upon opening the solution for the first time. We’ll go through each of these below, as some of them can safely be ignored, while others could break your install if you take the wrong action.
Unsupported Projects
Visual Studio may tell you "These projects are either not supported or need project behavior impacting modifications <…>" in a pop-up window upon opening the solution.
It is safe to click "OK" on this message and dismiss it.
Even though some of the components are outdated or out of support, they are the ones required by Satisfactory and Unreal and must be used.
Additional Components
Visual Studio may tell you "Based on your solution, you might need to install extra components for a full development experience" at the top of the Solution Explorer window.
It is safe to ignore this message.
Alternatively, you can install the requested components to keep Visual Studio from complaining about this at the cost of additional disk space.
Packages with Vulnerabilities
Visual Studio may tell you "This solution contains packages with vulnerabilities" at the top of the Solution Explorer window.
It is safe to ignore this message.
We must use these exact package versions to match what the game and engine are using, so they should not be updated.
Unreal Engine Integration Configuration
An editor tab titled "Unreal Engine Integration Configuration" opens on startup by default. It assists with initial setup of tools installed with the 'Game Development with C++' workload.
Uncheck the "Show on startup" checkbox at the top and close the tab. Unfortunately some of the changes required to make the custom engine work are not compatible with these tools. Do NOT set up the "Visual Studio Integration Tool" or "Unreal Engine Test Adapter", as they will make changes to the project and engine that break your ability to compile the editor and/or package mods.
If you accidentally enable one of these, redownload the starter project and reinstall the engine on top of your existing install to repair it.

Building the Solution
Once Visual Studio loads,
you should see a folder tree in the Solution Explorer containing entries for
Engine, Games, Programs, and more.
Expand the Games folder to reveal multiple projects, such as FactoryGame and FactoryGameEGS.
Some of these projects are "real", and some of them exist only for structure purposes.
When it’s time to compile your mods, you only need to compile the FactoryGame project (in the Games/ folder).
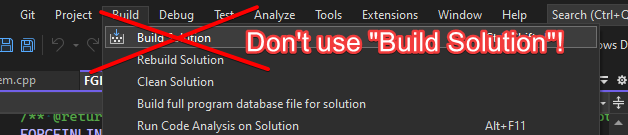
As such, we do NOT want to use the generic 'Build Solution' operation that Visual Studio provides.
Doing so will try to run the build one time for each project item in the solution,
wasting some time trying to build targets that won’t succeed,
and, if there are any error messages, duplicating them many times over!
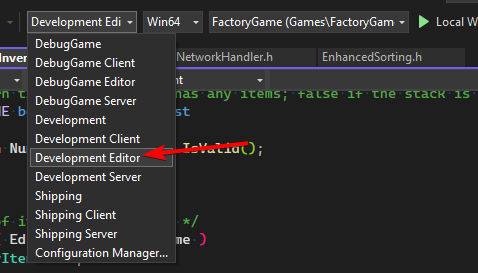
In preparation for compiling our project, first select
the Development Editor Solution Configuration
and Win64 Solution Platform
in the top bar.
It’s near the undo/redo buttons and the play button menu items.
Selecting "Development Editor" means compiling the Unreal Editor program that you’ll be using to make mods.
To start the actual compile process
find the FactoryGame project item in the Games/FactoryGame solution explorer tree,
right click on it, and select Build.
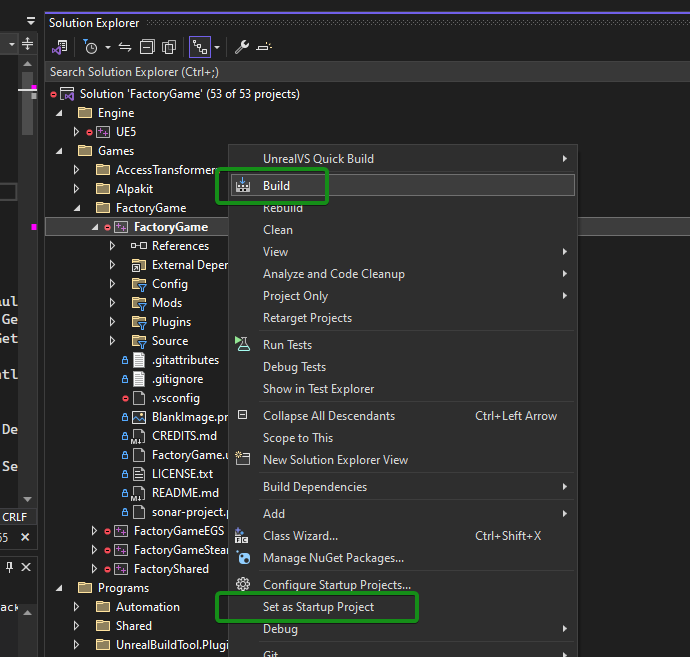
While you’re there, also click on Set as Startup Project
which will make the C++ debugger easier to use later, if you need it.
You only have to do this once, unless you change the Startup Project.
Compilation will take some time; go pet some lizard doggos as you wait. See below if you run into any issues. You’ll know it’s done when the little box-with-cubes-piling-into-it icon in the colored bar at the bottom of Visual Studio goes away. You can monitor its progress from the Output pane (View > Output) if desired.
Now that you’ve built the binaries, your Unreal Editor should open without any issues.
|
Some important notes for the future: After updates to SML that change the Editor,
or your own C++ code that changes Editor functionality,
you must close the Editor and rebuild Alpakit (a tool discussed later) will take care of building Shipping for you when required later, but it’s still possible to manually build them from Visual Studio. More information can be found on the C++ Modding Setup page. |
Build Troubleshooting
Almost all warnings, and occasionally some errors, reported by the editor can be safely ignored during the build process. This section will help you decide how to proceed if you encounter errors while building.
The command … exited with code 6
This is not actually an error message, just a message that is informing you that the build task has failed.
Keep reading the Error List to see what actually went wrong.
Sometimes the real error message does not show up until the build has finished,
and sometimes the Error List does not contain the real error message.
You may also have to check the Output window (select 'Show output from:' Build)
instead of the Error List to see the actual error message(s).
If you’re sharing an error message with others for help troubleshooting it, it’s best to share the entire build output - copy-paste the contents of this box to share. A screenshot alone cuts off most of the useful information.

Compiler is out of heap space
Your computer ran out of RAM while trying to compile the project. This is a common issue even on computers with 32GB of RAM. Thankfully the completed build progress persists between attempts at building, so just keep re-running the build task and it will slowly make progress. Close other stuff on your computer that is using RAM if possible, such as web browsers and games. Restarting your computer and then trying the build again may also help.
If the project still continues to fail to build with this reason after many attempts, contact us on the Discord for further troubleshooting. Your computer may unfortunately not have enough ram to compile the project.
AkAudio
If you see errors related to AkAudio or similar,
you need to go back and re-do the Wwise integration step.
Something.pch : No such file or directory
Make sure that your project folder is not stored in a folder path that contains unicode characters. Review the directions in the Starter Project section.
Open Unreal Editor
The Unreal Editor allows you to create new content for the game and helps build your mod. It also heavily relies on the C++ project, so make sure you don’t change stuff in there unless you know what you’re doing.
Depending on how your copy of Unreal Engine installed,
you may be able to double-click the FactoryGame.uproject file in the Starter Project folder to open the editor,
which will directly open your project.
If that doesn’t work, you’ll have to open the Unreal Editor separately, then browse to your project.
You can find it by searching for it in the Windows search bar
(it should appear as Unreal Engine - CSS)
or by navigating to where you installed it,
which is probably something similar to
C:\Program Files\Unreal Engine - CSS\Engine\Binaries\Win64\UnrealEditor.exe
Once the welcome panel has opened, click "Recent Projects",
then "Browse" and select the file FactoryGame.uproject in your starter project folder.
Opening the project for the first time can take a considerable amount of time as it compiles shaders.
You might be told that some modules were
"missing or built with a missing engine version"; press Yes and allow it to build.
This will take some time, and will drastically increase the size of your project folder
- go find some more lizard doggos to pet.
If this step fails, you should go back to compile the editor from Visual Studio to find out why it’s erroring and return here when finished with that step. Consider seeking help on the Discord if you are stuck here.
First Time User Pop-Ups
Opening the editor for the first time may present you with a few pop-up messages to address.
"GeneratedSoundBanks folder does not seem to be set"
If you see a message: "GeneratedSoundBanks folder does not seem to be set. Would you like to open the settings window to set it?", you need to change a couple Wwise settings.
Click Yes on the popup to open the settings window.
Or, if you’ve already closed the popup, open
the Unreal Engine project settings (Edit > Project Settings…)
and navigate to the "Wwise" category’s page Integration Settings.
In the "Installation" subsection,
change the Root Output Path setting to <WwiseProjectPath>/GeneratedSoundBanks.
Note that it may be pre-filled with an incorrect Wwise project path,
so use the directory picker to ensure you’ve selected your actual Wwise project.
Next, head to the "Initialization" subsection
and change the Unreal Audio Routing setting to Both Wwise and Unreal audio.
This pop-up should no longer appear next time you open the editor.
Familiarize Yourself with the Editor
Now is a good time to familiarize yourself with the Unreal Engine editor through various other tutorials.
We suggest the following resources:
-
⭐📖 Unreal Editor Interface - Provides a high-level overview of what each of the editor panels do.
-
⭐📖 Content Browser - How to access the Content Browser, including adding multiple Content Browser panels to your viewport.
-
⭐📖 Content Browser Interface - How to use the various features offered by the Content Browser.
You can find more on the Unreal Learning Resources page.
(Optional) Modify Editor Color Scheme
The Unreal Engine 5 editor is very dark by default. It may be difficult to read depending on your computer settings and eye health. This video shows how to change the editor’s color scheme and provides an alterative grey theme you can use out of the box.
Setting up Alpakit
Alpakit is a tool made by the modding community to make building and testing your mod more convenient. It’s one of the editor plugins that comes pre-installed with the starter project.
Opening Alpakit
Click on the Alpakit Dev button in the Main Toolbar of the Unreal editor to open its panel. It looks like an alpaca peeking out of a cardboard box.

You can also bring it up via File > Alpakit Dev from the
Menu Bar.
Next, open the alpakit-specific log window by clicking the three-dots button next the icon and selecting "Alpakit Log",
or using File > Alpakit Log.
This information is also present in the UE Output Log (Window > Output Log), albeit mixed with other editor messages.
Both the Alpakit Dev window and Log window can be dragged by their top tabs and docked as new tabs or panes in the editor for easy access later. We suggest docking the Alpakit Log in the same panel as the Viewport and Alpakit Dev in the same panel as Details.
If you’re wondering what something in an Alpakit window does, hover over it - most elements have expanatory tooltips.
Configuring Dev Packaging Settings
Once you’ve opened the Alpakit Dev window, head over to the "Dev Packaging Settings" heading. For now, the only target we need to modify is Windows (the game client), but later you can use the other options to build for dedicated servers.
In order to get started building mods, you’ll have to tell Alpakit where your game install directory is located so it can copy mod files there for you.
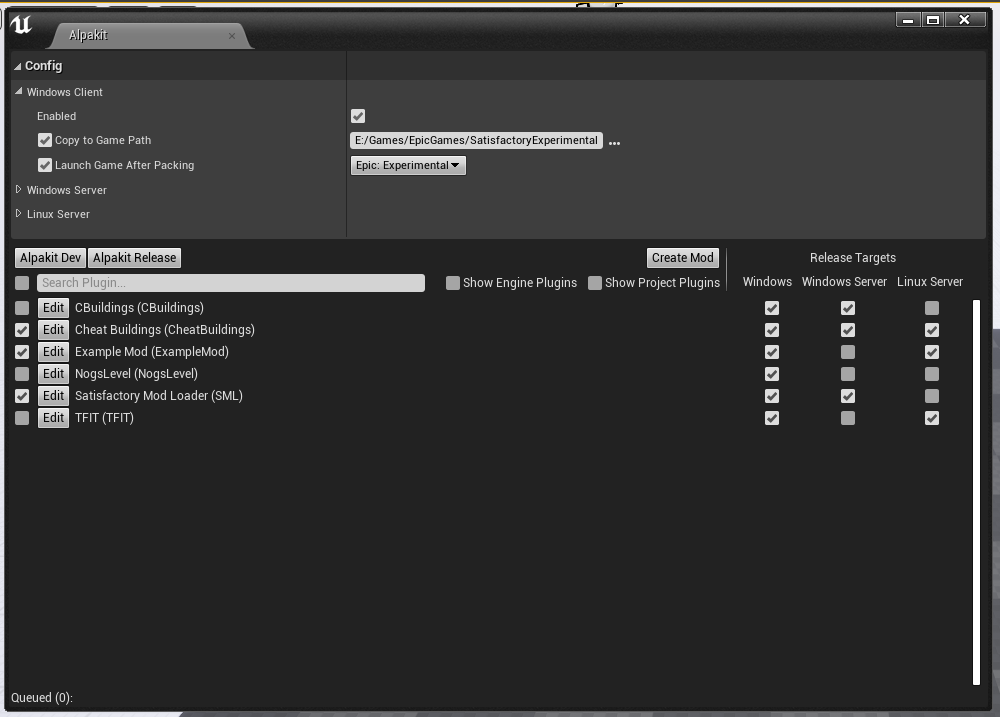
In the Windows subheading,
check the Enabled box to enable packaging for that target,
check the box next to Copy to Game Path to enable copying built mods,
then click on the 3 dots to the right to open a directory picker.
Select your root Satisfactory game installation folder.
It will be something like
C:\Program Files\EpicGames\SatisfactoryEarlyAccess\.
Follow the directions
on the FAQ
to easily determine this location.
Finally, check the box next to Launch Game Type and choose the entry that corresponds to the game install path you provided.
This will automatically start the game for you after all packaging and copying tasks are complete.
|
Find out more about how to launch the game quickly for testing on the Testing/Multiplayer Testing page. |
Packaging Mods with Alpakit
Below the "Dev Packaging Settings" heading are the mod list and packaging controls.
Right now you should see two items in a searchable list -
Example Mod (ExampleMod) and Satisfactory Mod Loader (SML).
This is the list of all mods present in your project.
They are listed first by friendly name and then by
Mod Reference
in parentheses.
Once you have created a mod, it will appear in the list automatically.
To package a single mod for testing, simply press the "Alpakit!" button next to its name in the list. Alpakit will compile and package your mod for you, then take actions based off of the options you selected in the Dev Packaging Settings.
If you want to package multiple mods at a time, check the boxes to the left of their "Alpakit!" buttons and use the "Alpakit Selected (Development)" button. This will first package all mods, wait for all packaging tasks for complete, then execute any Launch Game tasks you have enabled.
Upon starting an Alpakit task, a popup will appear informing you that the mod is being packaged and the Alpakit Log window will reflect the packaging results.
The Alpakit Release and Release Targets fields can be safely ignored for now as they will be explained later in the guide.
Uninstalling your Packaged Mods
Alpakit will automatically install the mods it packages for you when you have the 'Copy to Game Path' option enabled. The Satisfactory Mod Manager will try to avoid interferring with mods that you have packaged with Alpakit and will not "see" that you have them installed in its own mods list.
If you ever need to uninstall one of the mods you’ve packaged, simply go to your installation’s Mods folder and delete the folder named with the Mod Reference of the mod you wish to uninstall.
Packaging SML
If you have not yet installed the Satisfactory Mod Loader (SML) in your game client from playing with mods before,
you can use Alpakit to build SML for you and put it in the right folder.
Simply press the Alpakit! button next to Satisfactory Mod Loader (SML) in the list.
Alternatively, you can use the Mod Manager to install SML from a published version.
As a note for the future, using a locally built copy of SML could cause problems if your copy of the Starter Project is older than the latest SML release, in which case you should update your Starter Project or use the Mod Manager to install SML instead.
Next Steps
That should be it - your starter project should now be set up and ready to go! The next section provides an overview of the files included in the Starter Project to help you get situated before working on your first mod.