Migrating to Blueprint Hook Assets
Migrating a pre-SML3.11 blueprint hook to the new Hook Asset system is relatively straightforward because you already have all the information you need in the old "Bind on BPFunction" node or your old C++ hook macro.

This gives you the information required to make a Blueprint Hook using the new system:
-
Class
-
Binding (you will transfer the logic from this event to a function in your new hook asset)
-
Function Name to hook
-
Hook Offset Start
Note that one Hook Asset can contain multiple hooks on any number of classes.
Create Hook Asset
Now follow the instructions in the Blueprint Hooks page to create a new hook asset. Read the entire page to get an overview of the new system and how to create hooks using it.
Register the Hook Asset
Don’t forget to register your new Hook as described in the Blueprint Hooks page.
Create Hook Function
Next, make a function to hold your hook’s logic. You can either reuse the default-created New Function (give it a better name!) or make a fresh one.
Since Bind on BPFunction nodes only supported the Target parameter,
the only parameter your function needs is
an input named Target as an object reference to the class you are hooking.
If you were using the C++ blueprint hook macro,
see the Blueprint Hooks page
to set up other paramters as required.
Next, move the logic from the event on the Binding of the old node to the function you just created. Note that the previous system had hooks as Events and the new system has them as Functions, preventing the use of latent nodes like Delay. The Blueprint Hooks guide suggests workarounds for this.
|
Are you working with hooks that apply to a specific actor class? You may want to use an Actor Mixin instead, which allows using events as your hook function, among other features. |
Create Hook Graph
Next, switch to the Hook Graph view as described in the Blueprint Hooks page to create the nodes that specify how your hook will be applied.
Right click on empty space to create a new "Hooks" node. All "Bind on BPFunction" nodes from the old system correspond to the "Call Hook Before Statement" node in the new system. If you were using the C++ blueprint hook macro, check the Blueprint Hooks page to determine the equivalent node in the new system.
Next, specify the Class and Function being hooked under the "Target Class and Function" heading.
Under the "Hook Reference" heading, select the function you created earlier with your hook logic.
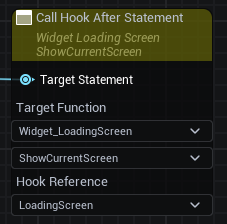
Finally, connect a target specifier to the "Target Statement" pin of the hook node.
Check your old "Bind on BPFunction" node’s setting for the "Hook Offset Start" checkbox. If it’s checked, use a "Function Entry Statement" specifier, and if it’s unchecked, use a "Function Exit Statement" specifier.