Creating an Item
Creating a new item is simple, as long as you’re fine with re-using meshes. This example will cover making a new item that looks like Leaves with no special properties.
Make sure to follow the Setting Up tutorial first!
In order to create your own Items, you will need the following. All of these will be explained in more details below.
-
If you want to re-use existing (modded or vanilla) item icons and meshes, the internal name of the item whose Visual Kit you want to re-use.
-
If you want to use your own icons, PNG images for the icons.
-
If you want to use your own meshes, a packaged mod with those mesh files contained within (the reasoning for this is explained further down).
-
A way to define a recipe for obtaining your item, usually a ContentLib Recipe.
Custom Item Example
Below is an example of a freshly created Item and a screenshot of it within the game. We’ll use it as a template to make our own item from.
{
  "$schema": "https://raw.githubusercontent.com/budak7273/ContentLib_Documentation/main/JsonSchemas/CL_Item.json",
  "$comment": "Comment lines will be ignored by the mod, and are a good place to leave yourself notes.",
  "Name": "My Custom Item",
  "VisualKit": "Desc_OreGold_C",
  "Form": "Solid",
  "Description": "This is a new custom Item which re-uses the visuals of Caterium Ore!",
  "Category": "Cat_Other"
}
Setting Up
Inside of your mod’s ContentLib/Items/ folder,
create a new file called Desc_DocsCustomLeaves.json
It’s important to make sure that the names of your files do not conflict with the names of any existing assets. If a conflict is found, it will appear in the logs. Viewing logs will be discussed later. For now, try to be unique and specific with your file names to avoid any possible conflicts.
Copy in the "Custom Item Example" JSON from above to the file.
Notice the $schema line at the top of what we copied in -
that tells your editor what kind of format the file will follow.
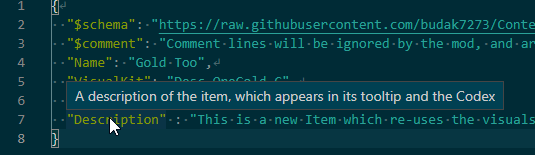
If you’ve set up your editor correctly, you should be able to hover over the Name field, for example, and get a description of what it does:
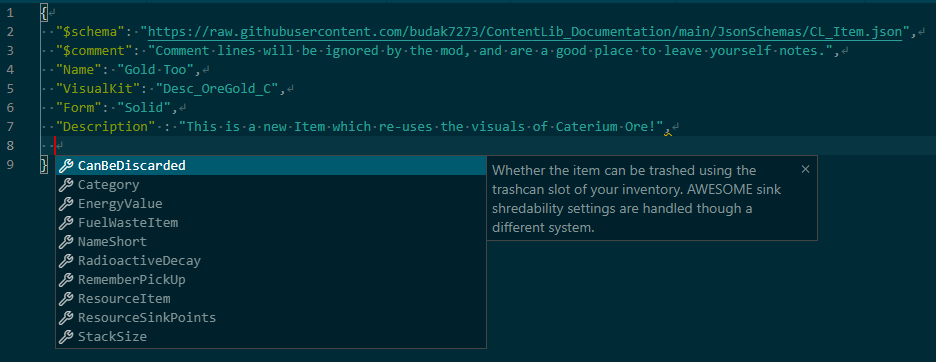
Or, you can press Ctrl+Space, and your editor will suggest more fields you could add:
If you don’t see these, go get a good text editor as described on the Setting Up page!
|
VSCode can automatically format your JSON files to be more readable.
To do this, open the Command Palette by pressing |
Name and Description
Setting the name and description of the item is as simple as specifying the Name and Description fields.
Let’s call our item "Custom Leaves", with the description "These leaves would look great in a Plantpot of Knowledge!"
Find the Visual Kit Name
In order to make our item look like leaves, we’ll need to find the name of the Visual Kit of the base-game Leaves item.
The names of base-game Visual Kits are based on the Class Name of the item descriptor that uses it. If you’d like, you can learn more about Visual Kits on their respective page.
You might already be able to guess from the template what the Leaves kit name would be, but it’s not always so straightforward.
Looking at the Satisfactory Wiki,
we can see in the infobox that the item’s Blueprint Path is
/Game/FactoryGame/Resource/Parts/GenericBiomass/Desc_Leaves.Desc_Leaves_C.
This means that the name of the item’s blueprint generated class,
which is used as the name of the Visual Kit, is Desc_Leaves_C.
ContentLib will automatically resolve the class name into the full asset path for you, saving you from having to use that full path.
You can find more info on the process of tracking down class names here.
Additional Properties
You might have noticed that there was another field,
'Form', specified as Solid.
If this field is not specified, the Item’s type will default to Invalid,
which can’t be used as a normal item.
If you’re making a Liquid or Gas, be sure to read the Fluids Info page.
There are a lot more fields you can use that this tutorial did not discuss. Check out the Item page for more info, or examine vanilla items with ContentInspector as examples.
Get the Item In Game
At this point, you have created an item, but there is no way to obtain it yet - even with cheats. See the 'More Info' section below to find out why.
Follow the Create a Recipe tutorial to make one so you can obtain your item and test it out.
If you’ve done everything correctly, you should be able to obtain your Item in game via an item spawning utility, or by unlocking the recipes you defined.
Common Errors
Make sure to read the Troubleshooting page.
-
Nothing showing up at all in the logs
-
Make sure your items are in the correct folder.
-
-
Item not showing up in-game
-
Did you give your Item or Recipe a Category? If not, it will only show up when searched for.
-
This could be the fault of the item, or the custom recipe you made to grant it. Check the logs as described on the Troubleshooting page.
-
Next Steps
As described in the "Get the Item In Game" section, you’ll need to create a Recipe to obtain your item. Do that first if you haven’t yet.
Custom Icon
If you want to use custom icons for your new item, you can create your own Visual Kit.
Fluids
If you’re making a Liquid or Gas, be sure to read the Fluids Info page.
More Info
Why a Recipe is Needed
"Why do I need to use a ContentLib Recipe so that I can obtain my item? Can’t I just spawn it in?"
As a performance measure, an Item is generally not available in Satisfactory unless a Recipe exists to register it. When you create a new item with ContentLib, there are no Recipes that produce it, so the game does not know to register it as existing. Writing a recipe with a ContentLib Recipe is the simplest way to create a recipe for it. Depending on how your item spawning mod of choice locates items, it may or may not be able to find this otherwise hidden item and register it for you.