Unreal Engine Asset Toolkit
|
This article is a work-in-progress. Please contact us on the Discord if you run into any issues here. |
Community member Archengius has created a set of two plugins useful for dumping content from a compiled Unreal Engine game and importing it into the Unreal Engine Editor.
Since most Satisfactory game files can’t be distributed with the Starter Project for download size and copyright reasons, the project instead contains empty "placeholder" assets. While this allows you to compile your mods and reference base-game content for use in them, previewing content (especially widgets) in the editor is inconvenient.
You can use the Asset Toolkit to generate a copy of the starter project, complete with icons, meshes, some materials, and more, making working with base-game content much more convenient.
|
If you decide to generate a complete copy of the project, make sure that your Content folder is not publicly available on Github or similar. If you only have a plugin-level repo, this is not a problem, but if you have a project-level repo as well, you should watch out for this. |
Installation
The Asset Toolkit consists of two plugins, a dumper, to be installed in the game, and an asset generator, to be installed in the editor. Both are contained in the Asset Toolkit repository. Download a zip of the repository and extract somewhere, or clone it if desired.
|
Note that the link above points to the dev branch of Mircea’s fork of the original project. Said fork is the one that the CI scripts use to semi-automatically generate the starter project, and as such is usually kept more up to date. |
Installing the Asset Generator
Take the AssetGenerator folder out of the files you downloaded
and move it to your modding project’s Plugins folder.
This plugin is only for use from the editor side. It will not appear in the Alpakit mods list.
Installing the Asset Dumper
Take the AssetDumper folder out of the files you downloaded
and move it to your modding project’s Plugins folder.
This plugin is already set up as a Satisfactory mod, and will appear in the Alpakit mods list once compiled. It will later be built and installed in the game.
Compiling
After putting both plugins in your project’s Plugins folder, re-Generate Visual Studio project files and build for Development Editor and Shipping.
Troubleshooting Compile Errors
-
Make sure you regenerated Visual Studio project files before building.
-
Make sure that you have updated to the latest version of the plugins from repository linked above.
-
If you encounter errors in
MaterialGenerator.habout the Material Graph being undefined, try adding the following imports to the top of the file:
#include "MaterialGraph/MaterialGraph.h"
#include "MaterialEditingLibrary.h"
-
If you get errors about unresolved external modules, try deleting the project’s
Intermediatesfolder, regenerating project files, and building again. -
Ask for help on the discord.
Dumping Game Assets
|
If you have already used the Asset Dumper and Generator in the past, you should probably download an updated version via the above directions. If you don’t, you could get ambiguous errors while dumping and generating. |
A user interface exists for using the dumper, but there are some crashing problems with it, so these directions will cover using the command line version instead.
To dump assets, navigate to your game install directory in Powershell.
For example, C:\EpicGamesGames\SatisfactoryEarlyAccess
Next, from that directory, run the Powershell command:
Engine\Binaries\Win64\FactoryGame-Win64-Shipping.exe -EpicPortal -NoSteamClient -nullrhi -DumpAllGameAssets -RootAssetPath=/Game -ExcludePackagePaths=/Game/WwiseAudio -ExcludePackageNames=/Game/Geometry/Meshes/1M_Cube_Chamfer -PackagesPerTick=32 -ExitOnFinish -log
|
Excluding the |
The Powershell command should immediately complete,
leaving you with the option to run another command.
Shortly after, you should see the Satisfactory splash screen and a console log window
which will provide info regarding the dumping process (since -log was used).
Once you see the console log window, you can safely close the Powershell window.
The game window itself will never open since the -nullrhi argument was used.
After the game’s loading process, you should see a sequence of LogAssetDumper messages.
This will take a bit; go pet a lizard doggo to pass the time.
You’ll know it’s finished when the command prompt window that was spawned closes.
You can expect a full dump to take up about 8.5 GB. You can delete it later after you have imported the assets.
Once it completes, the console window and game should close,
and you should have an AssetDump folder
inside the FactoryGame folder of your game install directory.
|
Asset dumping is also used to create the stater project stubs when the game updates. If you’re interested in how this works, check out the CI scripts, or contact us on the discord for more info. |
Troubleshooting Asset Dumping Crashes
Make sure that you have updated to the latest version of the Asset Dumper built from the repository linked above.
If you’re still encountering issues, ask for help on the discord.
Importing Dumped Assets to the Editor
You can expect a Content folder with all assets imported to take up about 7 GB. For comparison, a Content folder with placeholders takes up 366 MB.
Create a Backup
Before using the Asset Generator, you should move your existing modding project’s Content folder to another location. This serves two purposes - one, giving you a copy of the files to return to in case the asset generation does not succeed. Two, moving the folder therefore leaves an empty directory behind where the assets used to be, meaning that the asset generator is sure to re-generate every asset, ensuring any possible asset generator crashes aren’t caused by it trying to update the existing files.
Run the Generator Commandlet
Both a commandlet and and an in-editor UI are available for the Asset Generator, but at the time of writing, the in-editor UI is unstable as it has various issues related to Materials. As such, the commandlet should be used instead.
Below is a modified version of a Powershell script originally written by adamsogm for using the Asset Generator commandlet. You will need to modify the first few lines of the script to point to your Unreal Engine install, project path, and chosen dump directory.
Create a new Powershell script file (ex. generate_assets.ps1) in a location of your choice,
then copy-paste the below script and save after editing the path lines.
A Powershell script file is actually just a text file that ends in .ps1.
If you’re not sure how to make a file like this, see here.
To run the script, first open a new powershell terminal window in the folder where your generate assets file lives. You can do this by shift-right-clicking on empty space in File Explorer and selecting "Open PowerShell window here". More info on how to do can be found here.
If you were to run the script by right clicking on the file and selecting "Run with Powershell", the script would still run, but upon any error the window would immediately close, leaving you unable to read the error message, so this is not advised.
# Change the below path lines to match the actual locations of these files and folders for your system
# Using apostrophes so \ doesn't need to be escaped here
$UE4CmdPath = 'C:\Program Files\Unreal Engine - CSS\Engine\Binaries\Win64\UE4Editor-Cmd.exe'
$UProjectPath = 'D:\GitSecondary\SF_ModProject\FactoryGame.uproject'
$AssetDumpDirectory = 'D:\Programs\EpicGamesGames\SatisfactoryExperimental\FactoryGame\AssetDump'

# The below should not need to be modified

# Define temporary file names and a function to clean up temporary files from the process
$ForceGenerateFile = 'ForceGeneratePackageNames.txt'
$SkipSaveFile = 'SkipSavePackages.txt'
$BlacklistFile = 'BlacklistPackageNames.txt'

$TempFiles = $ForceGenerateFile, $SkipSaveFile, $BlacklistFile
function CleanupTempFiles {
	foreach ($FileName in $TempFiles) {
		if (Test-Path $FileName) {
			Remove-Item $FileName
			Write-Output "Cleaned up $FileName"
		}
	}
}


# Clean up the temp files, in case the script was exited or crashed earlier for some reason
CleanupTempFiles

# Force generated package names from https://github.com/mircearoata/satisfactory-modding-actions/blob/master/ForceGeneratePackages.txt
Write-Output "/Game/FactoryGame/Buildable/-Shared/Widgets/Widget_Output_Slot" >> $ForceGenerateFile

# Skip save package names from https://github.com/mircearoata/satisfactory-modding-actions/blob/master/SkipSavePackages.txt
Write-Output "/Game/FactoryGame/Interface/UI/BPI_ShoppingList" >> $SkipSaveFile
Write-Output "/Game/FactoryGame/Unlocks/BPI_UnlockableInterface" >> $SkipSaveFile
Write-Output "/Game/FactoryGame/Interface/UI/InGame/Graph/BPW_Graph" >> $SkipSaveFile
Write-Output "/Game/FactoryGame/-Shared/Blueprint/BP_OnlineHelpers" >> $SkipSaveFile
Write-Output "/Game/FactoryGame/AvailabilityDependencies/BPI_AvailabilityDependencyInterface" >> $SkipSaveFile

# Skip a few assets that cause annoying problems in the editor (ex. missing animation data spam errors)
# TODO not certain this functionality is working?
Write-Output "/Game/FactoryGame/Character/Player/Animation/FirstPerson/" >> $BlacklistFile
Write-Output "/Game/FactoryGame/Character/Player/Animation/ThirdPerson/" >> $BlacklistFile

# Run the generator commandlet
& $UE4CmdPath $UProjectPath -run=AssetGenerator -DumpDirectory="$AssetDumpDirectory" -ForceGeneratePackageNames="$(Get-Location)\\$ForceGenerateFile" -SkipSavePackages="$(Get-Location)\\$SkipSaveFile" -BlacklistPackageNames="$(Get-Location)\\$BlacklistFile" -stdout -unattended -NoLogTimes

# Clean up the temp files on exit
CleanupTempFiles
This script will take a considerable amount of time. Experts advise locating and petting a lizard doggo while you wait.
You’ll know it’s finished when your powershell window closes or you are prompted to enter another command.
After you’re done, your modding project’s content folder should be around 7 GB.
Troubleshooting Asset Generation Crashes
If the commandlet crashes, there are a few approaches you can take to troubleshoot it.
Make sure that you have updated to the latest version of the Asset Generator built from the repository linked above.
The first step in troubleshooting is to see what asset the generator was processing before it crashed.
For this to be tracked, you must change the LogAssetGenerator logging category detail level to VeryVerbose.
To do this, edit <starter project directory>\Config\DefaultEngine.ini
and add LogAssetGenerator=VeryVerbose to the [Core.Log] section.
Next, attach the Visual Studio debugger
as the asset generator is running - the process is called UE4Editor-Cmd.exe in the list.
Now the package being processed will be visible as a log message inside the Visual Studio output section.
After running the asset generator again, next time it crashes, the debugger will catch it as a breakpoint,
and you can look at the log messages to locate the troublesome asset in your dumped files, delete it, then re-run the asset generator.
Note that the debugger can sometimes stop for breakpoints on non-crash errors - after reviewing the log, try pressing Continue to see if it recovers cleanly and continues.
If you’re still encountering issues, ask for help on the discord.
|
It is quite possible for asset generation to crash due to your computer running out of memory, especially if you have the debugger attached. You should restart your computer to ensure that as much memory is available to the asset generator as possible. After restarting, run the generator again. It will keep most of the files generated from the previous run, making slightly more progress until the next out-of-memory crash. |
Bring in AngryBeaver’s Recreated Assets
Community member AngryBeaver has recreated a number of texturing assets that make working with models in the editor a lot more pleasant. They are not exactly like the 'real' ones used in game, but they are very close.
Once the Asset Generator has completed, you can manually copy in the assets from AngryBeaver’s repository, replacing the ones created by the Asset Generator.
You could either clone or download a zip of AngryBeaver’s repo, but you won’t need the downloaded repo any more once you have copied the files in.
Delete any Broken Assets
Unfortunately the Asset Generator is not capable of correctly recreating every asset. You will have to clean up some broken assets after generation is complete. The list of what assets need correcting changes every update and varies depending on what asset dumping/generation troubleshooting steps you followed earlier, so it is not feasible for a complete list to be provided here.
Unreal will usually complain about these assets in the Message Log (Window > Developer Tools > Message Log) when the editor opens.
In order to detect these assets, attempt to Alpak any mod in the project, for example, SML. The packaging task will fail and the Output Log will have error messages referencing these assets.
You have a couple options for dealing with these assets:
-
Delete the asset (without replacement) while the editor is open
-
Note, this will update other assets because the objects they were pointing to have been removed, blanking out the field.
-
If you choose not not save changes to these other assets upon exit, the situation described below will apply
-
-
Delete the assets from the filesystem while the editor is closed
-
Upon opening any other asset that depended on these deleted assets in the future, the editor will detect the missing reference and blank it out, requesting that the asset be re-saved. If you save it, the asset will be saved with the field emptied. If you don’t save it, the editor will continue to detect this every time the editor is opened.
-
-
Replace the asset with the "stub" version from the backup of the original stubs content folder you made earlier while the editor is closed
-
This approach should not suffer from the side effects mentioned above
-
After dealing with any broken assets, mods should package again as normal.
Additional Documentation
If you’d like to learn more about the Asset Toolkit, you can continue reading below.
Asset Generator Commandlet Documentation
Here is an explanation of what the various commandlet options do, written by Archengius:
Commandlet name is AssetGenerator

-DumpDirectory= is the path to the root directory of the dump, as specified in the asset dumper

-ForceGeneratePackageNames= is optional file contaning a newline-separated list of packages to be generated first, you want /Game/FactoryGame/Buildable/-Shared/Widgets/Widget_Output_Slot there to avoid the weird bug with editor crashing while generating the full project from ground up

-BlacklistPackageNames= is optional, semantics are the same as for ForceGeneratePackageNames, except that it also supports wildcard paths if they end with /, not really needed by default

-AssetClassWhitelist= is optional comma-delimited list of whitelisted asset classes to generate, should be left empty for full project generation

-PublicProject is optional and nulls out non-distributable assets in the generated project, if not specified it will generate a full project containing models and textures as they are in the game

-NoRefresh is optional and prevents the generator from touching existing assets if specified
Using the UI to Dump/Generate
|
If you are having issues using the command line versions of the Asset Toolkit, trying to use the UI usually won’t fix them! Ask for help on the discord. There are currently numerous crashing issues when using the UI of the Asset Toolkit plugins as opposed to the command line interface. Unless you have a specific reason for using the UI, you should probably use the command line directions above to dump and generate assets instead. |
Dumping
In order to extract the assets to be imported to the editor,
launch your copy of Satisfactory and open the in-game developer console,
which is opened when you press the grave/tilde key (` or ~), or when you press F2.
Type dumper.OpenAssetDumper and press enter. It should bring up a UI like the one shown below:
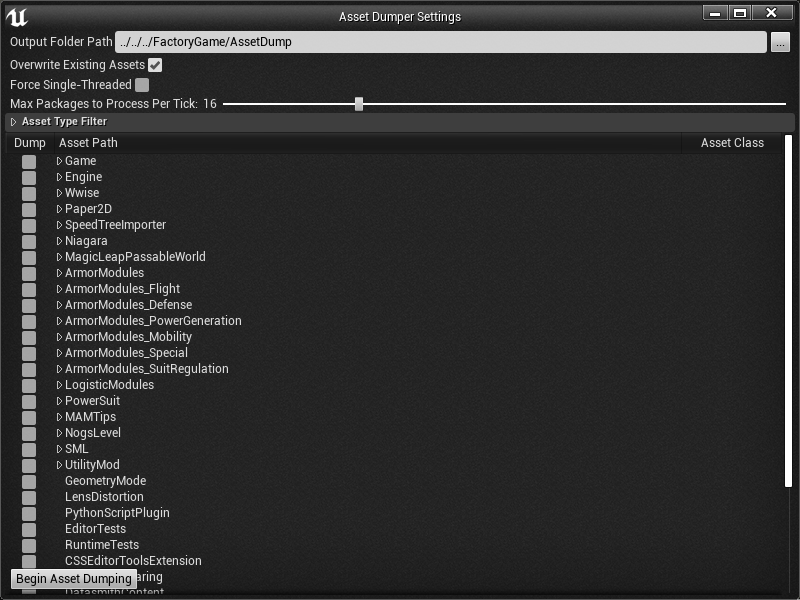
You can leave the Output Folder Path at the default to export to
<game install directory>\FactoryGame\AssetDump,
or use the … button to select a specific path.
Next, select the asset paths you would like to dump, usually Game/FactoryGame/,
and optionally restrict what is exported with the Asset Type Filter dropdown.
Once you’re ready, press "Begin Asset Dumping". This will take some time; go pet a lizard doggo while you wait.
