Releasing A Mod
Once you consider that one of your mods is ready to be released, there’s a few extra steps to follow to ensure that it’s working correctly, and to set up the required information for the Mod Repository to work with the mod.
Local Testing
Before you release your mod, you should make sure that the features you implemented are working as you expect.
For example, if your mod adds new items, recipes, or milestones, try to unlock them the same way a normal player would to ensure they are accessible.
For recipes, try setting up a building to craft the recipe and ensure it actually works. For example, if a recipe requires more of an item than its stack size, the machine can’t operate even though the recipe appears otherwise valid.
If your mod has configuration options, make sure that the default configuration options you specified are what you want, since all users who install your mod will have them, and might not even realize they can be changed. The default config settings should represent the intended user experience for your mod.
Make sure that your mod works for both client and host players in multiplayer. For mods that add items, schematics, and recipes, this is not much of an issue, but if you have added additional buildings or other functionality,
You can find more info on how to test your mod, including directions for running two copies locally to test multiplayer, on the Testing/Multiplayer Testing page.
Your Mod’s UPlugin File
Every Unreal Engine plugin is require to have a
<mod reference>.uplugin file,
and Satisfactory mods are no exception.
This file is json formatted and holds information about the mod,
such as its version number, dependencies, credits, links, and more.
Only one uplugin file should exist in a plugin’s directory,
else the editor will get very confused.
The file should have been automatically generated for you when you created your mod with Alpakit.
At that point in the tutorial, we said we’d come back to some fields later, and now is that time.
Although you can find this file in your mod’s plugin directory,
which is your modding project directory’s /Mods/<mod reference> folder,
you should generally edit it within the unreal editor via Alpakit.
Alpakit will automatically handle the file’s formatting for you
and help to prevent mistakes that would create an invalid uplugin file and be annoying to track down.
Open the Alpakit editor by clicking the Edit button next to your mod in the Alpakit mods list.
You can hover over the labels on the left to get a tooltip that explains their purpose.
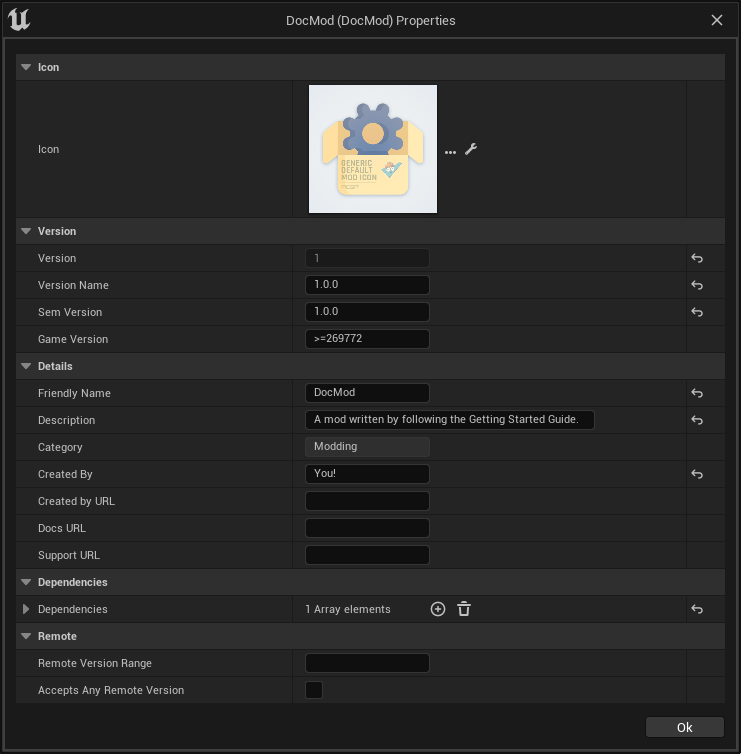
Below we will go into more detail about their purpose. It is suggested that you read all of the field definitions below to make well-informed decisions about the values you specify.
If you’d like, you can read about all the different Unreal settings available at the Plugins documentation here or at the C++ reference here, but this page will cover the ones most important to Satisfactory mods.
After editing these fields, be sure to re-Alpak your mod so the files you upload will have your changes.
Default Fields
The following fields are part of Unreal’s normal uplugin format, but are given additional functionality by the modding toolkit.
| Parameter | Description of Function |
|---|---|
Version |
This integer should match the first digit of your |
VersionName |
This string should exactly match your |
FriendlyName |
This string is the name of your mod as it will appear in the in-game loaded mods list and configs screen. |
Description |
This string will appear when someone looks at your mod in the in-game loaded mods list and configs screen. |
CreatedBy |
This string will appear as the author’s name section when someone looks at your mod in the in-game loaded mods list and configs screen. |
DocsURL |
If a link is provided here, a button will appear in the in-game loaded mods list that will open the URL when clicked.
The |
SupportURL |
If a link is provided here, a button will appear in the in-game loaded mods list that will open the URL when clicked.
The |
Special Fields
Note that SML and SMR require you to include additional fields in your plugin descriptor file. The most important of these are the SemVersion, GameVersion, and mod dependency list.
|
Make sure that you have SML listed in the Plugins field as explained below, unless your mod is specifically designed to work without SML. |
Below is a description of all extra fields SML and SMR require:
| Parameter | Description of Function | ||||||||||||
|---|---|---|---|---|---|---|---|---|---|---|---|---|---|
SemVersion |
Version number for the mod. Should always increase with new releases,
and should follow the semver format.
To summarize, the format is
|
||||||||||||
GameVersion |
Version range specifier for the game build version number this mod was developed for/tested on.
Since we don’t know what future game build numbers will be, only minimum ranges (ex. |
||||||||||||
Plugins |
Additional functionality has been added to the regular uplugin Plugins array.
You can list other mod references (or Unreal Plugins) here,
and SMM will know to download when installing your mod.
If you add a plugin with a Mod Reference,
this basically makes the listed mod a dependency for your mod.
Unless you are creating a mod separate from SML, the SML plugin should basically always be listed here, allowing you specify what SML versions your mod supports. Each plugin should be listed as an object with the following properties:
|
||||||||||||
RemoteVersionRange |
A Semver range of versions accepted from the remote clients.
This requires other players to have a certain version of the
mod installed to be able to join hosts.
See the Plugins SemVersion item above for the format for this field.
|
||||||||||||
RequiredOnRemote |
Controls if the mod is required to be on both sides in multiplayer.
When a client connects, the host checks its own mod list against what the client is connecting with.
If the host’s mod has |
Important C++ Fields
If your mod has C++ code, make sure that you list a UBT Module in the Modules plugin descriptor section. The examples below will demonstrate this.
Examples
Some example .uplugin s are presented here in their JSON format.
Example Blueprint only mod .uplugin:
{
	"FileVersion": 3,
	"Version": 6,
	"SemVersion": "6.2.1",
	"VersionName": "6.2.1",
	"FriendlyName": "Example Blueprint Only Mod",
	"Description": "An example of a .uplugin for a mod that contains only Blueprint content",
	"Category": "Modding",
	"CreatedBy": "Satisfactory Modding Team",
	"CreatedByURL": "https://github.com/satisfactorymodding/SatisfactoryModLoader",
	"DocsURL": "https://docs.ficsit.app",
	"MarketplaceURL": "",
	"SupportURL": "",
	"CanContainContent": true,
	"IsBetaVersion": false,
	"IsExperimentalVersion": false,
	"Installed": false,
	"LocalizationTargets": [
		{
			"Name": "ExampleMod",
			"LoadingPolicy": "Always"
		}
	],
	"Plugins": [
		{
			"Name": "SML",
			"Enabled": true,
			"SemVersion": "^3.8.0"
		}
	],
	"GameVersion": ">=365306"
}
Example C++ and Blueprint mod .uplugin:
{
	"FileVersion": 3,
	"Version": 6,
	"VersionName": "6.2.1",
	"SemVersion": "6.2.1",
	"FriendlyName": "Example Hybrid Mod",
	"Description": "An example of a .uplugin for a mod that contains both Blueprint content and a C++ module",
	"Category": "Modding",
	"CreatedBy": "Satisfactory Modding Team",
	"CreatedByURL": "https://ficsit.app/",
	"DocsURL": "https://docs.ficsit.app/",
	"MarketplaceURL": "",
	"SupportURL": "",
	"CanContainContent": true,
	"IsBetaVersion": false,
	"IsExperimentalVersion": false,
	"Installed": false,
	"Modules": [
		{
			"Name": "ExampleHybridMod",
			"Type": "Runtime",
			"LoadingPhase": "PostDefault"
		}
	],
	"Plugins": [
		{
			"Name": "SML",
			"SemVersion": "^3.8.9",
			"Enabled": true
		},
		{
			"Name": "DependencyMod",
			"SemVersion": "^1.3.0",
			"Enabled": true
		}
	],
	"GameVersion": ">=365306"
}
SMR UPlugin Validator
If you’d like to check the format for your uplugin file, SMR offers a validator on its help page. You can paste in your uplugin file into the box on the right and it will display any error messages below the box.
The validator isn’t perfect, but it can help troubleshoot many errors that could occur during upload. If it fails validation, keep your eyes out for things like missing commas and mismatched braces and brackets.
Remember, you can totally avoid formatting concerns by using the Alpakit widget in the editor!
Consider asking on the Discord if you get stuck on this step.
How Mod File Exporting Works
Up until this point, you have likely been using the Alpakit Dev 'copy to mods directory' feature to stage your mods files in game’s folders for testing.
Behind the scenes, using the 'Alpakit Selected (Development)' or the 'Alpakit!' (just this mod) buttons
generates a zip archive for you located at
<starter project folder>/Saved/ArchivedPlugins/YourModReference/YourModReference-TargetPlatformName.zip.
Note that this folder is in the starter project’s Saved folder, not the Saved folder of any of your mods.
Consider checking the zip’s contents to see if they’re what you expect. If for some reason you need extra files to be packaged into the mod, follow the directions here to tell Alpakit to include them when building.
Package for Release
Once you’re ready to release your mod, you will need to package your mod for uploading.
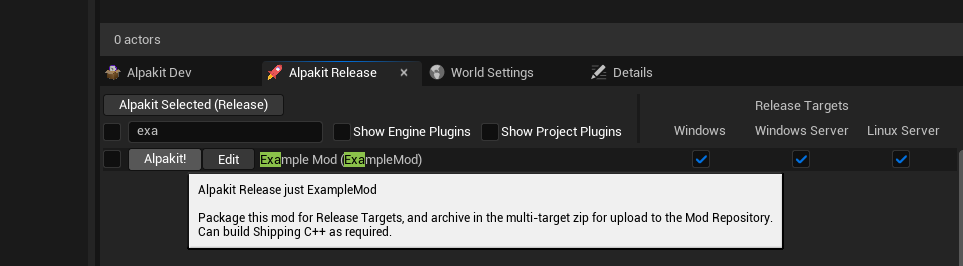
It’s time to make use of the "Alpakit Release" tab that we’ve been ignoring until now.
Open it by clicking the alpaca rocket button, or File > Alpakit Release.
Release Targets Explained
As you may be aware, there are multiple different versions of Satisfactory you can download.
The distinction between the Stable (the main branch) and Experimental (EXP, early feature testing) branch is relatively well known. However, there are also are also different builds of the game for different platforms (targets). There are Stable and EXP variants of each of these:
-
Windows- Client version of Satisfactory, the one you launch to play the game. People playing the game on Linux still use this version, they run it through a compatibility/emulation layer. -
Windows Server- Windows Dedicated Server version of Satisfactory. It doesn’t have a visual interface and is used to run servers from Windows, which is somewhat uncommon. -
Linux Server- Linux Dedicated Server version of Satisfactory. This is what most dedicated servers will be running, especially those hosted by third party services.
There are also slightly different versions of the Windows client for Steam and Epic. Your mod must be compiled in a slightly different way to be usable on each of these platforms, especially to be compatible with Linux Server.
Thankfully, Alpakit handles compiling your mod for all 3 of these target platforms and 2 launcher variants for you!
|
While you are testing your mod locally in singleplayer, it’s a waste of time to compile and package the code for the other platforms you aren’t using. That’s why the 'Alpakit Selected (Development)' and development 'Alpakit!' (just this mod) buttons follow your Dev Packaging Settings, compiling just the target(s) you care about while testing. It also only compiles the Epic/Steam variant of the client when it can be detected from your "Copy to Game Path" value. |
Configuring Release Targets
Before the mod can be released, use the Release Targets checkboxes to define which targets the mod is compatible with. If you leave out one of these targets, the mod will not work on that platform!
|
In most cases, especially for mods with no custom C++ code, you should check all 3 Release Target checkboxes. This means your mod will run on game clients and dedicated servers. |
Alpakit Release
The 'Alpakit Selected (Release)' and release 'Alpakit!' (just this mod) buttons
will compile and package mods for all targets into one multi-target zip file.
In the example image below, clicking Alpakit! for ExampleMod builds it for all 3 targets.
Once complete, find the completed package in the same ArchivedPlugins folder mentioned earlier
called YourModReference.zip.
This is the file you’ll upload to the Mod Repository later.
Last Chance to Change Your Mod Reference
As mentioned on the Mod Reference section of the Getting Started guide, once you release your mod, you can no longer change its Mod Reference.
If you decide to change it, you’ll have to edit a number of files, most of which are described on that page.
Upload to Satisfactory Mod Repository
Follow the directions on the Uploading to SMR page to create a modpage and a release.