Extracting Game Files
Having access to the model and texture files used by Coffee Stain can be a valuable resource for creating content for your own mods. This page contains instructions on how to view and extract various game assets.
As a reminder, redistributing these assets should not be done without permission, as they are copyrighted content of Coffee Stain Studios.
|
If you’re just looking to re-use the exact same icon, mesh etc. as something in the base game for your mod, you should check out the Reusing Game Files page instead. |
FModel
FModel is a tool that can be used to view and extract game assets. Documentation for FModel is available on its Github Wiki. This section will cover how to configure FModel to read Satisfactory files.
Add Undetected Game
The first time you open FModel you will be presented with a Directory Selector.
If you have already opened FModel in the past, you’ll be opened to another window,
so you can bring the selector up again via Directory > Selector.
Under the "Add Undetected Game" heading, click the two-arrows icon,
enter Satisfactory as the "Name",
and enter your game install directory as the "Directory"
(for example, C:\EpicGamesGames\SatisfactoryExperimental).
Next, press the blue Plus button (NOT the OK button!) to add the game to the Detected Game dropdown,
which should automatically select it.
Back in the upper section, select GAME_UE5_3 (536870960) for the "UE Versions" selector.
If this item doesn’t appear in the list, ensure "Enable custom UE versions" is unchecked.
After confirming that the game is selected, press the OK button.
The program should launch and display FactoryGame-Windows.utoc in the Archives tab list,
along with the paks and utocs of any other mods you may have installed.
If it opens another game instead,
return to the directory selector and review the above steps.
Specify Custom Version and Mapping
Unreal Engine 5 changed how assets are stored in packaged files. You will need to provide FModel with extra information so that it can read the data correctly. Coffee Stain Studios kindly ships this extra information with the game files for us.
First, navigate to your
game install directory
in a File Explorer window to locate the
/CommunityResources/FactoryGame.usmap
and /CommunityResources/CustomVersions.json files.
We need to open the CustomVersions file and copy its contents into a setting in FModel.
However, the file is stored in a text encoding (UTF-16 LE) that can confuse some text editing programs.
Many editors will auto-detect the encoding,
but you may need to specifically select the UTF-16 LE encoding when opening the file if the text displays with egregious spacing.
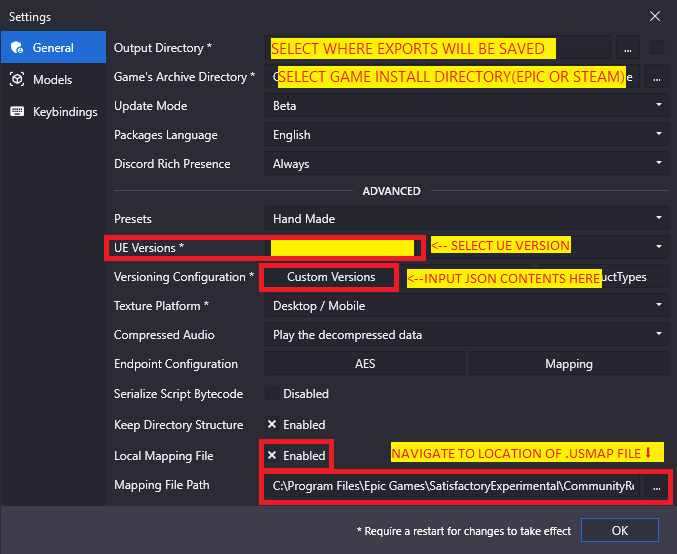
To start loading this additional information, open FModel and navigate to Settings > General,
then press the Custom Versions button in the "Version Configuration" row
which opens a new text editing window.
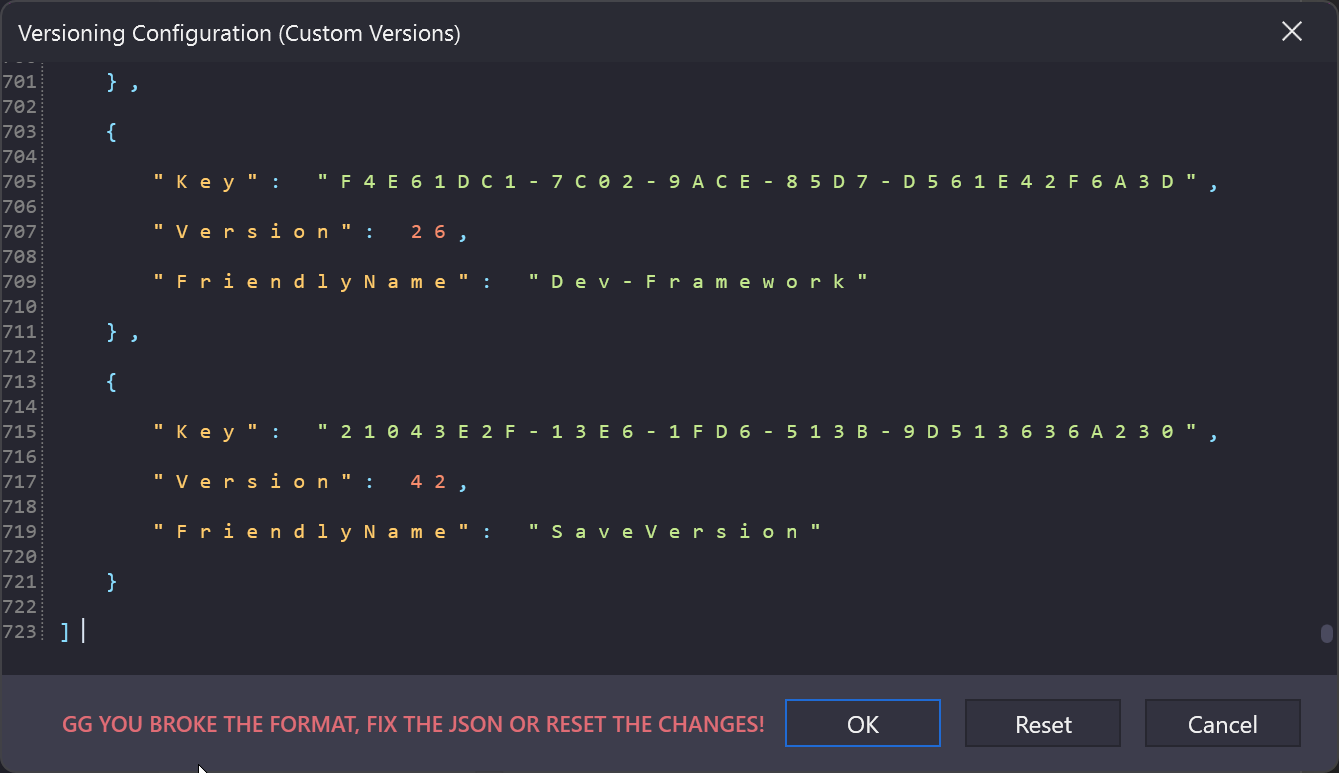
Delete the text contents of the popup window
and replace it with the copied contents of the CustomVersions.json file from your Community Resources folder,
then press OK to save your changes.
|
If the file’s contents look like the below image,
you either will need to use a different text editor to open and copy it
or try to reopen the file with the
|
Back on the Settings screen, check the box for "Local Mapping File"
and then enter the full path to your FactoryGame.usmap file, which is also in the Community Resources folder,
(for example, C:\EpicGamesGames\SatisfactoryExperimental\CommunityResources\FactoryGame.usmap).
Press OK to close the settings prompt,
which will open another prompt asking you to restart FModel - press OK.
Specify Model Export Settings
After specifying FModel’s Custom Version and Mapping for Satisfactory you will want change model export settings so it’s easier to work with exported results.
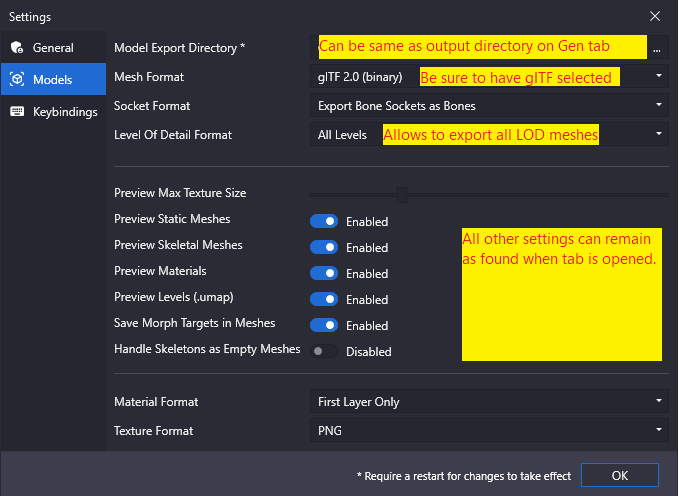
To do so, return to the Settings menu and select Models on the left side.
From here there are several fields to modify in order to properly export models for use with modeling software such as Blender:
-
Model Export Directory- This can be the same or different from the output directory you chose in the previous steps. -
Mesh Format- SelectglTF 2.0 -
Level of Detail Format- Allows you to select how many LODs (Level of Distance meshes) of the model to export. You usually wantFirst Level Only, but you can always remove the other LODs in your modeling software later. -
Texture Format- Set toPNGso textures will be exported to a lossless format that supports transparency.
Press OK to save your changes.
|
Any other changes made are at user discretion, and dependent on level of knowledge. |
Loading Archives
Now that your settings have been configured correctly,
navigate to the Archives tab in the FModel interface.
This tab displays pak and utoc files located in subfolders of the directory you selected earlier.
The base game’s utoc, FactoryGame-Windows.utoc, should be present, as well as utocs for any mods you have installed.
To load a utoc, select it and press the Load button.
This enables browsing its contents in the Folders and Packages tab.
Extracting Specific Models or Textures
|
If you’re looking to use parts of base game machines such as item and fluid ports, power connectors, or more, consider taking a look at AngryBeaver’s ModelingTools. |
This section explains how to use FModel to extract specific static meshes, skeletal meshes, and textures. Make sure you have set up FModel using the directions above before continuing.
The FModel Documentation explains its various UI elements and how to navigate through the pak file.
To test your settings, double-click the FactoryGame utoc in the Archives tab,
which will take you to the Folders tab,
then navigate to
FactoryGame/Content/FactoryGame/Resource/Parts/AIlimiter/Textures.
Double click on the Textures folder to be taken to the Packages tab,
then open the TX_AiLimiter_BC.uasset file.
This will open a two-pane display with text on the left and an image on the right.
To export a file, such as this texture, right click it in the Packages tab’s list
and select the relevant option, in this case Save Texture.
A message "[INF] Successfully saved TX_AiLimiter_BC.png" should appear in the log at the bottom of the window.
This will export the file to your Output directory, which is configured in the Settings > General menu.
You can control what file format assets will be exported in via the Settings > Models menu.
You can click on the text TX_AiLimiter_BC.png in the log to open your system file browser to the containing folder.
Opening a mesh asset, such as
FactoryGame/Content/FactoryGame/Equipment/JetPack/Mesh/SK_Jetpack_01.uasset,
will cause a 3D Viewer window to appear.
Searching for Files
In order to perform a pak-wide search, navigate to Packages > Search or press the keybind (Ctrl+Shift+F).
You can also search within a specific package by navigating to it in the Folders tab
then using the search bar built into the Packages tab.
FModel’s search supports multiple terms, returning results that match all terms.
For example, the search query Cave Play would find the assets
Play_M_SmallCave_Parameter, Play_Boombox_JoelSyntholm_CaveFlowers and more.
Regular expression searches can be enabling via a button at the right side of the search bar.
Extracting Sounds/Music
This section explains how to use FModel and wwiser to identify and extract sound files. Make sure you have set up FModel using the directions above before continuing. Installing wwiser will be covered below.
Context
Because Satisfactory uses the Wwise sound system, game sound files are stored in a manner different from standard Unreal Engine sounds.
Although all sound files are accessible via FModel, usage of Wwise means the files are not sensibly organized and do not have "nice" names, making finding the exact sounds you care about troublesome. Furthermore, the sound files are stored in their unmixed forms, meaning that the sound is lacking additional audio effects that are applied real-time in-game.
Thankfully, another tool exists to mitigate this problem. wwiser is capable of viewing data in Wwise bnk files, allowing you to connect a Wwise sound event (which has a human-readable-name) to the sound files it references.
Locating the Sound Event Bnk File
The first step in extracting a sound is to locate the Wwise audio event bnk it’s triggered by.
Wwise bnk files contain information about what sound files are used by the game when a sound event is triggered. We can extract this file and use it in wwiser to locate the raw sound files we care about.
Wwise audio event names are human-readable and can be found in subfolders of the pak’s (not utoc’s!)
FactoryGame/Content/WwiseAudio/Event/ folder.
Note that bnk files are not in the Events (plural) folder,
which instead contains their identically-named uasset counterparts not required for this process.
You may still find the Events folder useful for leaning the context of sound events.
For example, /Events/World_Events_FilatovD/Environment/Caves/ presumably contains
environmental sounds that would play while in caves.
FModel’s Package Search functionality is beneficial for finding specific sounds.
Events that begin sound playback follow the naming scheme Play_something.bnk,
so you can search for Play something bnk to find a list of valid sound bnk files containing something.
Once you have found the bnk you want to extract
(for example, FactoryGame/Content/WwiseAudio/Event/19/Play_EQ_JetPack_Activate.bnk)
right click on it in FModel’s "Packages" tab list and select Export Raw Data (.uasset),
which will export the bnk file despite the tooltip option claiming it will be a uasset.
Alternatively, you can extract the entire Event folder at once
by right clicking on it in the "Folders" tab and selecting Export Folder’s Packages Raw Data (.uasset).
Click on the text
(ex. Play_EQ_JetPack_Activate.bnk)
in the FModel log to open your system’s file browser to the folder that contains the exported bnk,
or the top-level export folder if you exported the entire Event folder.
Extracting sourceIDs with wwiser
You will need Python installed to utilize wwiser. Python 3.8.10 is known to work, and pyenv is the suggested method of install. Installing python is out of the scope of this guide.
Download the latest copy of wwiser from its releases page.
You’ll want both the wwiser.pyz and wwnames.db3 files from the release.
Use a zip extracting program of your choice to extract the files from wwiser.pyz
and place the wwnames.db3 file in the same directory as the extracted files.
To open the wwiser interface, run python .\wwiser.py in a terminal in that folder.
Next, select Load banks… and select the bnk file you extracted earlier.
Check wwiser’s log panel before continuing.
If it contains the message names: couldn’t find .\wwnames.db3 name file,
go back to grab the wwnames.db3 from the GitHub release and put it in the same folder as the bnk file you opened.
Next, select Generate TXTP which will create a folder in the same directory as the bnk file
containing a txtp file for the event.
(ex. Play_EQ_JetPack_Activate {s} {m}.txtp)
Open the txtp file in a text editor of your choice.
If the bnk is linked to any sound files
their sourceID numbers will be displayed at the top of the file
(ex. wem/633850317.wem has the sourceID number 633850317)
along with additional audio information.
Sound events typically consistent of multiple sounds played at different volumes. Take note of all the sourceIDs of the event as you will likely need to review a few raw sounds to find the exact one you’re looking for.
Extracting Sound Files
Now that we have sourceIDs we can use FModel to locate and extract their corresponding sound files.
First, locate the sound file in FModel via its sourceID, which will be its package file name.
Using FModel’s Package Search functionality is beneficial here.
All game audio can be found in subfolders of the pak’s (note - NOT the utoc!) FactoryGame/Content/WwiseAudio/Media/ folder.
To extract a sound file, first open its Package from the main window, which will cause an Audio Player window to appear. After optionally previewing the sound file in the player, right click on it in the player’s playlist and select Save, prompting a system dialog to select a save location.
|
Some users have reported issues with FModel’s audio player,
causing it to display sounds as See this Discord conversation and this Discord conversation if that didn’t work (mod developer discord role required to view). |
Bulk Audio Renamer
Community member MrCheese has created a python script that enables mass renaming of exported wem files to their associated named bnk files. If you decide to extract a large number of sounds, this script can save you a lot of time.
To use it:
-
Create a folder somewhere named
SatisfactoryAudioRenamer. -
Create a subfolder named
out -
Create a subfolder named
txtp -
Download this python file (convert.py) and place it in the SatisfactoryAudioRenamer folder
-
Move all the txtp files that wwiser generated earlier to the txtp subfolder and run
python .\convert.pyfrom a terminal in that SatisfactoryAudioRenamer folder.
Generating a Complete Starter Project
The Starter Project provided on the SML releases page excludes game models, textures, etc. for copyright and download size reasons. In their place, the Starter Project includes empty "placeholder" assets that, at runtime, will be resolved into the correct assets if you were to reference them, or simply excludes the asset from the project (which is the case for many textures).
It is possible to create a personal version of the Starter Project that includes most of these base game files accessible from within the editor. This version of the project would include models, textures, and other resources instead of their placeholder versions, allowing you to view them in-editor.
Generating this special project file takes a significant amount of time and additional disk space. If you’d like to do this, check out the page on the Asset Toolkit.
UModel
UModel is another tool that can be used to view and extract game assets.
However, at the time of writing, it does not currently have support for Unreal Engine 5 (Update 8 and beyond). As such, FModel should be used instead. The following instructions are left here for reference when working with past versions.
The tool UModel
can be used to view game pak file content,
and offers options for exporting meshes, skeletons, textures, etc. for use in other programs.
Tutorials for using UModel are plentiful online,
and a quick search can help you export for the modeling software of your choice. Make sure to select Unreal Engine version 4.26 when opening Satisfactory pak files. If you don’t see 4.26 as an option, you are running an older version of UModel
and you should download it again from the link above. You can find a brief tutorial on how to track down an asset for export on the
Reusing Game Files page. Once you have found the asset you want to export, open it in UModel’s UE Viewer
and use Note that not all of the content you can extract in this manner is directly useful.
For example, directly exporting an
Outdated directions for using UModel:
Tools → Export Current Object and you will be presented with
some options for export.
We suggest exporting as Static Meshes as glTF 2.0
so that software such as Blender can open them easily.FGItemDescriptor is not really helpful.