Releasing Your Mod
Once you consider your mod ready to release, there’s a few extra steps to follow to ensure that it’s working correctly, and to set up the required information for the Mod Repository to work with the mod.
Local Testing
Before you release your mod, you should make sure that the features you implemented are working as you expect.
For example, if your mod adds new items, recipes, or milestones, try to unlock them the same way a normal player would to ensure they are accessible.
For recipes, try setting up a building to craft the recipe and ensure it actually works. For example, if a recipe requires more of an item than its stack size, the machine can’t operate even though the recipe appears otherwise valid.
If your mod has configuration options, make sure that the default configuration options you specified are what you want, since all users who install your mod will have them, and might not even realize they can be changed. The default config settings should represent the intended user experience for your mod.
Make sure that your mod works for both client and host players in multiplayer. For mods that add items, schematics, and recipes, this is not much of an issue, but if you have added additional buildings or other functionality,
You can find more info on how to test your mod, including directions for running two copies locally to test multiplayer, on the Testing/Multiplayer Testing page.
Your Mod’s UPlugin File
Every Unreal Engine plugin is require to have a
<mod reference>.uplugin file,
and Satisfactory mods are no exception.
This file is json formatted and holds information about the mod,
such as its version number, dependencies, credits, links, and more.
Only one uplugin file should exist in a plugin’s directory,
else the editor will get very confused.
The file should have been automatically generated for you when you created your mod with Alpakit.
At that point in the tutorial, we said we’d come back to some fields later, and now is that time.
Although you can find this file in your mod’s plugin directory,
which is your modding project directory’s /Plugins/<mod reference> folder,
you should generally edit it within the unreal editor via Alpakit.
Alpakit will automatically handle the file’s formatting for you
and help to prevent mistakes that would create an invalid uplugin file and be annoying to track down.
Open the Alpakit editor by clicking the Edit button next to your mod in the Alpakit mods list.
You can hover over the labels on the left to get a tooltip that explains their purpose.
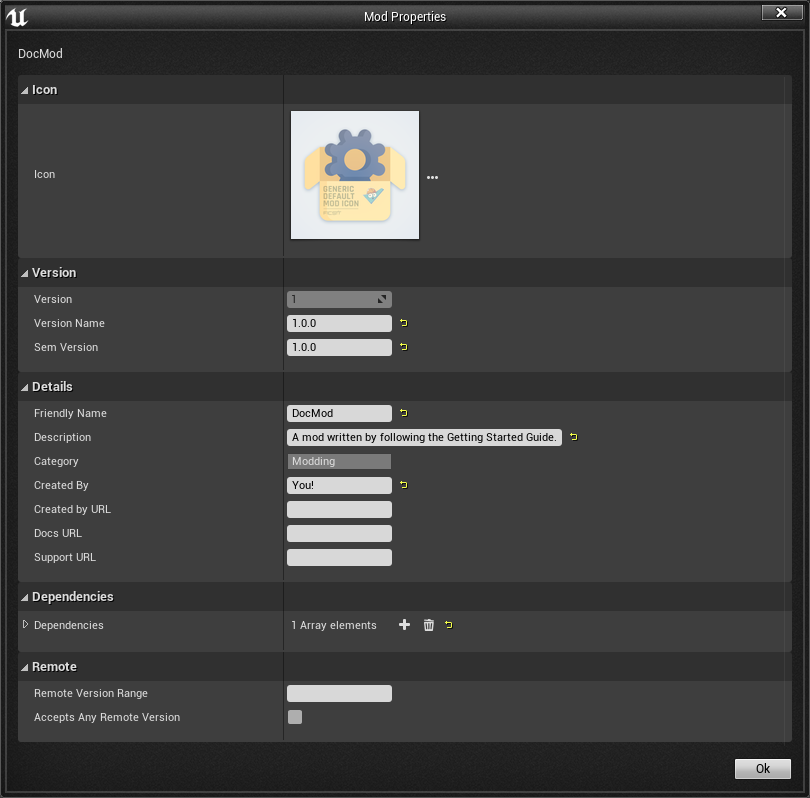
Below we will go into more detail about their purpose. It is suggested that you read all of the field definitions below to make well-informed decisions about the values you specify.
If you’d like, you can read about all the different Unreal settings available at the Plugins documentation here or at the C++ reference here, but this page will cover the ones most important to Satisfactory mods.
After editing these fields, be sure to re-Alpak your mod so the files you upload will have your changes.
Default Fields
The following fields are part of Unreal’s normal uplugin format, but are given additional functionality by the modding toolkit.
| Parameter | Description of Function |
|---|---|
Version |
This integer should match the first digit of your |
VersionName |
This string should exactly match your |
FriendlyName |
This string is the name of your mod as it will appear in the in-game loaded mods list and configs screen. |
Description |
This string will appear when someone looks at your mod in the in-game loaded mods list and configs screen. |
CreatedBy |
This string will appear as the author’s name section when someone looks at your mod in the in-game loaded mods list and configs screen. |
DocsURL |
If a link is provided here, a button will appear in the in-game loaded mods list that will open the URL when clicked.
The |
SupportURL |
If a link is provided here, a button will appear in the in-game loaded mods list that will open the URL when clicked.
The |
Special Fields
Note that SML and SMR require you to include additional fields in your plugin descriptor file.
The most important of these is a mod dependency list and a SemVersion for the mod.
|
Make sure that you have SML listed as an item in the Plugins field, as explained below. |
Below is a description of all extra fields SML and SMR require:
| Parameter | Description of Function | ||||||||||||
|---|---|---|---|---|---|---|---|---|---|---|---|---|---|
SemVersion |
Version number for the mod. Should always increase with new releases,
and should follow the semver format.
To summarize, the format is
|
||||||||||||
Plugins |
Additional functionality has been added to the regular uplugin Plugins array.
You can list other mod references (or Unreal Plugins) here,
and SMM will know to download when installing your mod.
If you add a plugin with a Mod Reference,
this basically makes the listed mod a dependency for your mod.
|
||||||||||||
RemoteVersionRange |
A Semver range of versions accepted from the remote clients.
This requires other players to have a certain version of the
mod installed to be able to join hosts.
See the Plugins SemVersion item above for the format for this field.
|
||||||||||||
AcceptsAnyRemoteVersion |
When |
Important C++ Fields
If your mod has C++ code, make sure that you list a UBT Module in the Modules plugin descriptor section. The examples below will demonstrate this.
Examples
Some example .uplugin s are presented here in their JSON format.
Example Blueprint mod .uplugin:
{
	"FileVersion": 3,
	"Version": 6,
	"VersionName": "6.2.1",
	"SemVersion": "6.2.1",
	"FriendlyName": "Example Mod",
	"Description": "This is a random Blueprint mod.",
	"Category": "Modding",
	"CreatedBy": "Satisfactory Modding Team",
	"CreatedByURL": "https://ficsit.app/",
	"DocsURL": "https://docs.ficsit.app/",
	"MarketplaceURL": "",
	"SupportURL": "",
	"CanContainContent": true,
	"IsBetaVersion": false,
	"IsExperimentalVersion": false,
	"Installed": false,
	"Plugins": [
		{
			"Name": "SML",
			"SemVersion": "^3.4.1",
			"Enabled": true
		},
		{
			"Name": "DependencyMod",
			"SemVersion": "^1.3.0",
			"Enabled": true
		}
	]
}
Example C++ and Blueprint mod .uplugin:
{
	"FileVersion": 3,
	"Version": 6,
	"VersionName": "6.2.1",
	"SemVersion": "6.2.1",
	"FriendlyName": "Example Mod",
	"Description": "This is a random example C++ and Blueprint mod.",
	"Category": "Modding",
	"CreatedBy": "Satisfactory Modding Team",
	"CreatedByURL": "https://ficsit.app/",
	"DocsURL": "https://docs.ficsit.app/",
	"MarketplaceURL": "",
	"SupportURL": "",
	"CanContainContent": true,
	"IsBetaVersion": false,
	"IsExperimentalVersion": false,
	"Installed": false,
	"Modules": [
		{
			"Name": "ExampleMod",
			"Type": "Runtime",
			"LoadingPhase": "PostDefault"
		}
	],
	"Plugins": [
		{
			"Name": "SML",
			"SemVersion": "^3.4.1",
			"Enabled": true
		},
		{
			"Name": "DependencyMod",
			"SemVersion": "^1.3.0",
			"Enabled": true
		}
	]
}
SMR UPlugin Validator
If you’d like to check the format for your uplugin file, SMR offers a validator on its help page. You can paste in your uplugin file into the box on the right and it will display any error messages below the box.
The validator isn’t perfect, but it can help troubleshoot many errors that could occur during upload.
If it fails validation, keep your eyes out for things like missing commas and mismatched braces and brackets.
Remember, you can totally avoid formatting concerns by using the Alpakit widget in the editor!
Consider asking on the Discord if you get stuck on this step.
Exporting
Up until this point, you have likely been using the Alpakit 'copy to mods directory' feature to move files to the game’s folders for testing.
Alpakit will generate a ready to distribute zip-archive for you, located at
<project folder>/Saved/ArchivedPlugins/WindowsNoEditor/<mod reference>.zip.
This zip contains all of your mod’s files, although it does not contain any dependency mods - you must specify those via the system described in the uplugin section.
Consider checking the zip’s contents to see if they’re what you expected. If for some reason you need extra files to be packaged into the mod, follow the directions here to tell Alpakit to include them when building.
Sending Your Mod to Testers
You may want to send out an early release of your mod to a few users to test it.
They will have to follow the Manual Installation directions to install it from the zip file.
Last Chance to Change Your Mod Reference
As mentioned on the Mod Reference section of the Getting Started guide, once you release your mod, you can no longer change its Mod Reference.
If you decide to change it, you’ll have to edit a number of files, most of which are described on that page.
Upload to Satisfactory Mod Repository
Once you’re ready to release your mod, follow the directions on the Uploading to SMR page to create a modpage and a release.