Unreal Engine Asset Toolkit
|
This article is a work-in-progress. Please contact us on the Discord if you run into any issues here. |
Community member Archengius has created a set of two plugins useful for dumping content from a compiled Unreal Engine game and importing it into the Unreal Engine Editor.
Since most Satisfactory game files can’t be distributed with the Starter Project for download size and copyright reasons, the project instead contains empty "placeholder" assets. While this allows you to compile your mods and reference base-game content for use in them, previewing content (especially widgets) in the editor is inconvenient.
You can use the Asset Toolkit to generate a copy of the starter project, complete with icons, meshes, some materials, and more, making working with base-game content much more convenient.
|
If you decide to generate a complete copy of the project, make sure that your Content folder is not publicly available on Github or similar. If you only have a plugin-level repo, this is not a problem, but if you have a project-level repo as well, you should watch out for this. |
Installation
The Asset Toolkit consists of two plugins, a dumper, to be installed in the game, and an asset generator, to be installed in the editor. Both are contained in the Asset Toolkit repository. Download a zip of the repository and extract somewhere, or clone it if desired.
Installing the Asset Generator
Take the AssetGenerator folder out of the files you downloaded
and move it to your modding project’s Plugins folder.
This plugin is only for use from the editor
Installing the Asset Dumper
Take the AssetDumper folder out of the files you downloaded
and move it to your modding project’s Plugins folder.
This plugin will be built as a mod to install in the game.
Compiling
After putting both plugins in your project’s Plugins folder, re-Generate Visual Studio project files and build for Development Editor and Shipping.
Dumping and Importing Assets
Dumping Game Assets
A user interface exists for using the dumper, but there are some crashing problems with it, so we suggest using the command line version instead.
Navigate to your game install directory, and then in Powershell, run
Engine\Binaries\Win64\FactoryGame-Win64-Shipping.exe -EpicPortal -nullrhi -DumpAllGameAssets -RootAssetPath=/Game -ExcludePackagePaths=/Game/WwiseAudio -ExcludePackageNames=/Game/Geometry/Meshes/1M_Cube_Chamfer -PackagesPerTick=32 -ExitOnFinish
You can expect a full dump to take up about 3 GB. You can delete it later after you have imported the assets.
This will take a bit; go pet a lizard doggo to pass the time.
Once it completes, you should now have an AssetDump folder inside the FactoryGame folder of your game install directory.
|
Asset dumping can also be performed automatically via the command line. Check out the CI scripts, or contact us on the discord for more info. |
Importing Dumped Assets to the Editor
You can expect a Content folder with all assets imported to take up about 2 GB. For comparison, a Content folder with placeholders takes up 366 MB.
Both an in-editor UI and commandlet are available for the Asset Generator, but at the time of writing, the in-editor UI is unstable as it has various issues related to Materials. As such, the commandlet should be used instead.
Below is a modified version of a Powershell script originally written by adamsogm for using the Asset Generator commandlet. You will need to modify the first few lines of the script to point to your Unreal Engine install, project path, and chosen dump directory.
To use the script, create a new Powershell script file (ex. generate_assets.ps1) in a location of your choice,
copy-paste the below script, right click on the file, and select "Run with Powershell" to begin the import.
Alternatively, launch it from a running powershell window to read the output after it has finished or crashed.
# Using apostrophes so \ doesn't need to be escaped here
$UE4CmdPath = 'C:\Program Files\Unreal Engine - CSS\Engine\Binaries\Win64\UE4Editor-Cmd.exe'
$UProjectPath = 'D:\GitSecondary\SF_ModProject\FactoryGame.uproject'
$AssetDumpDirectory = 'D:\Programs\EpicGamesGames\SatisfactoryExperimental\FactoryGame\AssetDump'

# Clean up the temp files, useful if the script was exited or crashed earlier for some reason
Remove-Item SkipSavePackages.txt
Remove-Item ForceGeneratePackageNames.txt

# Force generated package names from https://github.com/mircearoata/satisfactory-modding-actions/blob/master/ForceGeneratePackages.txt
Write-Output "/Game/FactoryGame/Buildable/-Shared/Widgets/Widget_Output_Slot" >> ForceGeneratePackageNames.txt

# Skip save package names from https://github.com/mircearoata/satisfactory-modding-actions/blob/master/SkipSavePackages.txt
Write-Output "/Game/FactoryGame/Interface/UI/BPI_ShoppingList" >> SkipSavePackages.txt
Write-Output "/Game/FactoryGame/Unlocks/BPI_UnlockableInterface" >> SkipSavePackages.txt
Write-Output "/Game/FactoryGame/Interface/UI/InGame/Graph/BPW_Graph" >> SkipSavePackages.txt
Write-Output "/Game/FactoryGame/-Shared/Blueprint/BP_OnlineHelpers" >> SkipSavePackages.txt
Write-Output "/Game/FactoryGame/AvailabilityDependencies/BPI_AvailabilityDependencyInterface" >> SkipSavePackages.txt

# Run the generator commandlet
& $UE4CmdPath $UProjectPath -run=AssetGenerator -DumpDirectory="$AssetDumpDirectory" -ForceGeneratePackageNames="$(Get-Location)\\ForceGeneratePackageNames.txt" -SkipSavePackages="$(Get-Location)\\SkipSavePackages.txt" -stdout -unattended -NoLogTimes

# Clean up the temp files on exit
Remove-Item SkipSavePackages.txt
Remove-Item ForceGeneratePackageNames.txt
This will take a considerable amount of time. Experts advise locating and petting a lizard doggo while you wait.
After you’re done, your project’s content folder should be around 2 GB.
Bring in AngryBeaver’s Recreated Assets
Community member AngryBeaver has recreated a number of texturing assets that make working with models in the editor a lot more pleasant. They are not exactly like the 'real' ones used in game, but they are very close.
Once the Asset Generator has completed, you can manually copy in the assets from AngryBeaver’s repository, replacing the ones created by the Asset Generator.
You could either clone or download a zip of AngryBeaver’s repo, but you won’t need the downloaded repo any more once you have copied the files in.
Additional Documentation
If you’d like to learn more about the Asset Toolkit, you can continue reading below.
Asset Generator Commandlet Documentation
Here is an explanation of what the various commandlet options do, written by Archengius:
Commandlet name is AssetGenerator

-DumpDirectory= is the path to the root directory of the dump, as specified in the asset dumper

-ForceGeneratePackageNames= is optional file contaning a newline-separated list of packages to be generated first, you want /Game/FactoryGame/Buildable/-Shared/Widgets/Widget_Output_Slot there to avoid the weird bug with editor crashing while generating the full project from ground up

-BlacklistPackageNames= is optional, semantics are the same as for ForceGeneratePackageNames, except that it also supports wildcard paths if they end with /, not really needed by default

-AssetClassWhitelist= is optional comma-delimited list of whitelisted asset classes to generate, should be left empty for full project generation

-PublicProject is optional and nulls out non-distributable assets in the generated project, if not specified it will generate a full project containing models and textures as they are in the game

-NoRefresh is optional and prevents the generator from touching existing assets if specified
Using the UI to Dump/Generate
|
There are currently numerous crashing issues when using the UI of the Asset Toolkit plugins as opposed to the command line interface. Unless you have a specific reason for using the UI, you should probably use the command line directions above to dump and generate assets instead. |
Dumping
In order to extract the assets to be imported to the editor,
launch your copy of Satisfactory and open the in-game developer console,
which is opened when you press the grave/tilde key (` or ~), or when you press F2.
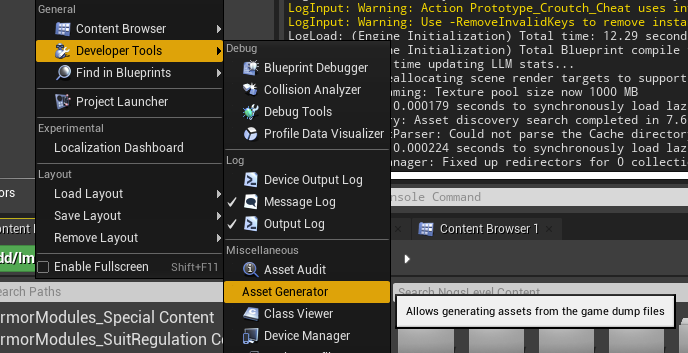
Type dumper.OpenAssetDumper and press enter. It should bring up a UI like the one shown below:
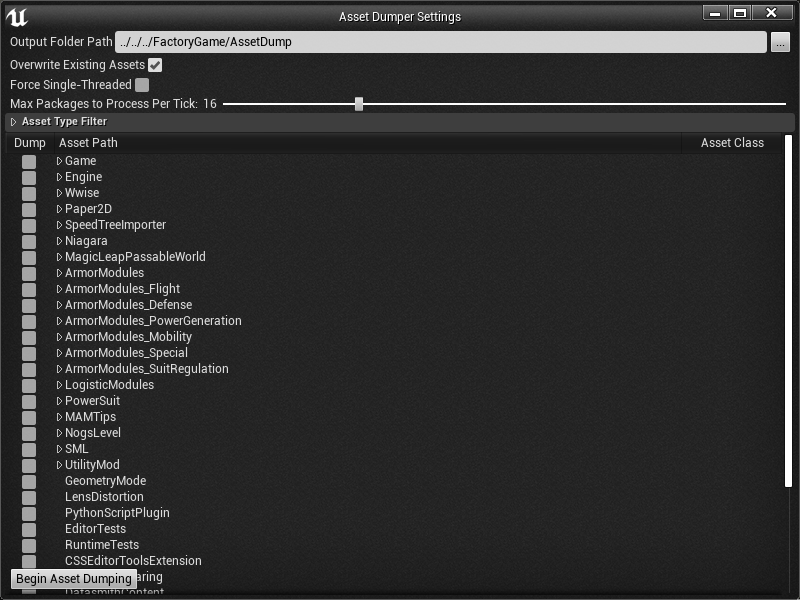
You can leave the Output Folder Path at the default to export to
<game install directory>\FactoryGame\AssetDump,
or use the … button to select a specific path.
Next, select the asset paths you would like to dump, usually Game/FactoryGame/,
and optionally restrict what is exported with the Asset Type Filter dropdown.
Once you’re ready, press "Begin Asset Dumping". This will take some time; go pet a lizard doggo while you wait.